No Results Found
The page you requested could not be found. Try refining your search, or use the navigation above to locate the post.

 Aloha Dreams


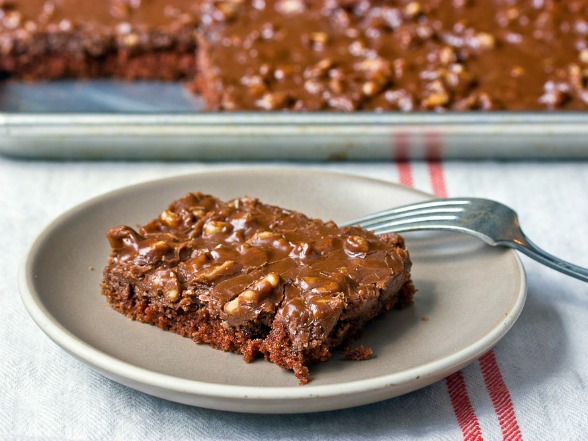
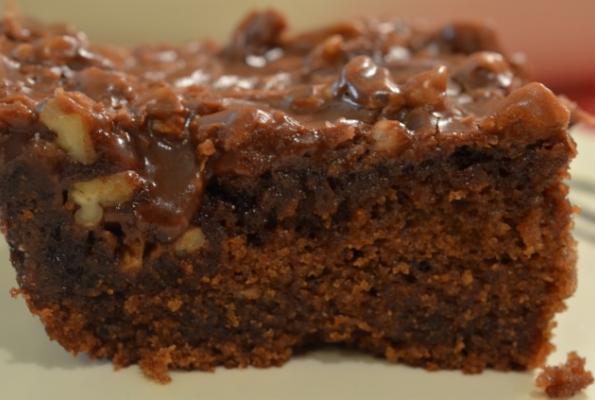
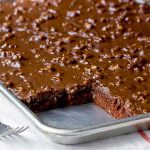
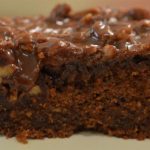
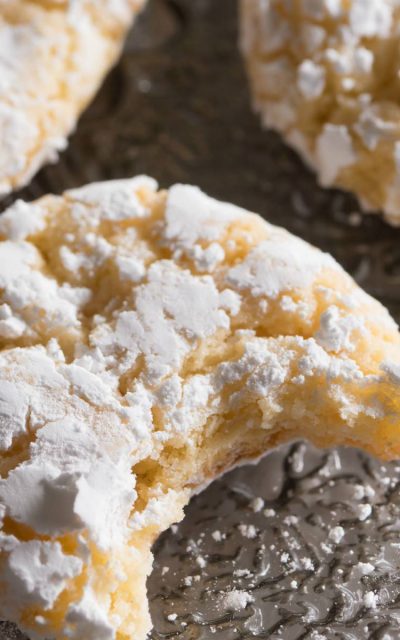
This Best of the Best Texas Sheet Cake is amazingly fudgy and creamy.
And guess what? It’s even better the next day. You can make and frost two within an hour. This recipe is a real keeper.
I’ve made this recipe for years. It’s moist and incredibly delicious, and very easy. It cooks quickly and you frost it while it’s still warm, so you don’t have to stay up late waiting for it to cool.
You’ll want to make sure you have the frosting ready to go when this comes out of the oven, then you’ll spread it on on the cake while it’s still warm.
I'm hoping this site will really help them. If you think so too, please take a minute and send them a link.
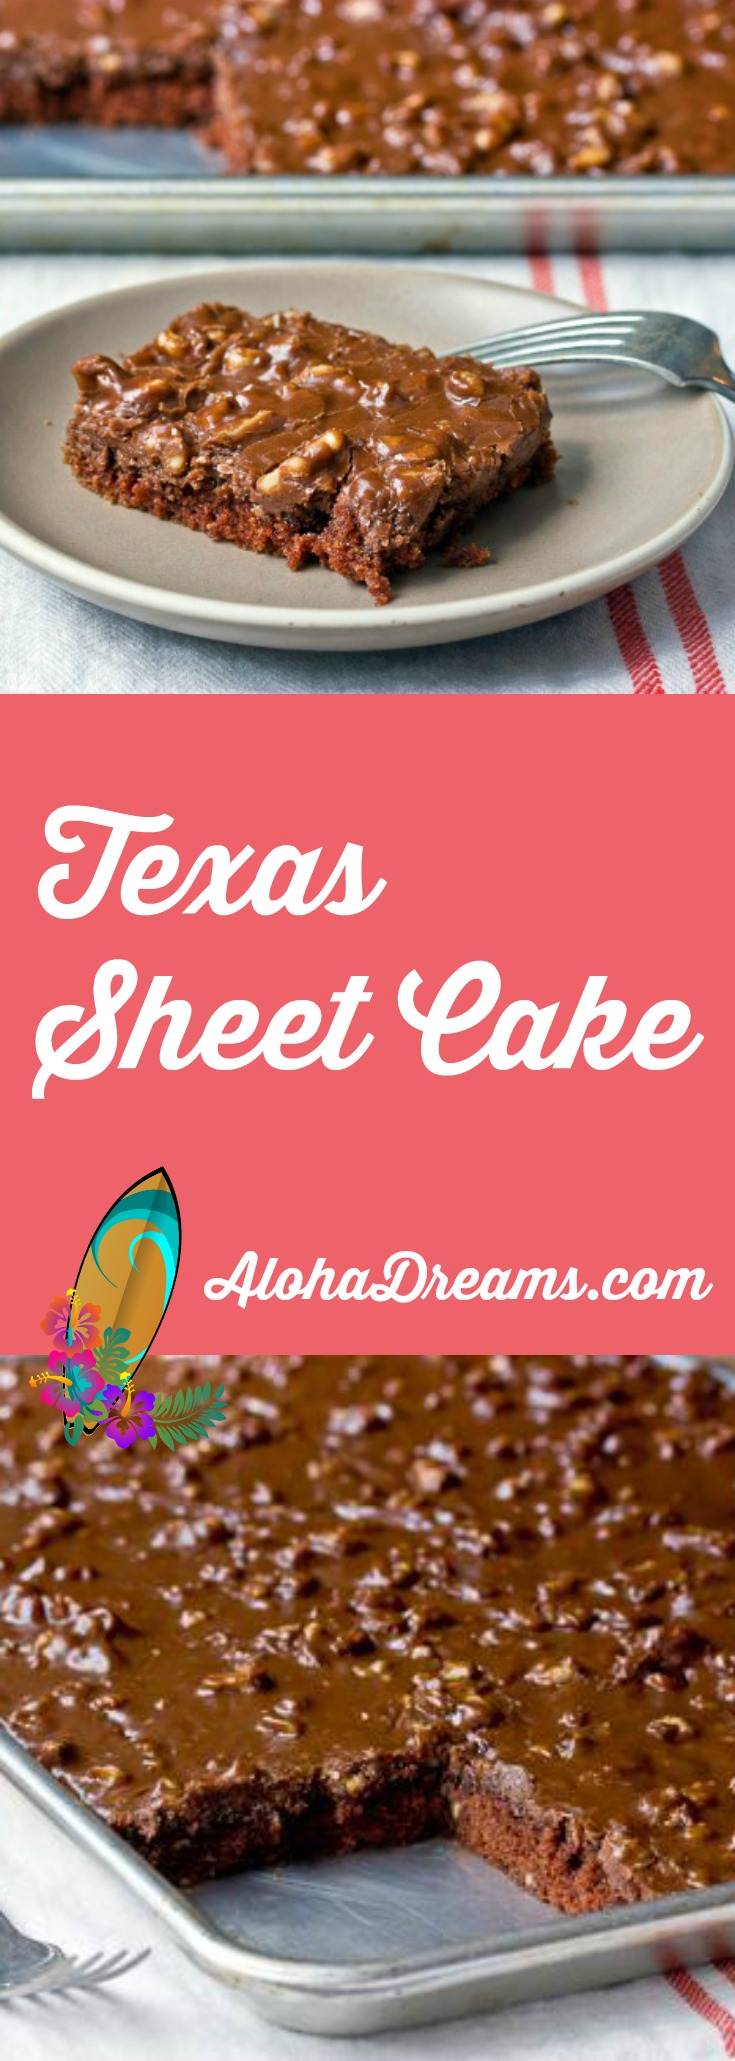
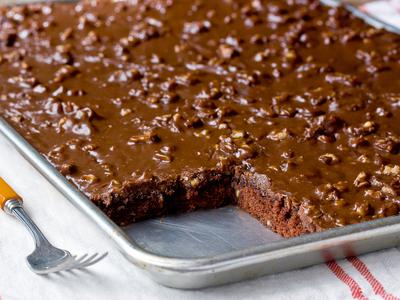
Best of the Best Texas Sheet Cake for a Crowd
This is a wonderful recipe for a crowd. It comes together quickly, can be made in advance and tastes even better the next day.
If you bake it in a half sheet pan (13 x 18 inches) and cut it in 5 rows by 8 rows you can yield 40 servings. I would not plan to cut it any smaller than that. If you would like slightly larger pieces (who wouldn’t??), then you can cut it in 6 rows by 6 rows for 36 servings. The half sheet pan is the standard size sheet pan in our church kitchen. In fact, our kitchen has 16 of them!! (Hm, somehow I’m wondering if I should be very afraid…)
Here’s all you need to serve 36 – 40. (A great family-size version follows this Large Group recipe.)
This version of the recipe will serve up to 40 people, can be made in advance and tastes even better the next day. Perfect.
Preheat oven to 350 degrees F (175 degrees C). Grease a 13 x 18 inch sheet pan with butter then dust lightly with flour.
In a large sauce pan, over low heat, melt 3 sticks butter. When the butter is melted add 1 ½ cups water and whisk in 1/4 cup plus 3 tablespoons cocoa powder. Bring the mixture to a boil then remove from heat. Allow the cocoa mixture to cool slightly.
Meanwhile, in a large bowl, combine 3 cups all purpose flour, 3 cups sugar, 1 ½ teaspoon baking soda and ¾ teaspoon salt. Stir to mix.
Add the cocoa mixture to the dry mixture, stirring continuously, until blended.
In a small bowl, beat together 3 eggs and ¾ cup sour cream until combined. Slowly add the egg mixture to the large bowl containing the cocoa and flour mixture.
Pour batter into prepared pan. Bake for 20 minutes. At 20 minutes check and continuing baking until a toothpick inserted into the center comes out clean.
When there is 10 minutes baking time left on the cake, make the frosting. In a large saucepan, over low heat, add ½ cup milk and 1 1/2 sticks butter. When melted, remove from heat and slowly whisk in ¼ cup plus 3 tablespoons cocoa until combined. Stir in 4 cups confectioners' sugar and 1 ½ teaspoon vanilla, then fold in the nuts, mixing until blended. When the cake comes out of the oven, spread frosting over hot or warm cake.
Can be made and frosted and kept at room temperature for up to 3 days. Cover it lightly with plastic wrap to protect it from dust, etc. Cakes both frosted and unfrosted, cut and un-cut, are perfectly fine at room temperature for several days. Refrigeration is only necessary if your kitchen gets very hot during the day (think bacteria feeding frenzy) or if you're making a cake that won't be served for more than three days.
To refrigerate, wrap unfrosted cakes in plastic to protect it from absorbing any weird fridge smells and to protect it from drying out, and then unwrap it to warm up on the counter before serving. For frosted cakes, chill the cake uncovered for fifteen minutes to harden the icing, then wrap it in plastic wrap.
Family Size Best of the Best Texas Sheet Cake
This Best of the Best Texas Sheet Cake is amazingly fudgy and creamy and it’s even better the next day. It comes together quickly and everyone will LOVE it. It's designed to be made in a standard 10" x 15" or an 11" x 15" sheet pan. so don't substitute a different pan size.
Preheat oven to 350 degrees F (175 degrees C). Grease a 10" x 15" or 11" x 15" inch sheet pan with butter then dust lightly with flour.
In a large sauce pan, over low heat, melt 2 sticks butter. When the butter is melted add 1 cup water and whisk in 5 tablespoons cocoa powder. Bring the mixture to a boil then remove from heat. Allow the cocoa mixture to cool slightly.
Meanwhile, in a large bowl, combine 2 cups all purpose flour, 2 cups sugar, 1 teaspoon baking soda and 1/2 teaspoon salt. Stir to mix.
Add the cocoa mixture to the dry mixture, stirring continuously, until blended.
In a small bowl, beat together 2 eggs and 1/2 cup sour cream until combined. Slowly add the egg mixture to the large bowl containing the cocoa and flour mixture.
Pour batter into prepared pan. Bake for 20 minutes. At 20 minutes check and continuing baking until a toothpick inserted into the center comes out clean.
When there is 10 minutes baking time left on the cake, make the frosting. In a large saucepan, over low heat, add 1/4 cup plus 2 tablespoons milk and 1 stick butter. When melted, remove from heat and slowly whisk in ¼ cup plus 1 tablespoon cocoa until combined. Stir in 4 cups confectioners' sugar and 1 ½ teaspoon vanilla, then fold in the nuts, mixing until blended. When the cake comes out of the oven, spread frosting over hot or warm cake.
The page you requested could not be found. Try refining your search, or use the navigation above to locate the post.

I'm so glad you dropped by. I'm Betsy. Here you'll find my favorite fabulous, trusted recipes - everything from delicious, quick meals for your family to wonderful classics made easy.
I'm also here to help you with large group recipes from 20 to 200. So next opportunity you get to cook for a large group - Say 'Yes!' Then relax. I've got your back.
Ever wished you could build your dream home? How about building your dream home in a tropical paradise? Join me, room by room, as we design and build a fabulous dream home in Hawaii!


If you're planning a vacation to Hawaii, I've got you covered on the very best places to go! From many amazing restaurants to incredible adventures in the surf and on land, this is your go-to source for unique and exciting things to do on the Big Island of Hawaii. Or just take a Virtual Vacation!! Let's go!
If you've been asked to cook for a large group activity, be it a Girl's Camp or a Graduation Party, say Yes! I'm here to help. From Menus to Game Plans to Recipes, I'll help you keep on schedule and turn out amazingly delicious food if you're cooking for a crowd! My recipes are tested and trusted. Let's cook!
Ever wished you could build your dream home? Like amazing house design and home building ideas? Me too! Join me as I design and build a home on the Big Island of Hawaii. Follow along while I design each room. Enjoy a front row seat for the entire amazing construction process. Let's play!
Would you like to throw a Luau, but not sure where to start? Want to know how to build a tiki bar and roast a pig? Here's everything you need to have a luau. How about a Christmas Feast or even a fabulous dinner for your neighborhood supper club? You've come to the right place. Let's party!
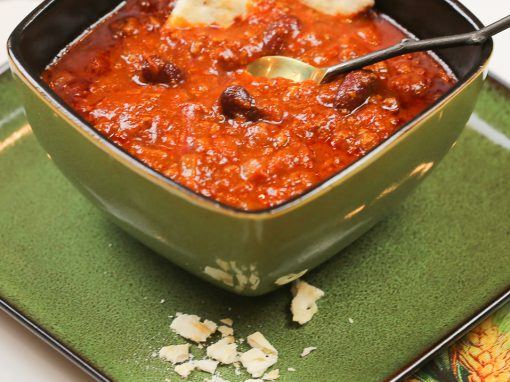

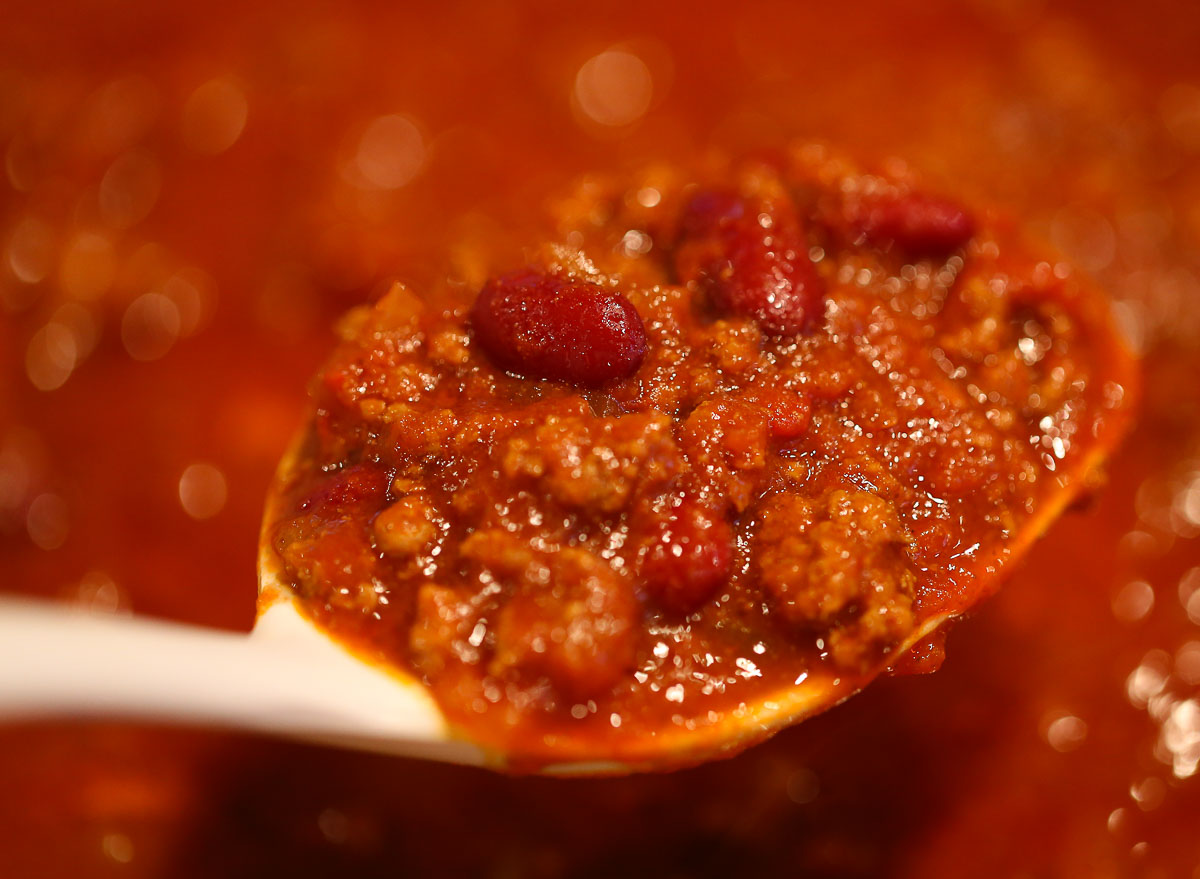
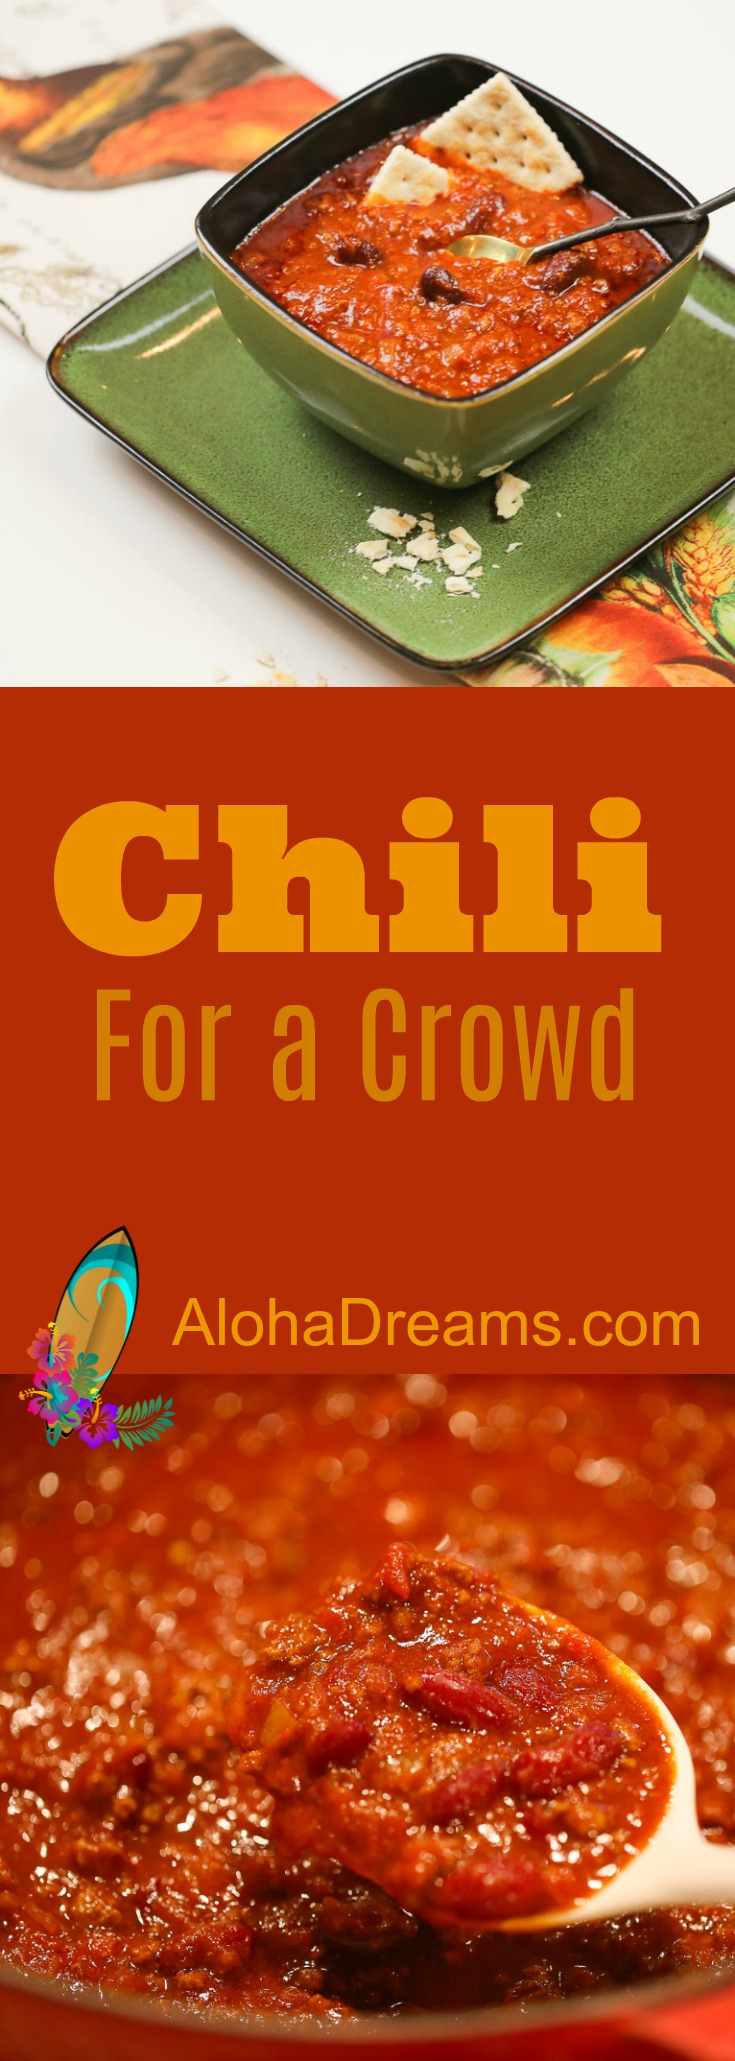
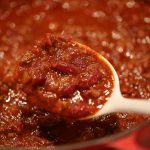
For a potluck or big game night at home, my Chili for a Crowd has everything it takes to thrill your guests. This top-rated chili is a wonderful crowd-pleaser, perfect for tailgating, Halloween parties and other large group gatherings. You’ll have enough to serve 30 hungry guests.
I often make this chili for my Super Bowl parties. It’s always a hit with everyone at our house. The recipe is simple and packs a whole lot of flavor. When making it for a crowd, I cut the chili back by one-forth to 9 tablespoons (instead of 12) and it’s a real favorite with youth. We’re cooking this in a couple weeks for a group of 150 – 175 youth who requested Chili and Cornbread for a Pre-Dance meal.
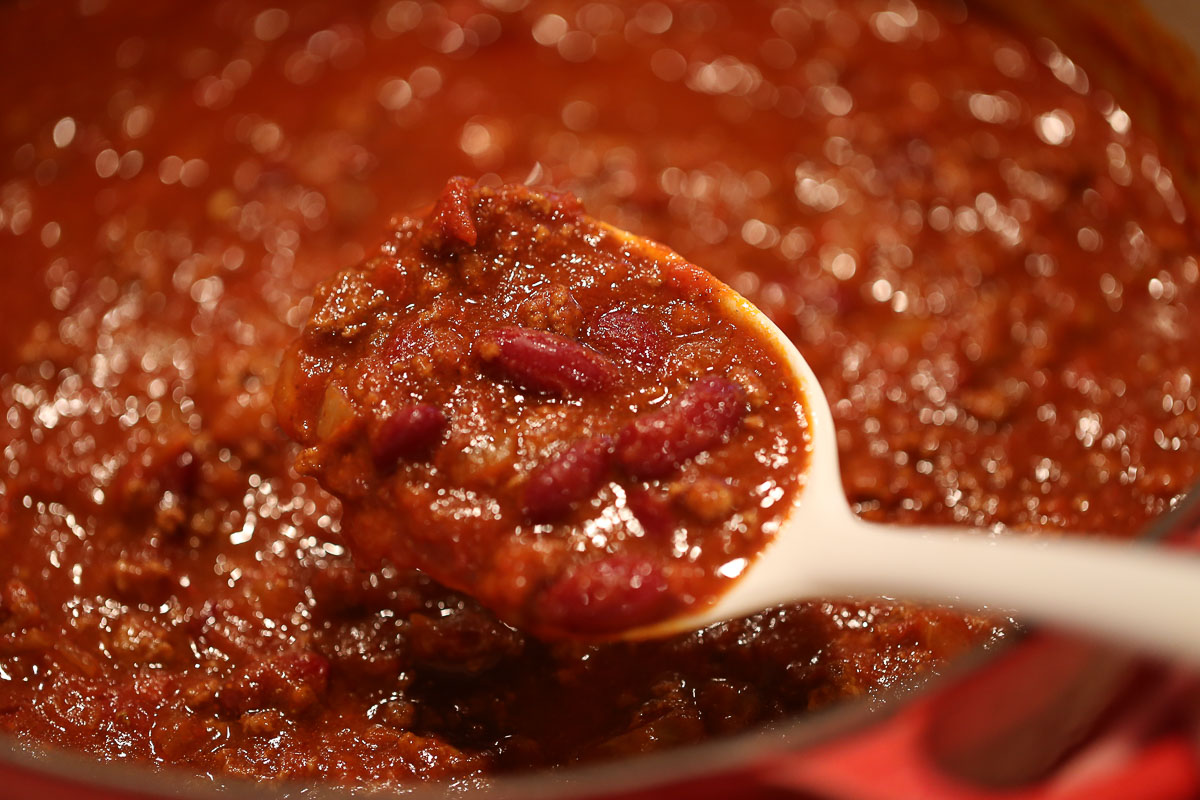
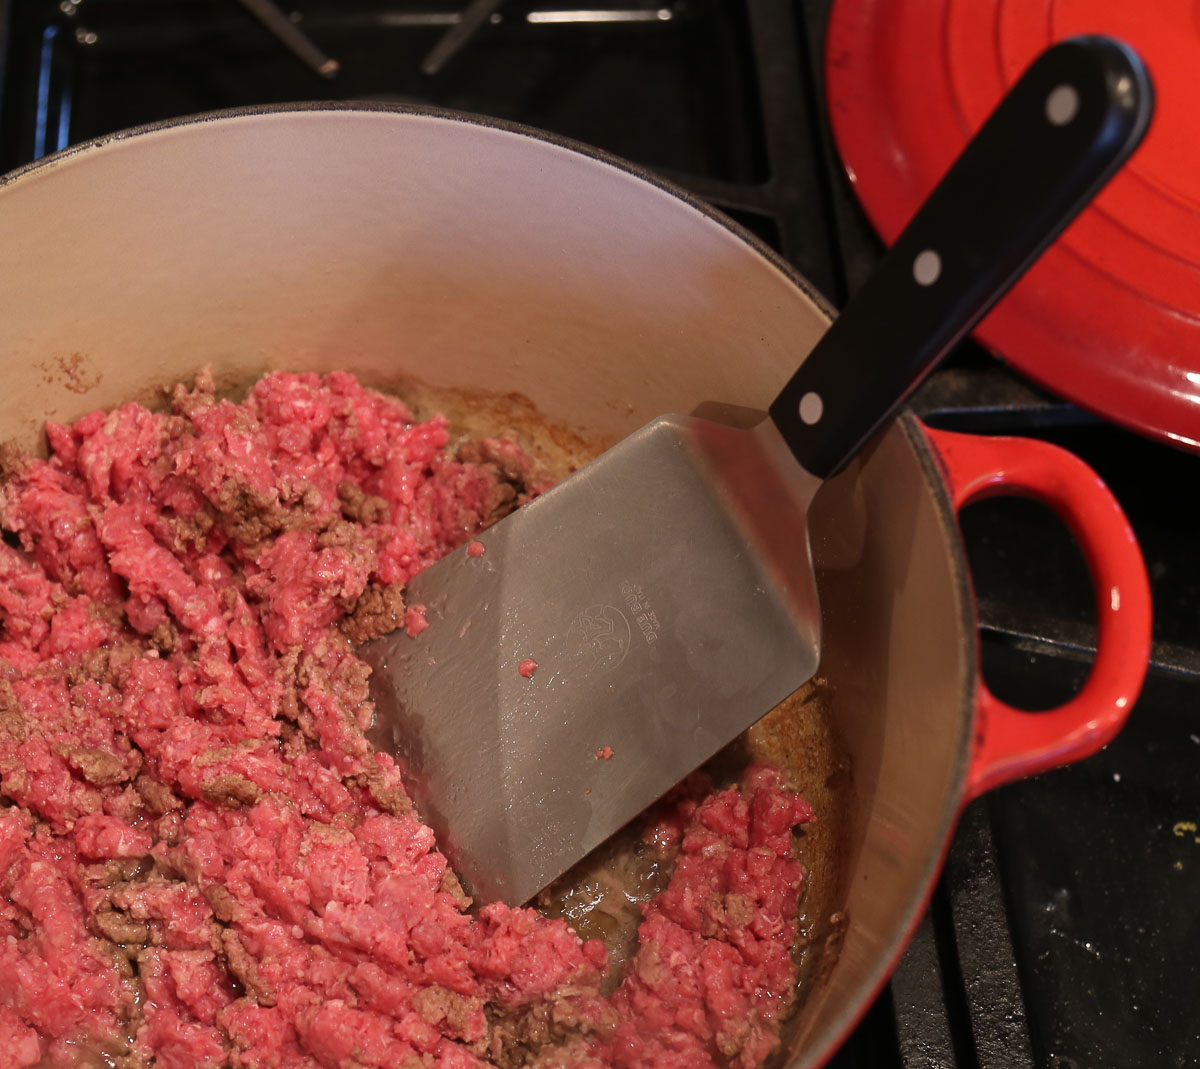
When choosing hamburger for chili, you’ll want 85/15 fat content. That’s the right amount of fat to add flavor without being too greasy. You’ll also want to break the hamburger up into smaller pieces as you’re cooking it. See the spatula in the next picture? It’s one of my favorite kitchen tools. It’s perfect for breaking up hamburger in recipes like this one.
I whip up this recipe to feed a large group, and I rarely have any leftovers. But if you do, it freezes beautifully and will keep up to 3 months in the freezer.
As with any good chili, it holds well – up to 3 days in the refrigerator – and just gets better with time. Serve with Cornbread for a Crowd and a Mixed Salad for a great, easy meal.
Easy Chili for a Crowd
This chili just gets better with time. It freezes very well for up to 3 months.
Add hamburger to a very large stockpot. Cook over medium heat, breaking hamburger into small pieces until brown. Remove hamburger to a plate. Drain all but 1 tablespoon of the fat from the pan.
Add onions to the pot and sauté until translucent.
Simmer 30 minutes.
The page you requested could not be found. Try refining your search, or use the navigation above to locate the post.
I'm so glad you dropped by. I'm Betsy. Here you'll find my favorite fabulous, trusted recipes - everything from delicious, quick meals for your family to wonderful classics made easy.
I'm also here to help you with large group recipes from 20 to 200. So next opportunity you get to cook for a large group - Say 'Yes!' Then relax. I've got your back.
Ever wished you could build your dream home? How about building your dream home in a tropical paradise? Join me, room by room, as we design and build a fabulous dream home in Hawaii!
If you're planning a vacation to Hawaii, I've got you covered on the very best places to go! From many amazing restaurants to incredible adventures in the surf and on land, this is your go-to source for unique and exciting things to do on the Big Island of Hawaii. Or just take a Virtual Vacation!! Let's go!
If you've been asked to cook for a large group activity, be it a Girl's Camp or a Graduation Party, say Yes! I'm here to help. From Menus to Game Plans to Recipes, I'll help you keep on schedule and turn out amazingly delicious food if you're cooking for a crowd! My recipes are tested and trusted. Let's cook!
Ever wished you could build your dream home? Like amazing house design and home building ideas? Me too! Join me as I design and build a home on the Big Island of Hawaii. Follow along while I design each room. Enjoy a front row seat for the entire amazing construction process. Let's play!
Would you like to throw a Luau, but not sure where to start? Want to know how to build a tiki bar and roast a pig? Here's everything you need to have a luau. How about a Christmas Feast or even a fabulous dinner for your neighborhood supper club? You've come to the right place. Let's party!
 Aloha Dreams
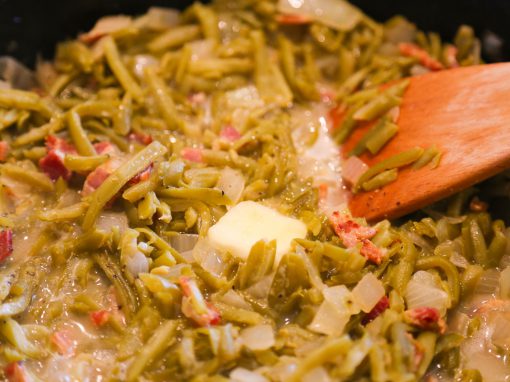
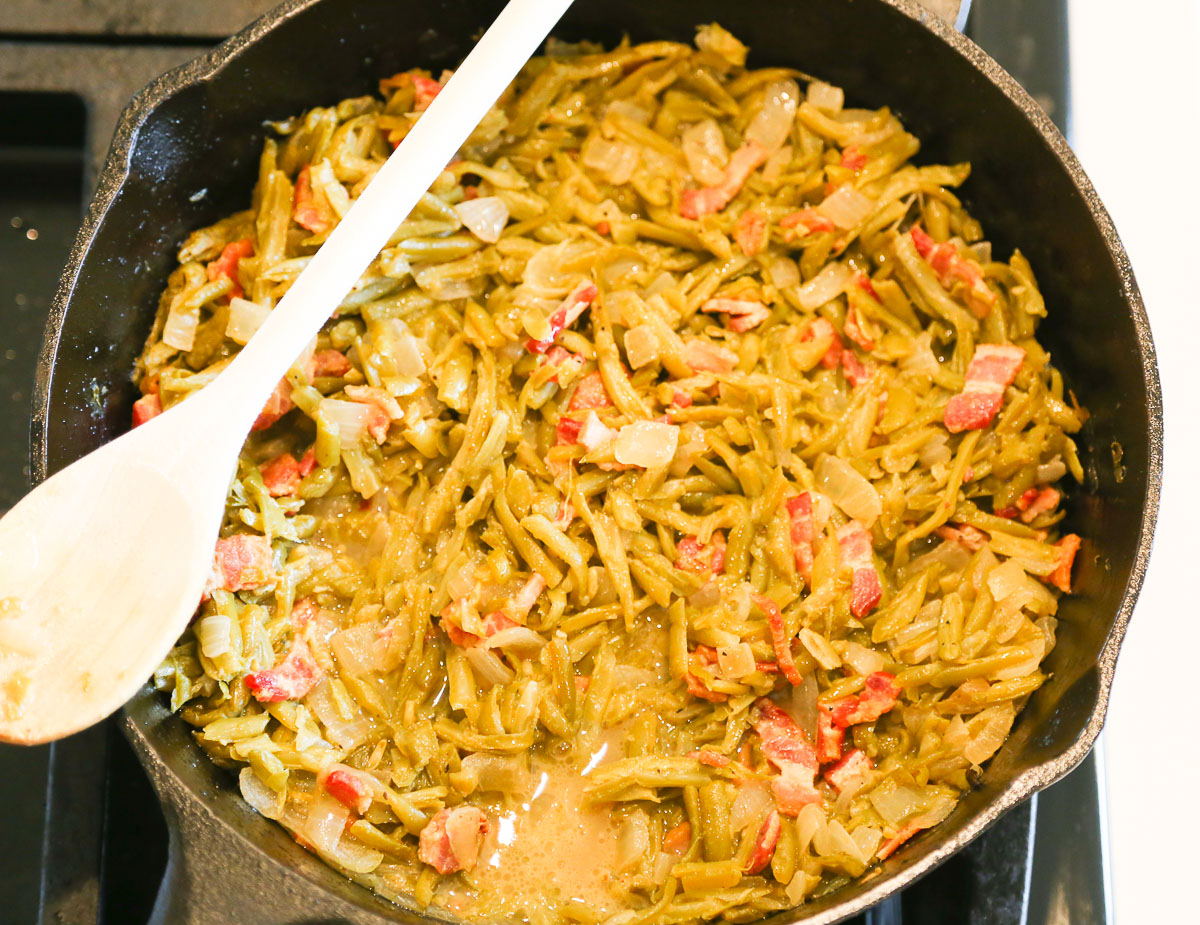
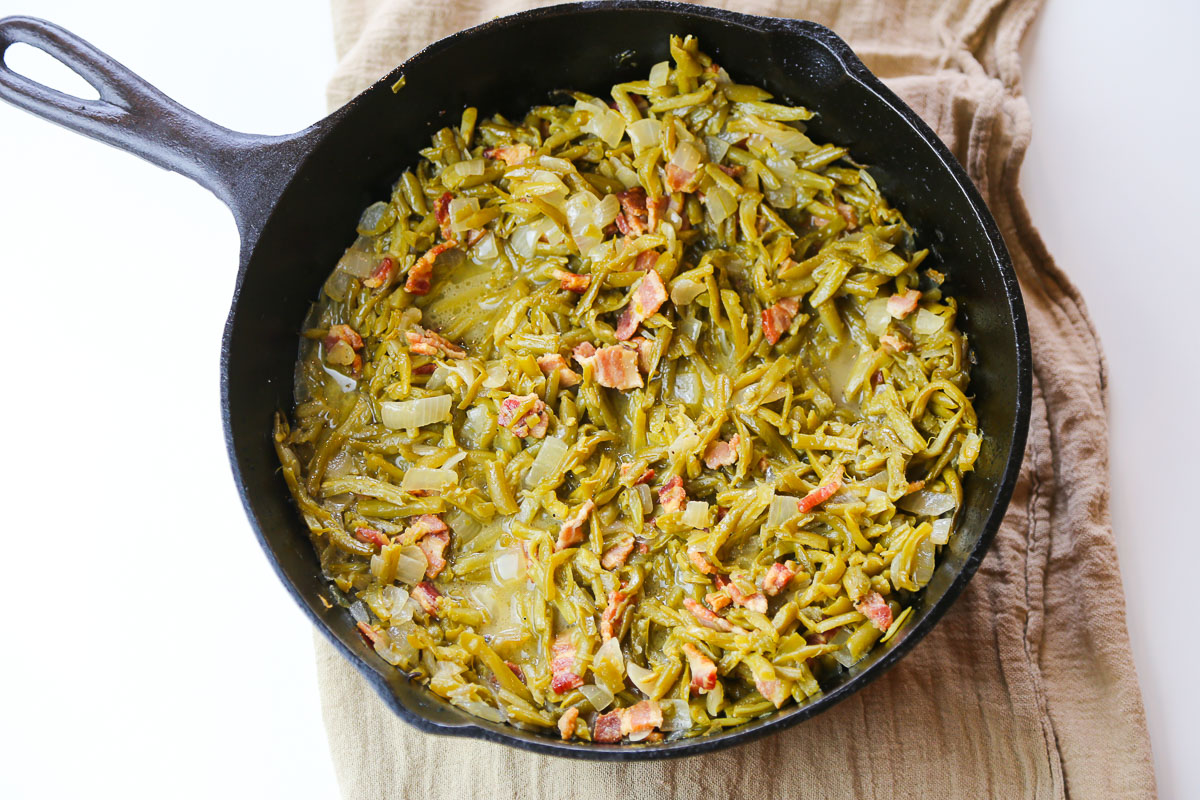
Don’t you just love Southern cooking? It always brings a smile to my face. It’s like hearing a soft, welcoming southern accent. What’s not to love? It’s comfort food at it’s best, kinda like snuggling into the best bed ever for a relaxing nap. (Can you tell I’m still jet lagged from our recent Hawaii trip?) These Easy Southern Style Green Beans are a perfect example of that Southern charm. Jeff could easily eat these several times each week.
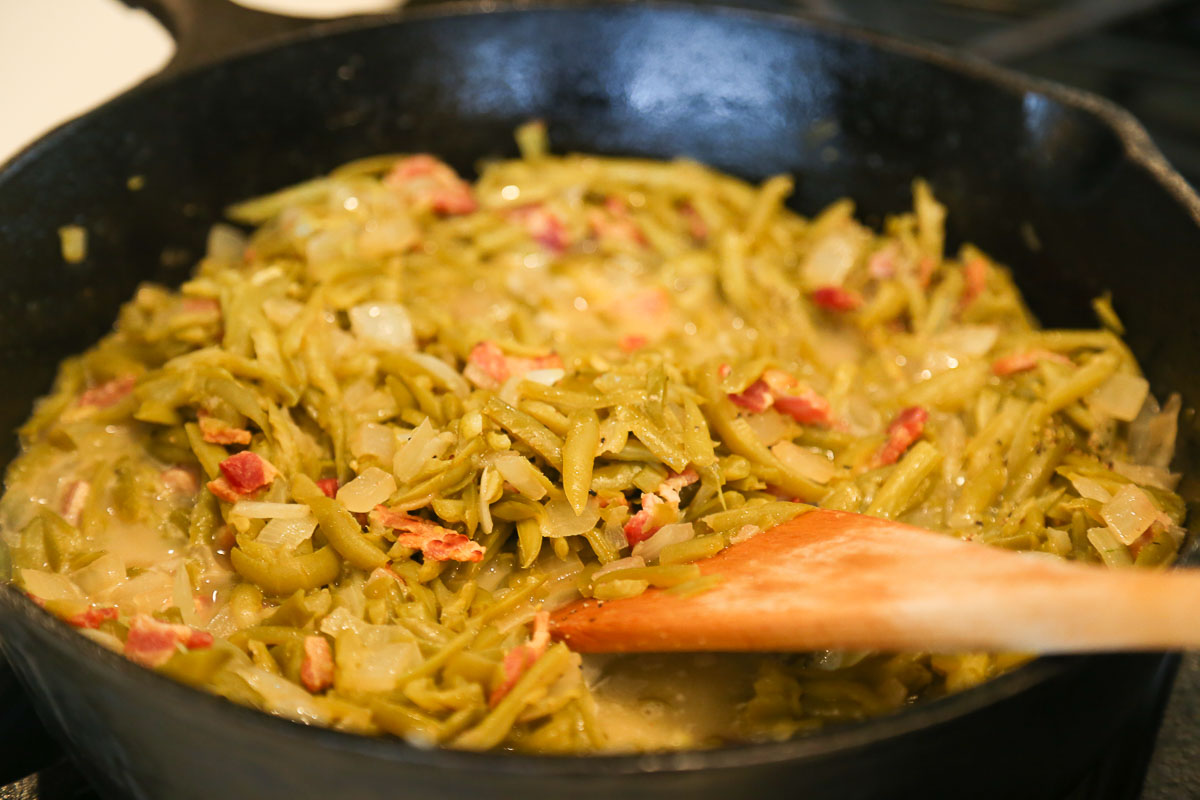
Doesn’t that look good? It tastes even better. This quick, easy, make in advance side dish is a skillet of bacon-y, buttery, meltingly tender deliciousness. The beans come out tasting better than any veggie I’ve ever served! Even kids love them. This is one of my go-to, work-horse side dishes. I’ll often put it on the menu for casual dinners when we have friends over. It’s also a great pot-luck side dish!
So what’s the secret?
Canned beans.
I’m as big a fan of fresh green beans as the next person, but for depth of flavor and tenderness frankly you can’t beat canned French cut beans for this recipe. And because you’re using canned beans they do not have to cook nearly as long. I always keep 3 – 4 cans of the French cut beans in the pantry so when a craving hits I can have them on the table in less than 30 minutes with the rest of the meal.
Try it tonight. You’ll love it. These beans are insanely drool-worthy.
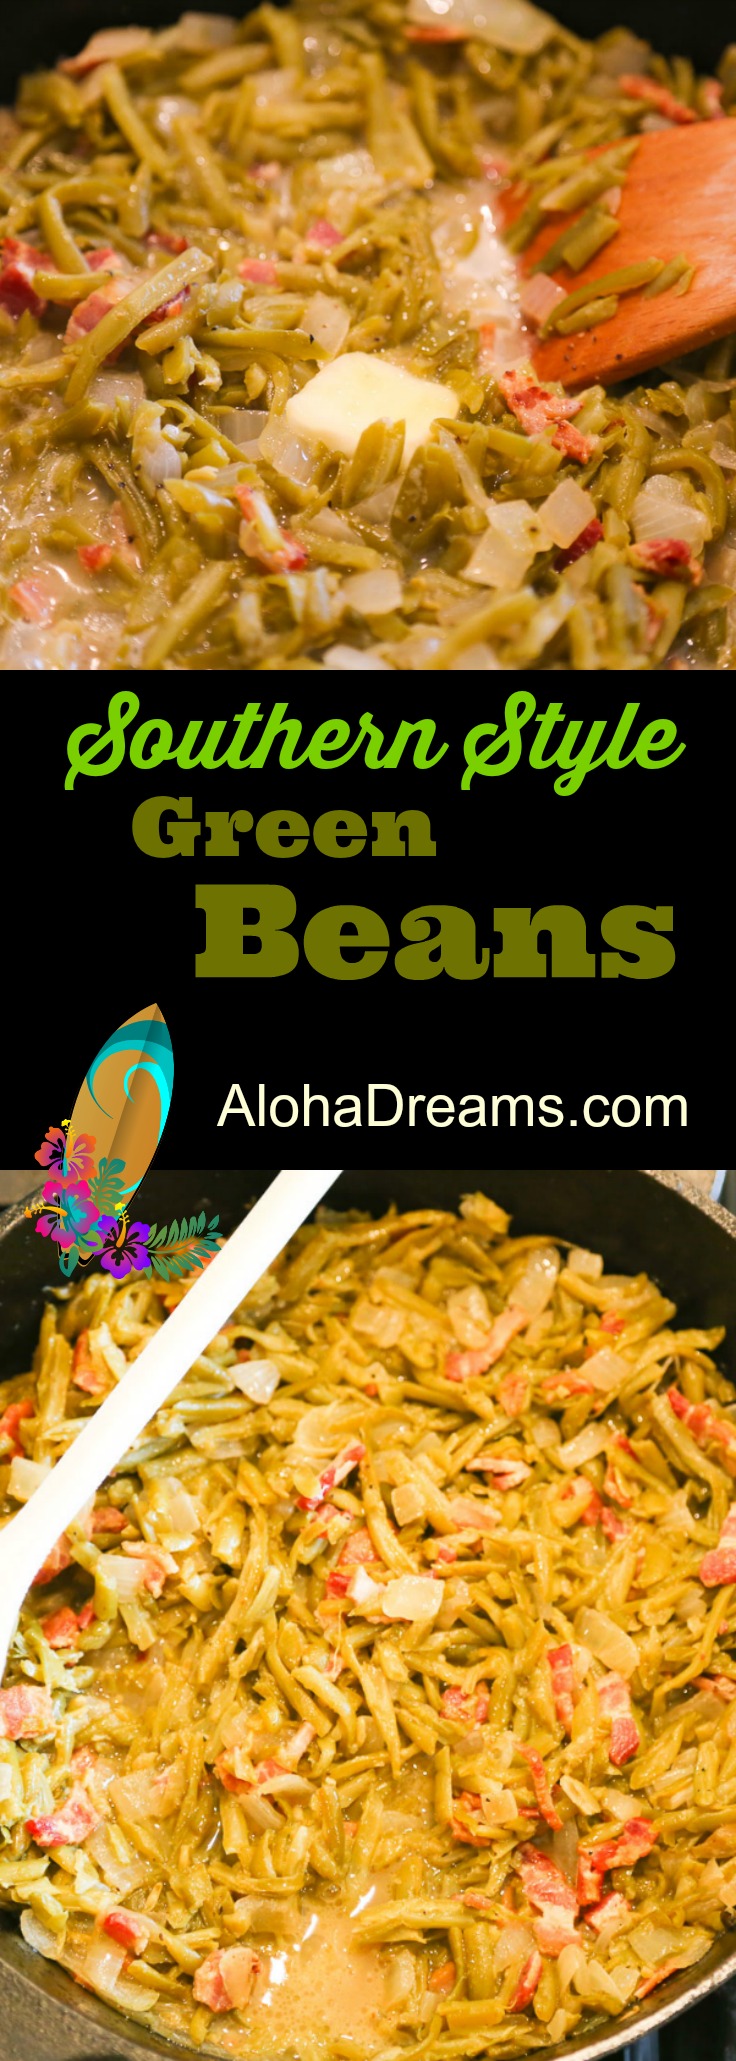
This recipe for Southern Style Green Beans is a quick, easy, make in advance pot of bacon-y, buttery, meltingly tender deliciousness.
Can hold on low up to 1 hour, add ¼ cup of water as needed to replace evaporation.
When I’m fixing a meal, I fix this first and let it hang out on the stovetop on low while I’m preparing the other items.
Easy Southern Green Beans for a Crowd
This is a wonderful recipe for a crowd. It’s inexpensive, it comes together quickly, it and be made in advance and it holds remarkably well (in fact it just keeps tasting better). I made it for a 140 person cast and crew of The Savior of the World and was getting recipe requests for days afterwards.
Here’s all you need to serve 50.
| 50 Servings | |
|---|---|
| Bacon | 30 strips |
| White onions, chopped | 5 |
| French cut green beans | 15 (14.5 ounce) cans |
| Butter | 2 1/2 sticks (20 tablespoons) |
| Table Salt | 6 2/3 teaspoons |
| Ground Black Pepper | 1 1/4 teaspoon |
| Slow Cooker | 1 large (7 - 8 quart) |
When making this for a large group, I follow all instructions above – including, and especially, browning the bacon on the stovetop. I do this in a large Dutch Oven. The difference I make when cooking this for a large group is to use a big pot. I still cook it on the stovetop. Once it’s cooked, THEN I transfer it to the slow cooker, and hold it up to 3 hours (covered) on Low.
Occasionally I may use my slow cooker for long simmering recipes, but I almost never start the cooking process in it. There’s a reason for this. It is next to impossible to get the same depth of flavor from a slow cooker that you can from browning on the stovetop. Sure you could put everything in the slow cooker to cook, but you’ll miss the flavor that comes from browning the bacon on the stove top. Since the liquid released from sweating the onions de-glazes the browned bacon bits from the pan, you might as well just completely the cooking process on the stove top while you’re at it. Once it’s cooked then you can move the whole party to the slow cooker to hang out.
Important note: If transporting these Southern Style Green Beans to an event in a slow cooker it is VERY IMPORTANT that you put the slow cooker in a box with minimal/no room around the slow cooker within the box so the slow cooker can not tip over when you hit the breaks. Don’t EVEN ask me how I know…. : )
I have the BEST smelling CR-V in town.
The page you requested could not be found. Try refining your search, or use the navigation above to locate the post.
I'm so glad you dropped by. I'm Betsy. Here you'll find my favorite fabulous, trusted recipes - everything from delicious, quick meals for your family to wonderful classics made easy.
I'm also here to help you with large group recipes from 20 to 200. So next opportunity you get to cook for a large group - Say 'Yes!' Then relax. I've got your back.
Ever wished you could build your dream home? How about building your dream home in a tropical paradise? Join me, room by room, as we design and build a fabulous dream home in Hawaii!
If you're planning a vacation to Hawaii, I've got you covered on the very best places to go! From many amazing restaurants to incredible adventures in the surf and on land, this is your go-to source for unique and exciting things to do on the Big Island of Hawaii. Or just take a Virtual Vacation!! Let's go!
If you've been asked to cook for a large group activity, be it a Girl's Camp or a Graduation Party, say Yes! I'm here to help. From Menus to Game Plans to Recipes, I'll help you keep on schedule and turn out amazingly delicious food if you're cooking for a crowd! My recipes are tested and trusted. Let's cook!
Ever wished you could build your dream home? Like amazing house design and home building ideas? Me too! Join me as I design and build a home on the Big Island of Hawaii. Follow along while I design each room. Enjoy a front row seat for the entire amazing construction process. Let's play!
Would you like to throw a Luau, but not sure where to start? Want to know how to build a tiki bar and roast a pig? Here's everything you need to have a luau. How about a Christmas Feast or even a fabulous dinner for your neighborhood supper club? You've come to the right place. Let's party!
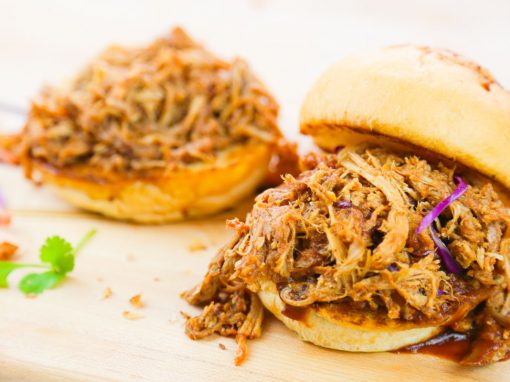

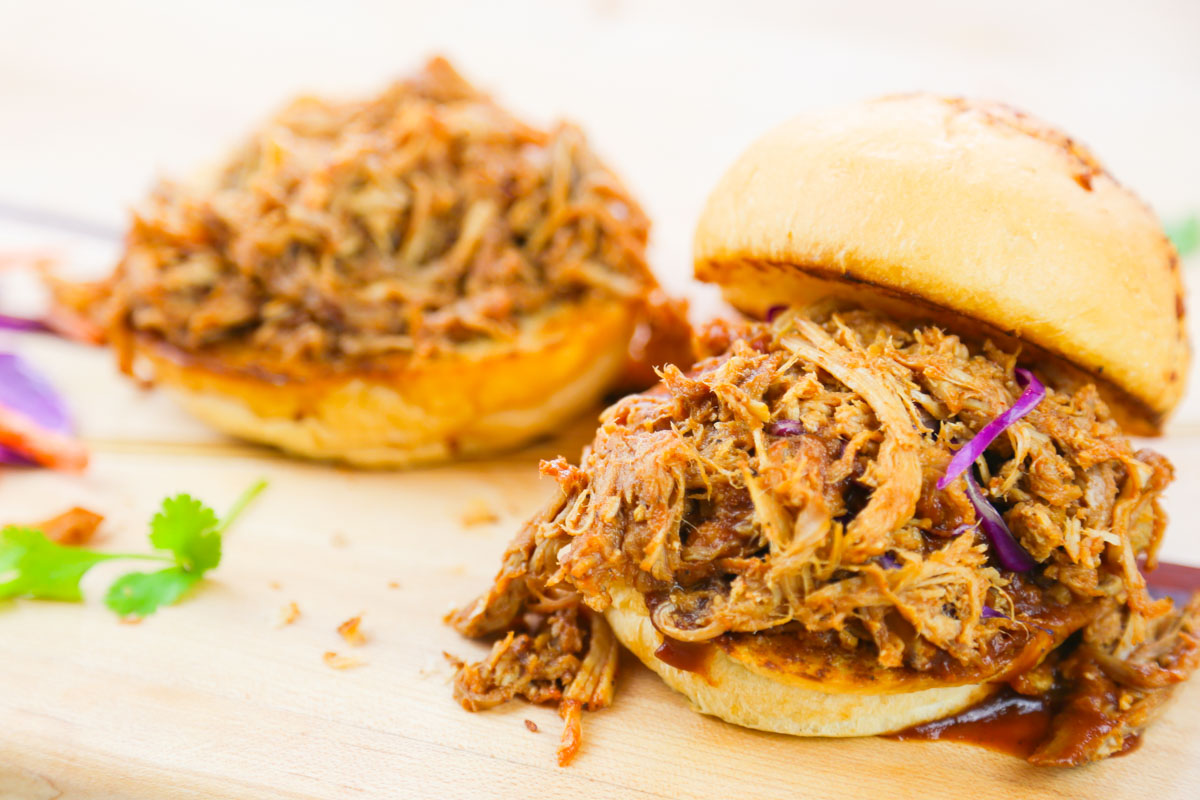
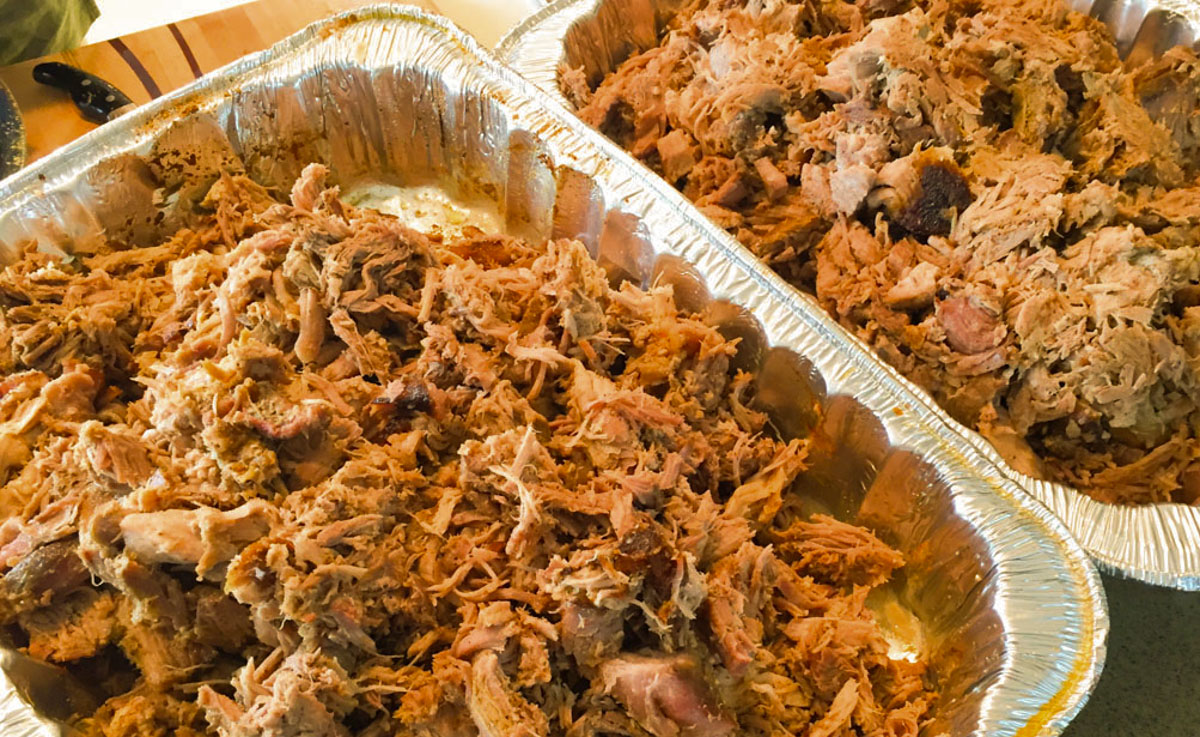
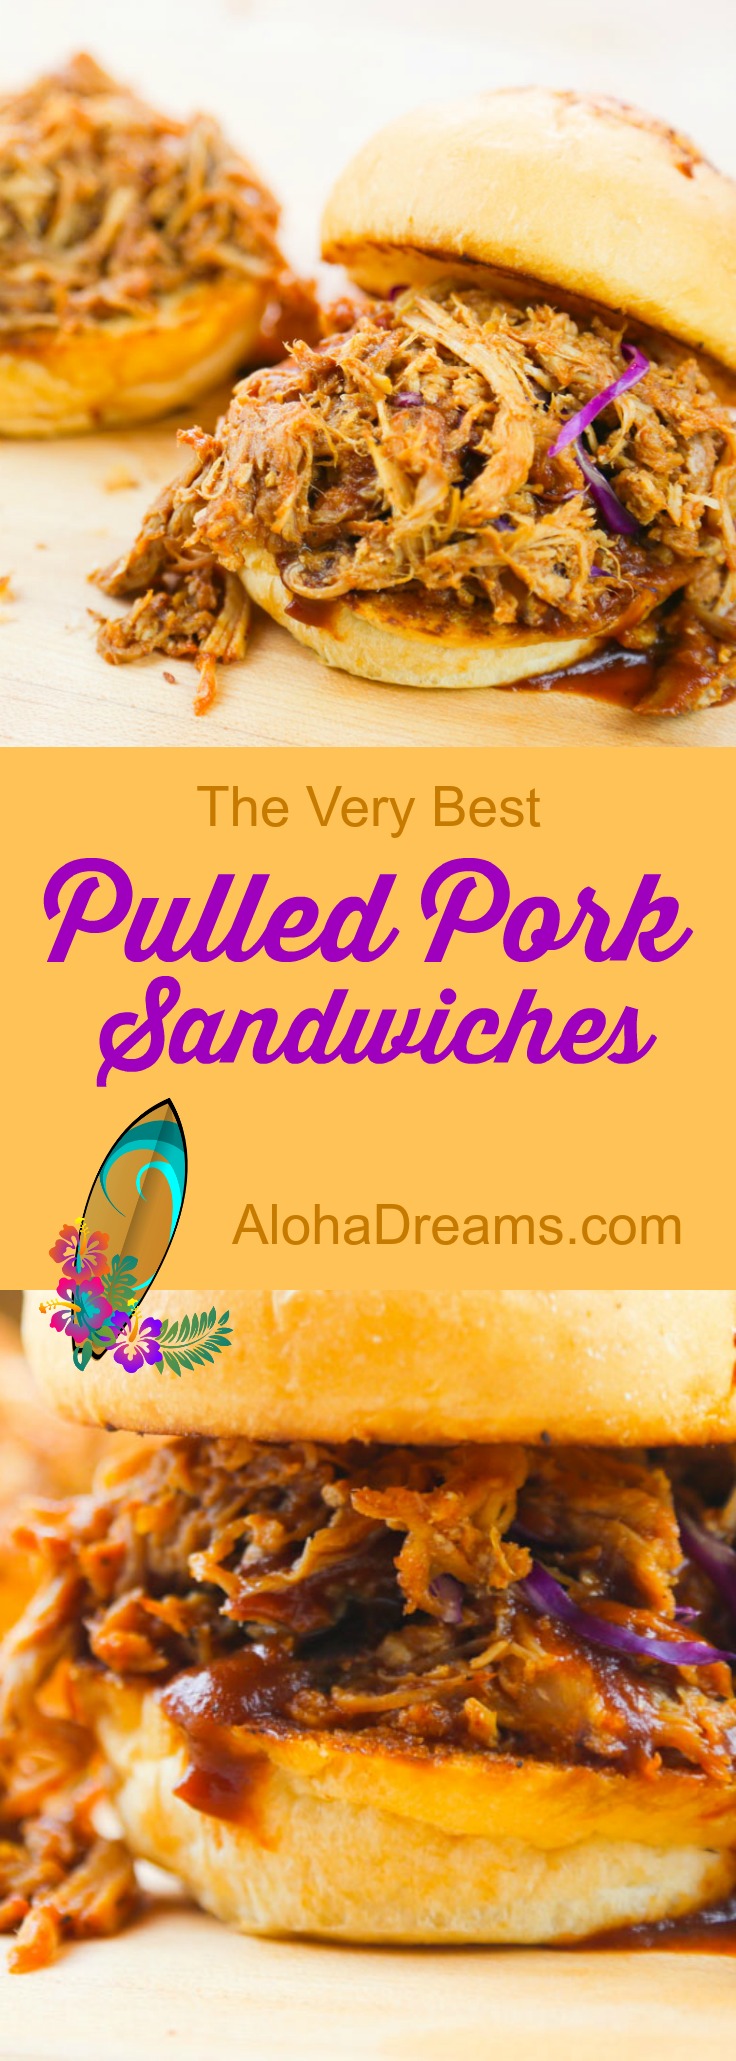
You really have to try this pulled pork recipe. It’s one of those recipes that you’ll turn to over and over. And every time you serve it, your family and friends will love it. (Be prepared for recipe requests.) It’s really flavorful, very moist and melt in your mouth tender. It freezes incredibly well, and it re-heats beautifully… Once you try it, you’ll be hooked. It will quickly join your list of favorite recipes.
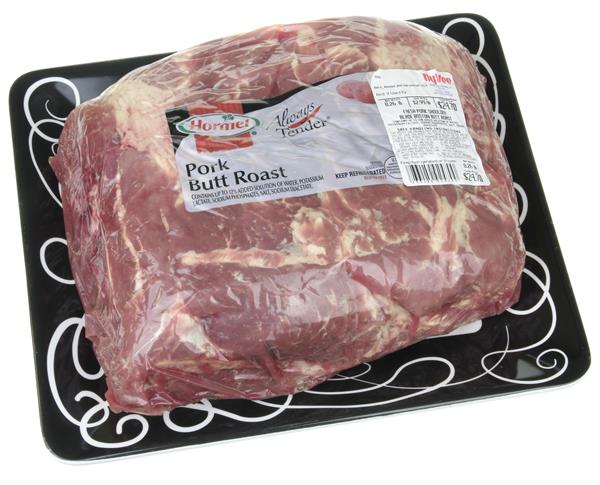
I like to get a roast with a bone in it and a fat layer on one side – but that’s not necessary. A boneless roast is just fine too. They will both cook in the same amount of time. The cooking time is simply based on the size of the roast. It should look like this…
In addition to your roast, you’ll also find these items helpful – although certainly not mandatory:
If your roasts are larger (7-8 pounds) or you’re buying one or more large cuts of meat and cutting them into several 7-8 pound pieces, then go with the 2 Gallon Freezer Bags.
You’ll make this pulled pork recipe over several days. You can do it in 3 simple steps. The process is the same regardless of the amount you’re making. By the way, if this is the first thing (or one of the first things) you’re cooking for a large group of people, I totally get how intimidating it can be. I was pretty anxious the first time I cooked for a really large group (230) too. One of the best aspects of this recipe is it is VERY FORGIVING. You probably won’t use all of the brine (no problem), you may not be able to brine as long as you’d like (ok), it may take your roast(s) a longer or shorter time to cook (no biggie, as long as you wait to remove them until they are fall apart tender).
With this recipe, it’s all good. In fact, this is the recipe I fine tuned for that first group of 230. I’ve been using it on a regular basis ever since. It’s a true winner.
As long as you start 2 nights before you want to serve, you’ll be fine. My Game Plan is designed to finish your roast sometime in the MORNING of the day you want to serve it (freeing your oven up for last minute dishes) like my mom’s fantastic Baked Beans recipe. Just save the cooking liquid and start re-heating the pulled pork 60 minutes (it will actually take less than this) before you’re ready to serve, adding the juice as necessary to keep it nice and moist. When it’s hot, reduce heat to low and cover with foil. Done this way there are no last minute surprises or rush, since it will hold moist and delicious for several hours in a slow cooker on LOW or a 200 degree oven. And YOU will be a rock star.

I'm so glad you dropped by. I'm Betsy. Here you'll find my favorite fabulous, trusted recipes - everything from delicious, quick meals for your family to wonderful classics made easy.
I'm also here to help you with large group recipes from 20 to 200. So next opportunity you get to cook for a large group - Say 'Yes!' Then relax. I've got your back.
Ever wished you could build your dream home? How about building your dream home in a tropical paradise? Join me, room by room, as we design and build a fabulous dream home in Hawaii!

At its most basic, a brine is simply salt water. The salt in the brine forces the liquid out of the brine solution and into the meat, making the meat juicier. The salted liquid also breaks down the connective tissue in the meat making it more tender. If you stopped there, you would be ahead of most people. But why stop now? Let’s use that fluid moving from the salt solution into the meat to carry flavor, such as apple cider. We’ll even include a couple tablespoons of the dry rub seasonings to flavor it further!
You’ll mix all your brine ingredients, put the roast in a freezer bag and pour in the brine. Then refrigerate the roast at least 12 hours and preferably 24. NOTE: This recipe makes a lot of brine just in case you’re cooking a lot of roasts. You will very likely have some extra. You can simply discard any you do not use. Just as long as the roast is covered in the brine, you’re fine. No need to replenish the brine and you don’t need to use all of it.
Here’s what it looks like before putting multiple roasts in the fridge to brine overnight.
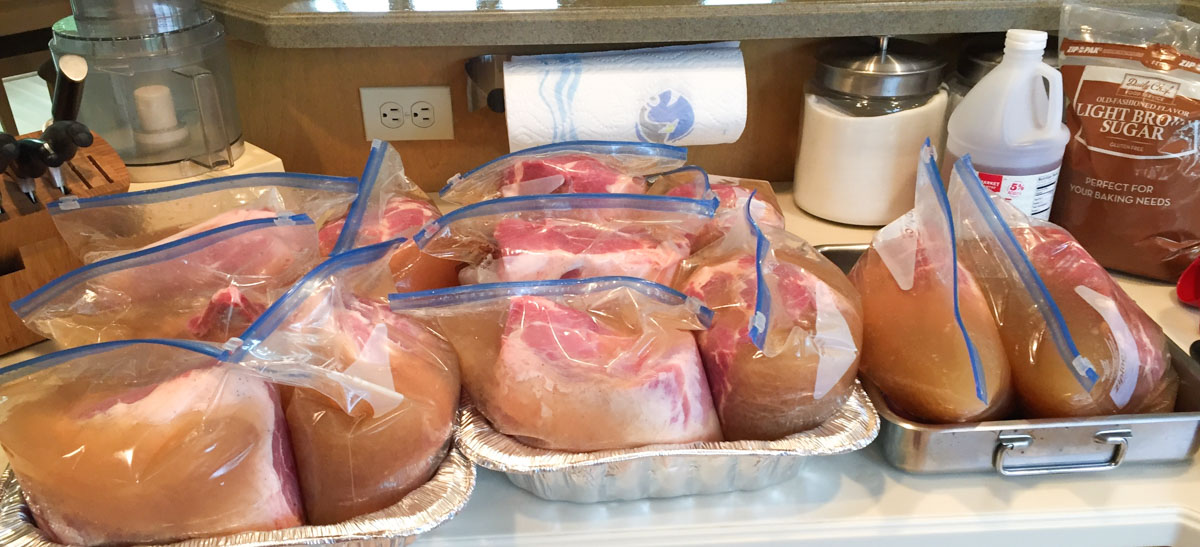
In case you’ve ever wondered how much pulled pork is required to serve 230, this is it. (And if you have, you’re MY kind of cook!) But unless you’re fixing it for 230 (and if you are, it’s actually very easy – just see my Pulled Pork for a Crowd instructions at the end of this post), you’ll only have 1 of these roasts (to serve your family) in 1 bag in 1 roasting pan. Just refrigerate your roast while it’s brining for at least 12 hours and, if possible, 24 hours. Situate the bag in the refrigerator so that the shoulder is completely covered in the brine while it rests.
All great recipes are built on layers of flavor. It’s one of the main differences between a good recipe and a great recipe. You’ve added the first layer of flavor with your brine. Your next step is a dry rub which will add your next layer of fabulous flavor.
While you’re at it, you really might want to consider fixing 2 or 3 roasts. It will hardly take any more time, the pork freezes beautifully and you will LOVE, LOVE, LOVE pulling out a packet of this delicious shredded goodness for quick, delicious meals later on! (Jeff is strongly lobbying for Pulled Pork Nachos as we speak.) (He’ll probably get them.)
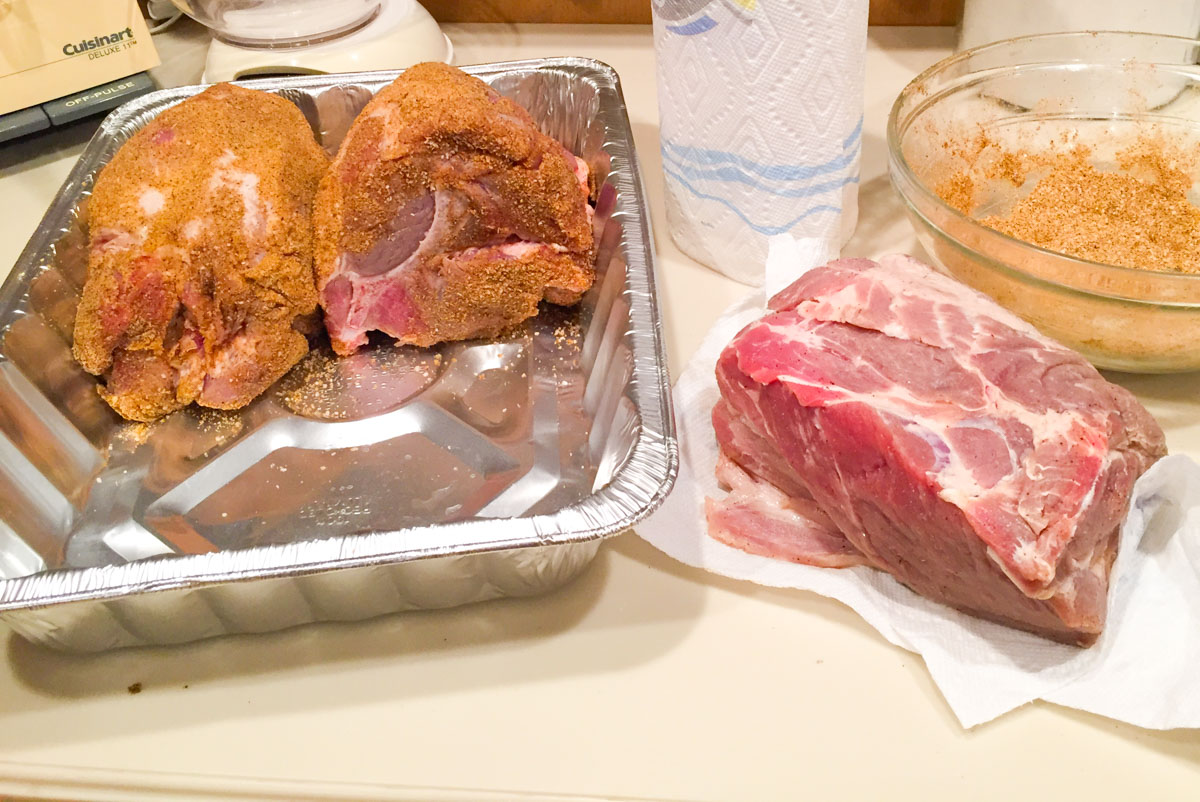
Once your roast is done brining, remove it from the brine solution and place in your roasting pan. Pat it dry and spread your dry rub over the entire surface of your roast, covering thoroughly. See how much I have on the 2 roasts in the image below? That’s not enough. You want to cover the entire surface with no meat showing if possible.
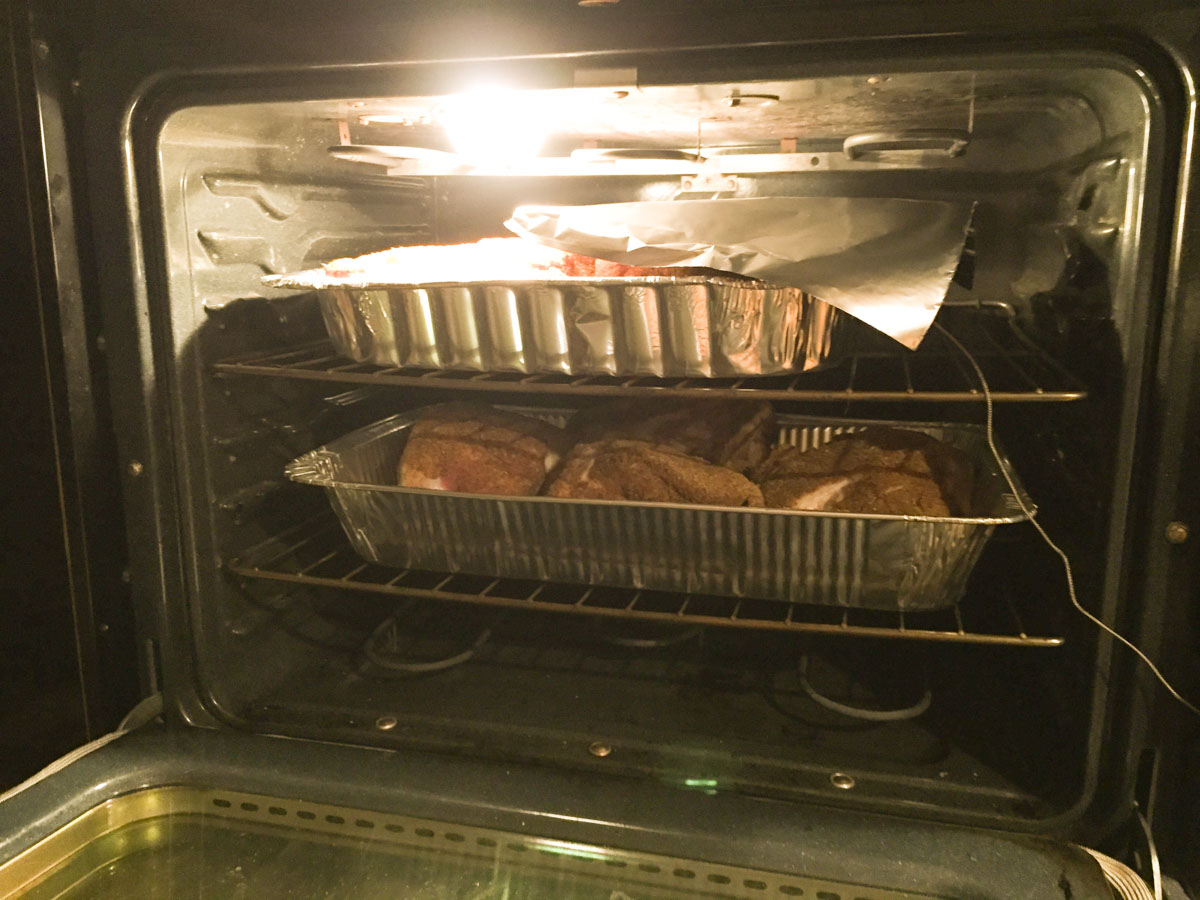
Your pork shoulder is laced with both flavorful fat and connective collagen tissue. When cooked low and slow, the fat and collagens melt, and the muscle fibers are made tender, making your meat moist, and succulent. This process takes 8 to 12 hours or more. You’ll do this in a 225 degree F oven. (Yep, 225 degrees).
And you will only have 1 pan with 1 roast (or 2-3 if you go with my earlier suggestion to make some extra and freeze it – which you’ll totally thank me for!) Your shoulder should take between 1.5 to 2 hours per pound to cook. If you are cooking multiple roasts, it will probably take closer to the 2 hour range. Let me give you an example: I’ve cooked this recipe multiple times with anywhere between 4 – 6 (7.5 – 8 pound) roasts in a large disposable aluminum roasting pan and 2 of these ‘full’ pans in 1 oven. Since each of the roasts were large and I had a ‘full’ oven, it took about 2 hours per pound, or about 16 hours total cook time (8 pound roast x 2 hours/pound = 16 hours cook time) for all the roasts to be fall apart tender. This is probably about the maximum you’d do in 1 (30″ non-convection) oven.
Here’s the best way to do it.
Make the dry rub and the brine solution. Brine the roast(s) overnight and all the next day in the refrigerator.
Remove the roast from the brine, pat dry, cover with dry rub and cook overnight for approximately 10 – 16 hours depending on the size and number of roasts you’re cooking. Set a digital thermometer for 200 degrees and once the internal temperature of the roast reaches that point, you’re done. If you don’t have a digital thermometer, you’re done when the pulled pork is fall-apart tender when shredded with a fork. NOTE: It’s also a good idea to set an alarm to alert you at the 12 hour mark in case your oven is designed to turn off after 12 hours.
At this point your shoulder has reached 200 degrees. Turn off the oven and leave in the thermometer. Your pan should have plenty of wonderful cooking juices in the bottom. If not, add 1 cup of water and cover the pan to retain the moisture while your roast is resting. Let your roast rest in the oven for about 2 hours, until it reaches an internal temperature of 170 degrees. When it hits 170 you can remove the roast from the oven. All we’re doing with this step is letting it cool down to make it easier to shred.
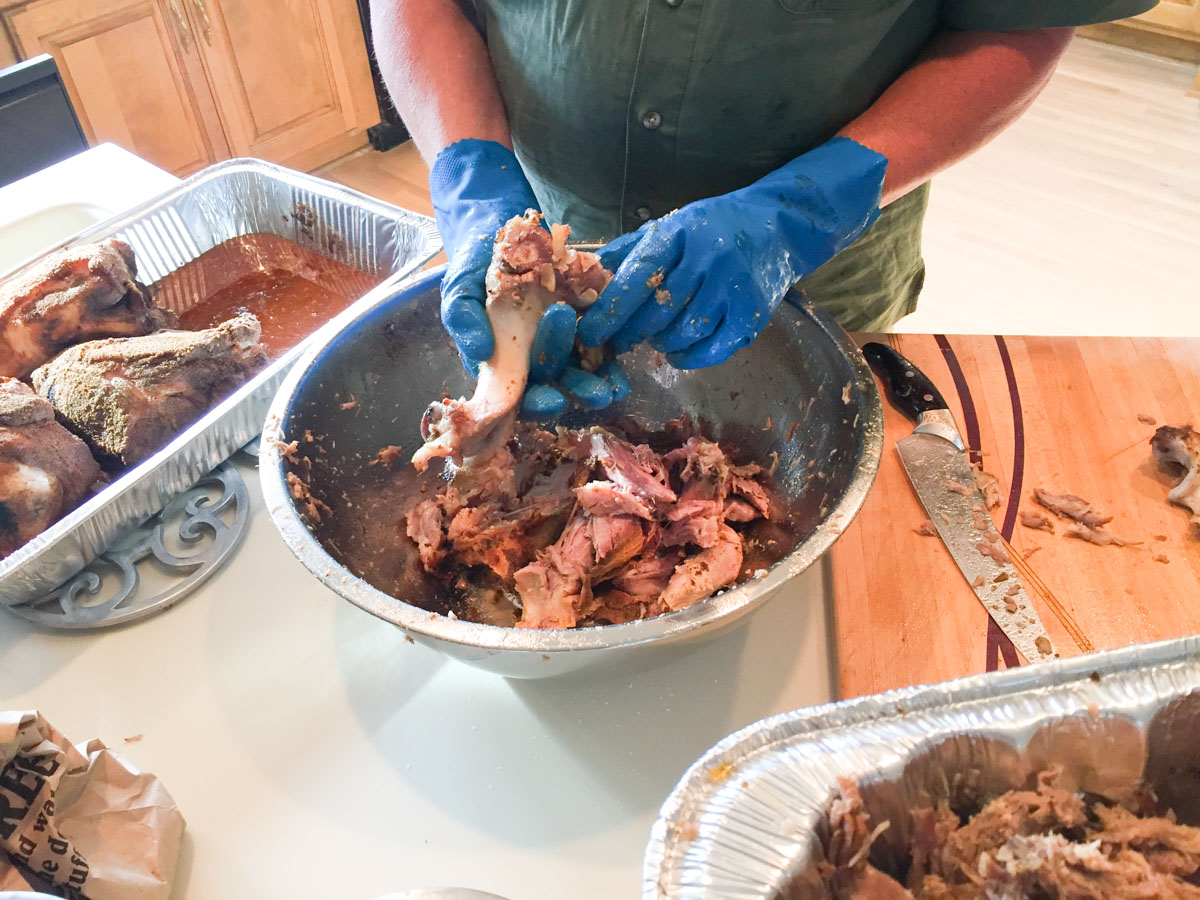
This picture should really be titled “Yet another reason why I LOVE my husband.” Once your pork shoulder has hit the 170 degree internal temperature mark, it’s ready to shred. If you don’t have heat resistant gloves, you may want to let it cool a little bit more before shredding.
Now here’s the final secret to fabulous pulled pork. See that wonderful, flavorful cooking juice in the roasting pan with the pork?
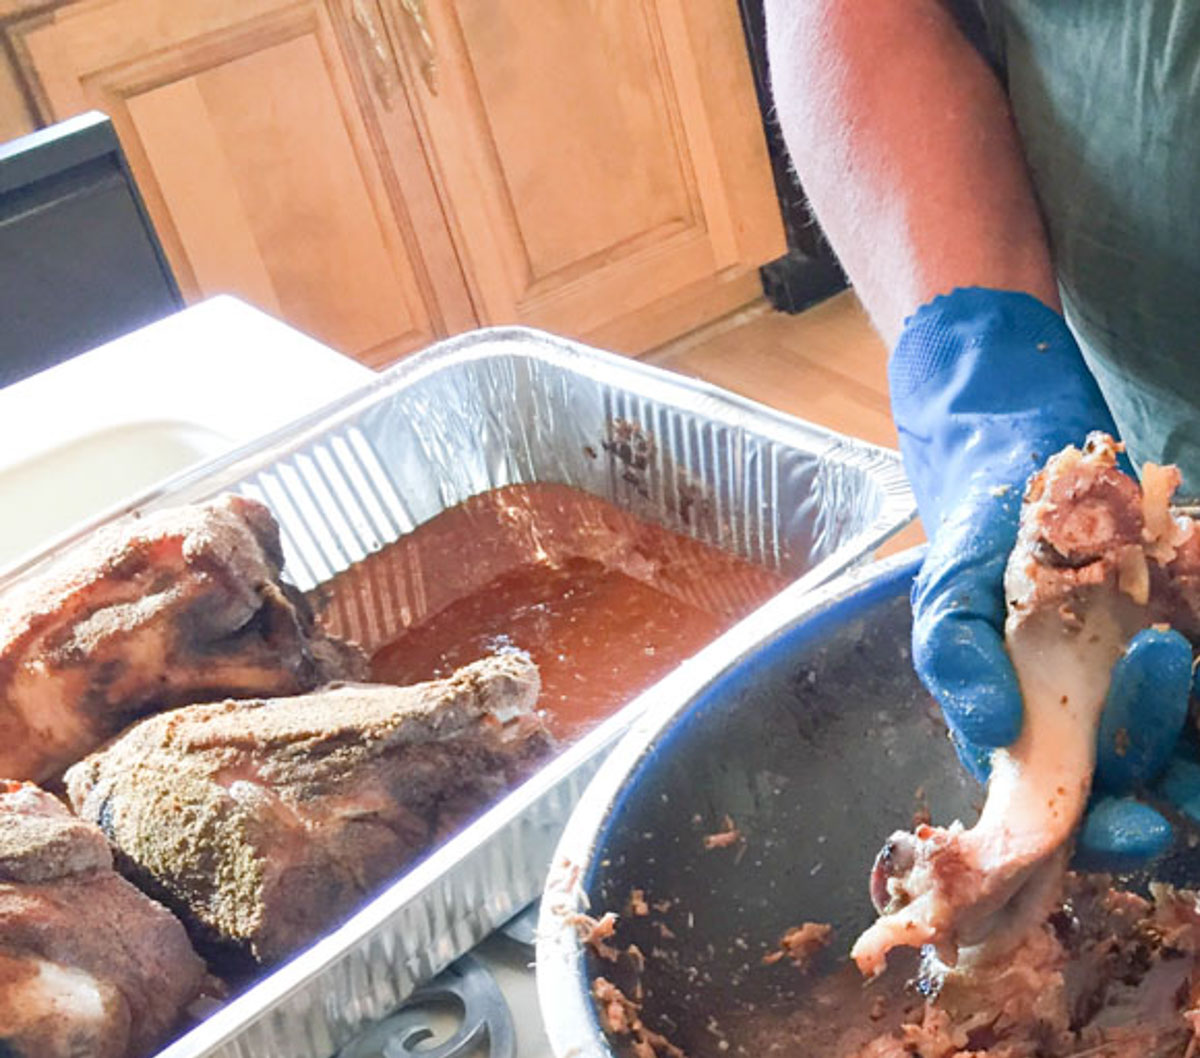
That comes from the fat on and in the pork shoulder. When your pork comes out of the oven you’ll have plenty of that of juicy goodness. You’ll want to pour that juice into a fat separator, pour off the juice and KEEP EVERY BIT OF IT. If you’re freezing your pork for later use you’ll mix some of the juice in with each portion and freeze the remainder to add as you’re re-heating and holding your pork for serving. If you’re serving all your pork immediately after making it, mix in enough juice so your pork is juicy and moist.
(I’ve included these affiliate links for your convenience. Click here for my full disclosure policy.)

It will only take you seconds to get this sleek Bluetooth thermometer up and running. It reports accurate readings on your smart phone up to 100 - 150 feet from its base. From the moment your meat is placed in the oven (or grill) to the second it reaches the perfect temperature, the iGrill has your back. Insert the temperature probe(s) into your meat and track the doneness of your food from your smart phone on the Weber iGrill app, without having to lift the lid. It comes with 2 probes and you can order 2 more, for a total of 4! And you can use it for everything including chicken, steak, burgers, pork roasts. You'll love it for baking chicken because you'll know exactly when the chicken is done so it doesn’t get dried out. It's the reason my dishes come out at just the right degree of done-ness time after time!

Alright, granted these look a lot like Dr. Nefario’s creepy lab gloves…

…but….these gloves really are THE BOMB! They do a great job protecting your hands while you’re shredding hot pulled pork or chicken. They’re even better when you’re working with hot meat on your smoker or barbecue! You will feel like a real pit master with these gloves. A soft jersey cotton liner double coated in neoprene with a full 14″ length protects your forearms from battle scars. They utilize a waterproof design that is resistant to staining, grease and flames. These gloves can easily manage messy BBQ sessions, grabbing or preparing hot food in the kitchen or on the BBQ all while keeping your hands safe and dry. They’re easy to clean too. You’ll love these gloves so much you’ll want to give them as Christmas presents to all your grilling friends and relatives!
These aluminum roasting pans are convenient and great for baking, serving and transporting foods. Use them once for easy no mess clean up, or with a little care you can use them multiple times. They come in a case of 12. I always keep a stack of these in my pantry.
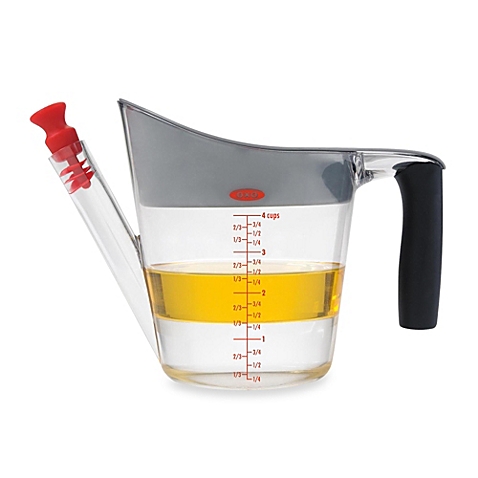
Pour your liquid into the separator and watch the fat rise to the top while everything else settles to the bottom. Once the gravy has settled, remove the strainer and the stopper and pour out perfect gravy; a shield prevents the gravy from spilling over the top of the separator instead of through the spout. This heat-resistant fat separator has measurement markings for increased convenience and a non-slip handle for a comfortable, firm grip. You’ll love it.
Here’s the recipe for Pulled Pork for 50. You can also scroll down below this to see the family-sized version. Below that is information on pulled pork for even larger crowds.

In a large bowl, add the salt, water and cider vinegar, stirring thoroughly until most all of the salt is dissolved. When the salt is completely, or mostly dissolved, add the brown sugar, bay leaves (don't crush the bay leaves), garlic and 1/2 cup of the dry rub mix (we'll use the rest later). Stir well to combine.
Place the pork roast in a 1 gallon freezer bags. Pour the brine solution into the bag until the shoulder is completely covered. Close the bags and place in the refrigerator for at least 8 hours and up to 24 (preferred).
Remove the pork roasts from brine solution, pat dry with paper towels, place in several large roasting pans, leaving 1 inch clearance on all sides of the roast to accommodate the cooking juices which will accumulate. Press the dry rub onto the surface of the roasts, pressing it so it will adhere to the surface. Generously coat all sides and under any flaps with the rub.
When done make sure the fat layer on the pork roasts is on the TOP. Insert a digital probe thermometer into the thickest part of one of the shoulders, but not touching the bone. Place the roasting pans, uncovered, in the 225 F degree oven on the middle rack if possible.
Monitor the temperature throughout cooking. Do not remove roasts from the oven until the center of the pork roasts reaches 200 F degrees. The internal temperature should reach at least 200 F degrees to get that tender, falling apart shredded meat. Don’t worry about the long cooking time. They will still be juicy and flavorful because of the brining. Cooking at 225 F degrees, your shoulders will take between 1.5 to 2 hours per pound to cook. An 8 lb. pork roast will take about 13 hours.
When the pork roasts' internal temperature reaches 200 F degrees, turn off the oven, leaving the roasts in the oven and the thermometer in the roast. Your pan should have plenty of wonderful cooking juices in the bottom. If not, add 1 cup of water and cover the pan to retain the moisture while your roast is resting.
Let the roasts cool (for approximately 2 hours) to an internal temperature of 170 F degrees before removing from the oven.
When the temperature drops to 170 degrees, remove the roasts from the oven. Place the roasts on a large, clean work surface and remove any remaining fat from the top. Pour the juices from the roasting pans into a fat separator cup to strain and reserve the juices.
Shred the roasts with two forks, it will pull apart very easily. Discard the bone. Add back in some of the defatted pan juices. IT’S VERY IMPORTANT to taste and sprinkle with kosher salt as you go.
If frozen, thaw pork and juice over night in refrigerator. Then re-warm in a 350 degree oven for about 15 -30 minutes. Add in reserved pan juices as necessary to achieve desired level of moisture.

This is adapted from a dynamite recipe on the blog KevinandAmanda.com
Make the dry rub and the brine solution.
In a medium container with a lid, combine all ingredients for the rub. Mix well, cover and set aside.
In a large bowl, add the salt, water and cider vinegar, stirring thoroughly until most all of the salt is dissolved. When the salt is completely, or mostly dissolved, add the brown sugar, bay leaves (don't crush the bay leaves), garlic and 2 tablespoons of the dry rub (we'll use the rest later). Stir well to combine.
Place the pork roast in a 1 gallon freezer bag or in a large container. Pour the brine solution into the bag until the shoulder is completely covered. Close the bag or cover the container and place in the refrigerator for at least 8 hours and up to 24 (preferred).
Pre-heat the oven to 225 F degrees.
Remove the pork roast from brine solution, pat dry with paper towels, place in a large roasting pan, leaving 1 inch clearance on all sides of the roast to accommodate the cooking juices which will accumulate. Press the dry rub onto the surface of the roast, pressing it so it will adhere to the surface. Generously coat all sides and under any flaps with the rub.
When done make sure the fat layer on the pork roast is on the TOP. Insert a digital probe thermometer into the thickest part of the shoulder, but not touching the bone. Place the roasting pan, uncovered, in the 225 F degree oven on the middle rack.
Monitor the temperature throughout cooking. Do not remove roast from the oven until the center of the pork roast reaches 200 F degrees. The internal temperature should reach at least 200 F degrees to get that tender, falling apart shredded meat. Don’t worry about the long cooking time. It will still be juicy and flavorful because of the brining. Cooking at 225 F degrees, your shoulder will take between 1.5 to 2 hours per pound to cook. My 8 lb. pork roast took 13 hours.
When the pork roast's internal temperature reaches 200 F degrees, turn off the oven, leaving the roast in the oven and the thermometer in the roast. Your pan should have plenty of wonderful cooking juices in the bottom. If not, add 1 cup of water and cover the pan to retain the moisture while your roast is resting.
Let the roast cool (for approximately 2 hours) to an internal temperature of 170 F degrees before removing from the oven.
When the temperature drops to 170 degrees, remove the roast from the oven. Place the roast on a large, clean work surface and remove any remaining fat from the top. Pour the juices from the roasting pan into a fat separator cup to strain and reserve the juices.
Shred the roast with two forks, it will pull apart very easily. Discard the bone. Add back in some of the defatted pan juices. IT’S VERY IMPORTANT to taste and sprinkle with kosher salt as you go.
Transfer shredded pork to 2-gallon freezer bags and refrigerate or freeze. Freeze remaining pan juice separately. You'll use it later when you re-warm the pork.
If frozen, thaw pork and juice over night in refrigerator. Then re-warm in a 350 degree oven for about 10 - 20 minutes. Add in reserved pan juices as necessary to achieve desired level of moisture.
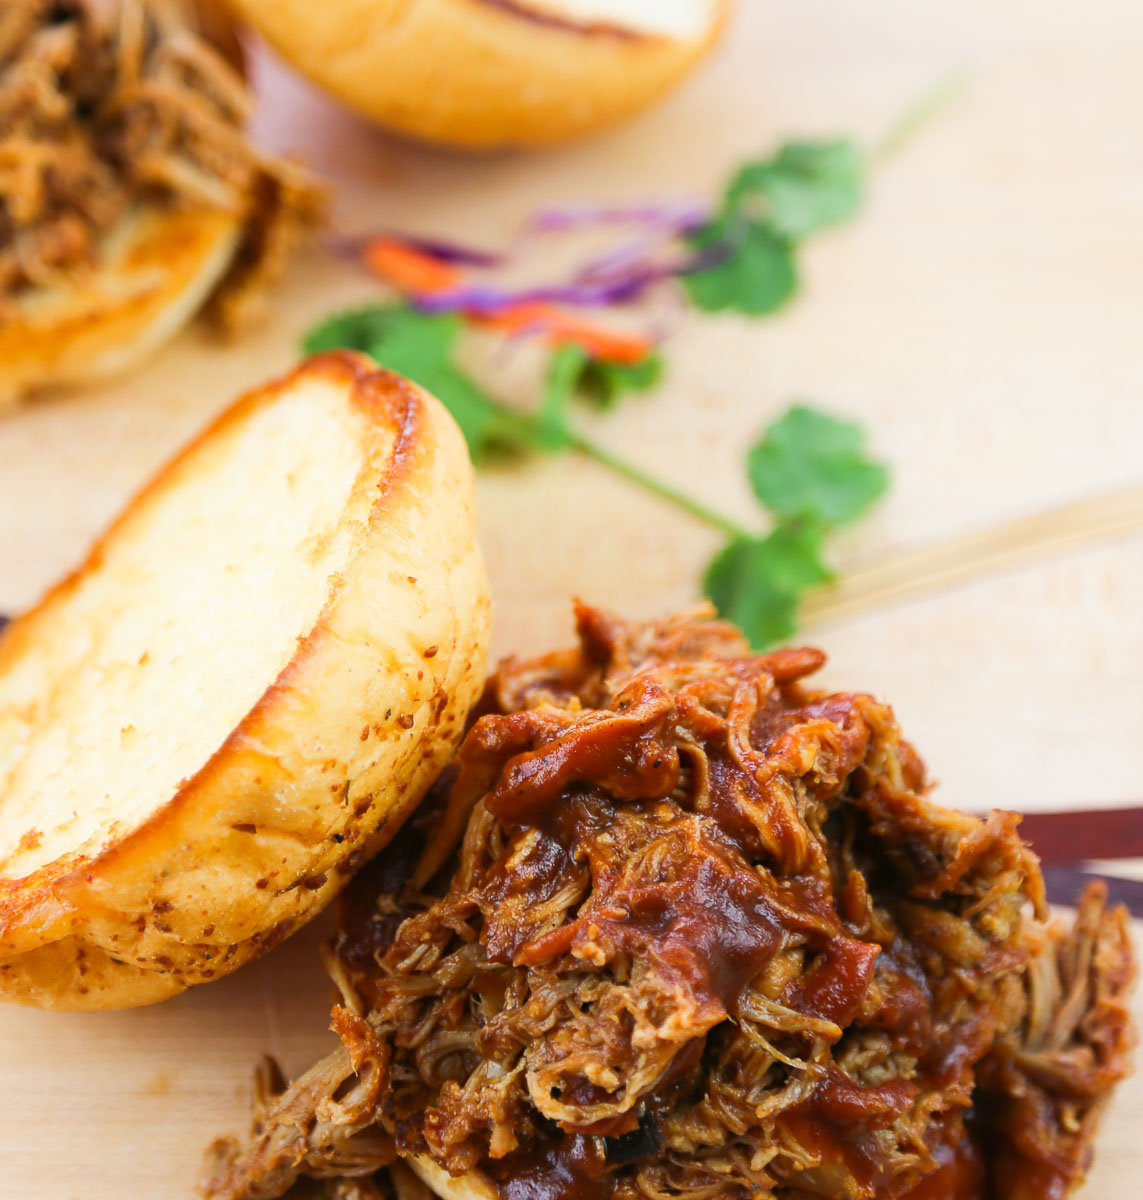
Melt 1 tablespoon butter for every 2 buns and baste the cut side of buns with the butter. Sauté the buns on a griddle over medium temperature until golden brown. Set aside, covered.
Mix pulled pork with your favorite barbecue sauce. Serve on toasted buns with cole slaw.
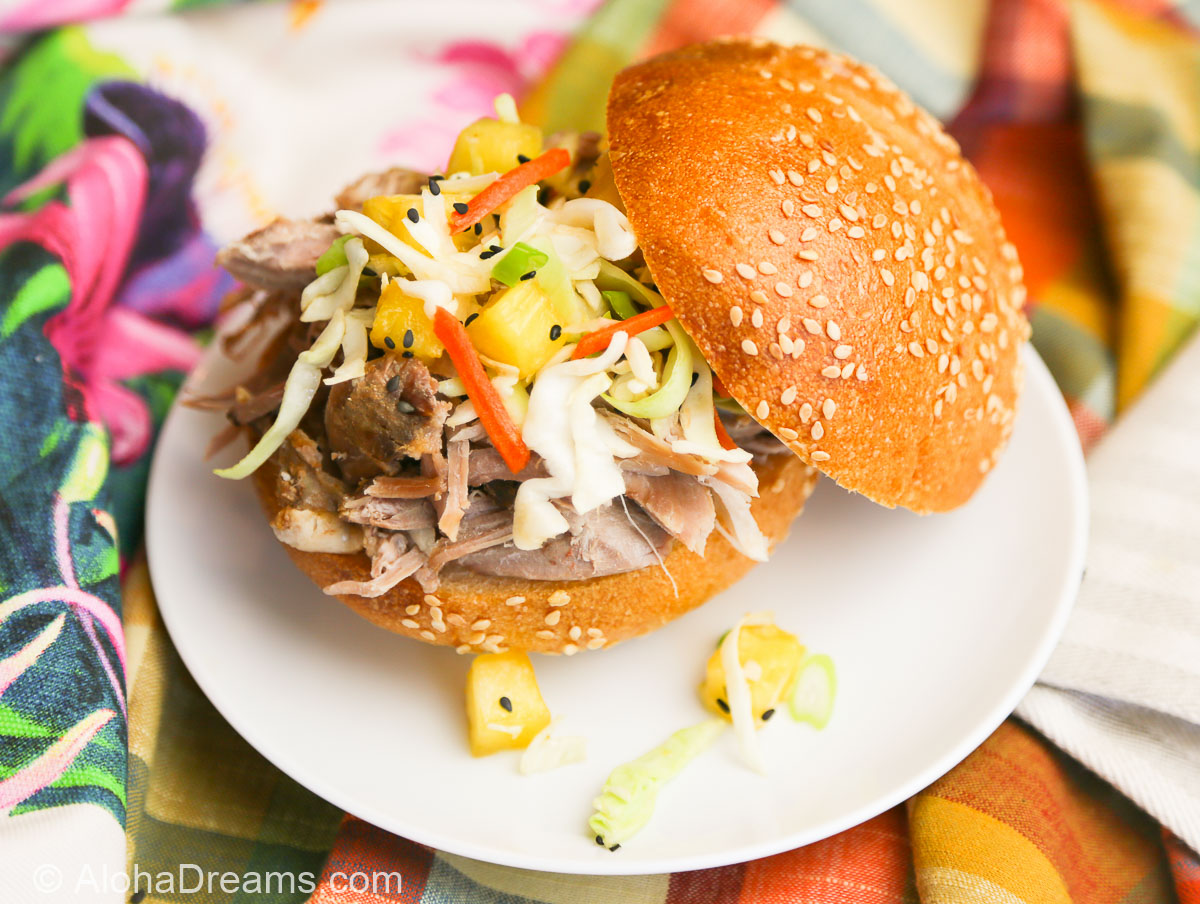
My Hawaiian coleslaw will take your pulled pork sandwich to a whole new level. You’ll love it!
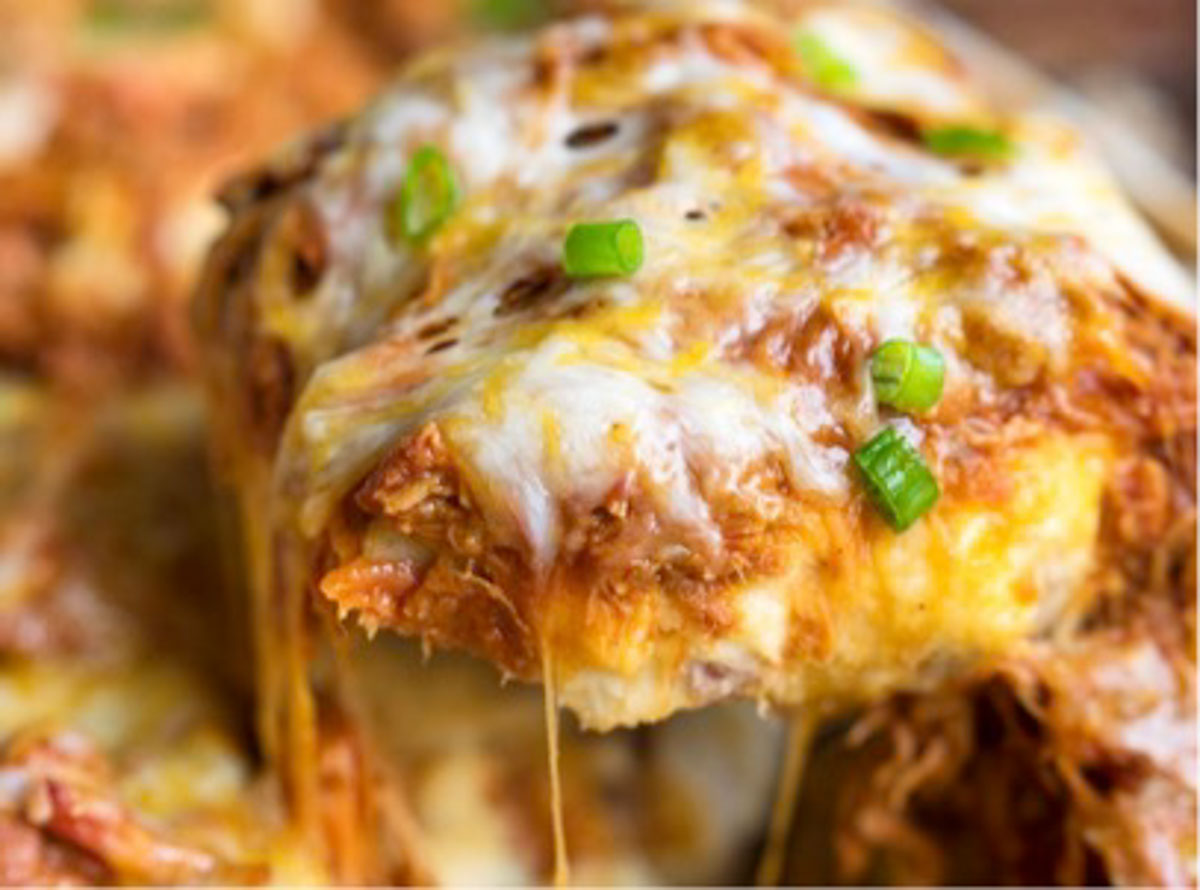
This Loaded Barbeque Pulled Pork Potato Casserole is a guaranteed huge hit at your next barbecue or family dinner! It’s a wonderful, easy to make, crowd-pleasing recipe. Comfort food doesn’t get much better!

These Pulled Pork Nachos will become your new game day or weekend favorite. So easy and so good.
So you’ve said “Yes!” “I’ll be happy to be in charge of the main dish for the family reunion / church activity / party / company picnic / girl’s camp / fill-in-the-blank”. Good for you!!! Now what?? You need an easy, no-fail recipe that can be made in advance, re-heat well that every one will love. You want a proven winner. Well I have your answer.
Pulled Pork sandwiches.
My pulled pork is a great make ahead, terrific tasting choice. The pulled pork freezes beautifully up to 3 months. (At 6 months, it’s definitely freezer burned. Don’t ask me how I know. Sigh.) It reheats wonderfully and holds very well. It’s also a VERY cost effective main dish because a little shredded pork goes a long way on a sandwich, as you’ll find out below. In short, pulled pork sandwiches using this pulled pork recipe are my ALL TIME, GO-TO FAVORITE large group main dish choice.
When it comes to cooking your pulled pork for a large group, you have several options: 1) You can cook it ALL yourself, or 2) You can assign it out to volunteers to make in smaller batch sizes to meet your needs.
I have cooked up to 250 servings myself, which is about the most you can process effectively in one session, and that’s assuming you have 2 ovens. It’s a bit of a trudge, and most of the time involved is inactive, but it’s certainly do-able. However, if you have limited bandwidth or you’re in charge of the entire meal, I’d assign it out. Just send your volunteers a link to this page.
One of the biggest questions on your mind is undoubtedly ‘how much raw pork should I buy to effectively serve my guests??’ At least that’s the one that caused me to lose the most sleep the first several times I fixed this for a large group. A more detailed answer to that question is below. The short answer is your guests will eat between 2.5 to 5 ounces of cooked pulled pork each. That’s a large variance!
The last large group pulled pork meal I fixed for 230 people, averaged 2.5 ounces of cooked pulled pork meat (in pulled pork sandwiches) per person. You’re likely to average 2.5 ounces if: 1) your pulled pork is served as a sandwich filling in regular smallish sized hamburger buns, 2) you use smallish tongs for serving the pork and, 3) it’s the last item on a buffet of at least 4-5 other items. If that’s the case, your budget’s tight and you don’t want any leftovers, you can get by with that much.
However, that’s not what I would plan on. Many of your guests (and me) will take up to 4 or so ounces. To be safe, I would plan on 4 ounces cooked meat per person and you will have leftovers.
If you’re cooking for large group of people, this is a very legitimate question. Too much and you’re over budget, too little and people go home hungry (Not on my watch!). When I first started cooking for large groups, these were the kinds of questions that kept me from going back to sleep at 2:00 AM (I really need a hobby!).
This is how much raw pork I purchased for a Youth Conference dinner for 230 people.

Then I started second guessing myself and went out got 2 more 7 pound roasts. And guess what? (If you said I didn’t need the additional 2 roasts, reward yourself with a virtual vacation!)
After doing this more times than I can count, I now have a simple and proven formula:
Here’s a safe and proven formula you’ll want to use to calculate how much RAW pork butt (also known as Boston Butt) you’ll need to buy. DISCLAIMER… I tend to calculate my pulled pork amounts slightly on the high side. I would always rather have leftovers than run out of food. BUT, you can never know for sure how people are going to eat, so don’t be surprised when your 30 Cub Scouts eat more than 30 high school football players. Or if it’s a hot day, and they’ve had several large meals earlier, don’t be surprised if your 30 high school football players don’t pig out.
1/4 of a pound (4 ounces) is a nice size serving on a plate or bun. (Actual consumption will likely be closer to 2.5 – 3 ounces, but 4 ounces is a safe number to use.)
65% yield means that if you start with a 10 pound raw pork butt you will end up with 6.5 pounds of pulled pork.
Based on our two simple rules we can calculate how much pulled pork we’ll need for 100 people.
100 people/4 servings per lb = 25 lbs of finished pulled pork.
25 lbs of finished pulled pork / .65 (65% yield) = 38.5 pounds of raw pork required.
If you are feeding a group of kids or seniors adjust the equation to 5 people per pound (or 3.2 ounces each). If you are feeding big eaters like athletes or fireman adjust to 3 people per pound (or 5.3 ounces each).
If you are serving other main dishes in addition to the pulled pork you can reduce your amount to cook by 1/3.
My goal is to always have some leftover pulled pork. That way we know everybody got as much to eat as they wanted. You can keep the extra and freeze it.
| Serving: 1 sandwich 4 ounces cooked pork per sandwich | 25 | 50 | 100 |
|---|---|---|---|
| Boston butt pork | 10 pounds raw pork butt (which is 160 ounces) | 20 pounds raw pork butt (which is 330 ounces) | 40 pounds raw pork butt (which is 640 ounces) |
| These calculations assume 35% shrinkage of raw meat. | (25/4 = 6.25) (6.25/.65 = 9.6 pounds or 154 ounces. Round up to 160 ounces.) | (50/4 = 12.5) (12.5/.65 = 19.2 pounds or 307 ounces. Round up to 320 ounces.) | (100/4 = 25) (25/.65 = 38.5 pounds or 616 ounces. Round up to 640 ounces.) |
| (To give you a rough idea, 154 ounces works out to 2 roasts of 4.75 pounds each) | (To give you a rough idea, 307 ounces works out to 4 roasts of 4.8 pounds each) | (To give you a rough idea, 616 ounces works out to 8 roasts of 4.81 pounds each) | |
| Buns | 30 | 55 | 105 |
| Butter (basting) | 1/2 pound | 1 pound | 2 pounds |
| ½ tablespoon/bun | (2 sticks) | (4 sticks) | (8 sticks) |
| Barbeque Sauce (2 ounces per serving) | 25 servings = 50 ounces | 50 servings = 100 ounces | 100 servings = 200 ounces |
| (.75 gallon) | (1 and ½ gallons + 6 ounces) | ||
| For the Dry Rub | 25 | 50 | 100 |
| ground pepper | 1 tablespoon + 1 teaspoon | 2 tablespoons + 2 teaspoons | 5 tablespoons + 1 teaspoon |
| ground cumin | 2 tablespoons | ¼ cup | ½ cup |
| onion powder | 2 tablespoons | ¼ cup | ½ cup |
| chili powder | 2 tablespoons | ¼ cup | ½ cup |
| Kosher salt | 2 tablespoons | ¼ cup | ½ cup |
| paprika | 2 tablespoons | ¼ cup | ½ cup |
| garlic powder | 4 tablespoons | ½ cup | ½ cup |
| brown sugar | 1 cup | 2 cups | 4 cup |
| For the Brine | 25 | 50 | 100 |
| table salt | 1 cup | 2 cups | 4 cups |
| water | 2 quarts | 5 quarts | 10 quarts |
| cider vinegar | 2 cups | 1 quarts | 2 quarts |
| brown sugar | 1 cup | 2 cups | 4 cups |
| bay leaves | 4 bay leaves | 8 bay leaves | 16 bay leaves |
| Garlic, rough chopped (BUY IN THE JAR!) | ¼ cup | ½ cup | 1 cup |

If you're planning a vacation to Hawaii, I've got you covered on the very best places to go! From many amazing restaurants to incredible adventures in the surf and on land, this is your go-to source for unique and exciting things to do on the Big Island of Hawaii. Or just take a Virtual Vacation!! Let's go!
If you've been asked to cook for a large group activity, be it a Girl's Camp or a Graduation Party, say Yes! I'm here to help. From Menus to Game Plans to Recipes, I'll help you keep on schedule and turn out amazingly delicious food if you're cooking for a crowd! My recipes are tested and trusted. Let's cook!
Ever wished you could build your dream home? Like amazing house design and home building ideas? Me too! Join me as I design and build a home on the Big Island of Hawaii. Follow along while I design each room. Enjoy a front row seat for the entire amazing construction process. Let's play!
Would you like to throw a Luau, but not sure where to start? Want to know how to build a tiki bar and roast a pig? Here's everything you need to have a luau. How about a Christmas Feast or even a fabulous dinner for your neighborhood supper club? You've come to the right place. Let's party!
 Aloha Dreams
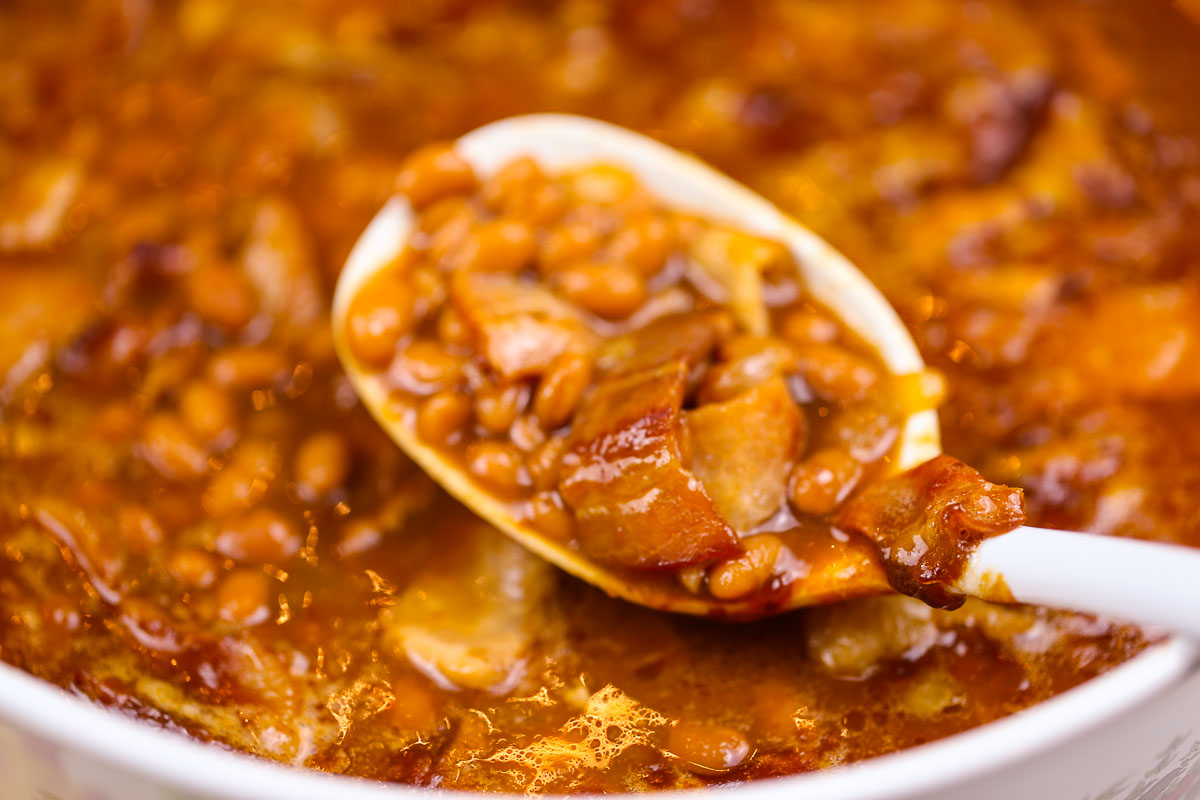
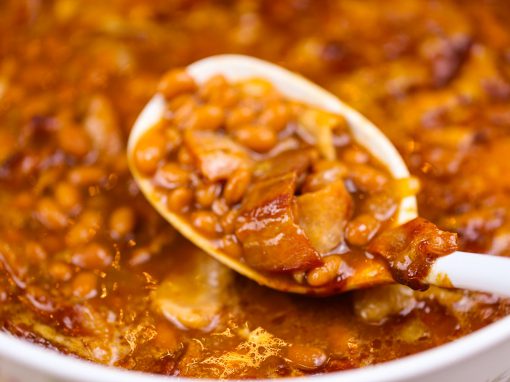
I’m excited to be sharing with you our family’s wonderful baked beans recipe: Betty’s Best-Ever Baked Beans! These beans will become your new favorite BBQ side dish. They are so simple to make and they taste amazing. They are a must-have at family barbecues and a wonderful ‘cooking for a crowd’ side dish at cook-outs.
You’ll love the smell of the beans and sautéed onions, molasses, brown sugar, mustard, and bacon… all bubbling away in the oven while the flavors merge together. And speaking of bacon….the bacon gets chopped and fried before going into the oven so you get a savory, bacon-y taste in every bite. It’s a nice compliment to the jam-y sweetness of the brown sugar and syrup.
These baked beans are the perfect side dish for potlucks, picnics and barbecues – easy to make and so good. They are sure to become a new favorite.


Serves: 20
Combine all ingredients in a large Dutch oven or heavy oven-safe pot.
Make in Slow Cooker These can also be cooked in the slow cooker set on low for 6 to 8 hours as well. They won't get that nice caramelized top, but they’ll still be delicious if you're in a pinch for time.
When serving these baked beans as part of a buffet line-up, I plan on about 4 ounces per person. A 6 quart (192 fluid ounces) slow cooker will hold a double batch of this recipe, serving 44 – 50 people.
An 8 quart (256 fluid ounces) slow cooker will hold a triple batch of this recipe, serving 66 – 70 people.


I’m so excited you are making one of my recipes and I would love to see how it turns out! Make sure to share the aloha on instagram and tag me@alohadreams so I can see your masterpiece!
Follow me on Instagram . Have fun cooking, and be happy!
I'm so glad you dropped by. I'm Betsy. Here you'll find my favorite fabulous, trusted recipes - everything from delicious, quick meals for your family to wonderful classics made easy.
I'm also here to help you with large group recipes from 20 to 200. So next opportunity you get to cook for a large group - Say 'Yes!' Then relax. I've got your back.
Ever wished you could build your dream home? How about building your dream home in a tropical paradise? Join me, room by room, as we design and build a fabulous dream home in Hawaii!
If you're planning a vacation to Hawaii, I've got you covered on the very best places to go! From many amazing restaurants to incredible adventures in the surf and on land, this is your go-to source for unique and exciting things to do on the Big Island of Hawaii. Or just take a Virtual Vacation!! Let's go!
If you've been asked to cook for a large group activity, be it a Girl's Camp or a Graduation Party, say Yes! I'm here to help. From Menus to Game Plans to Recipes, I'll help you keep on schedule and turn out amazingly delicious food if you're cooking for a crowd! My recipes are tested and trusted. Let's cook!
Ever wished you could build your dream home? Like amazing house design and home building ideas? Me too! Join me as I design and build a home on the Big Island of Hawaii. Follow along while I design each room. Enjoy a front row seat for the entire amazing construction process. Let's play!
Would you like to throw a Luau, but not sure where to start? Want to know how to build a tiki bar and roast a pig? Here's everything you need to have a luau. How about a Christmas Feast or even a fabulous dinner for your neighborhood supper club? You've come to the right place. Let's party!
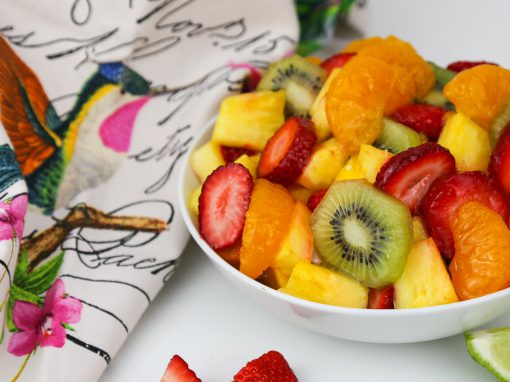


So tell me, does this look good, or what? It is!!! This is a fabulous salad for a large group or you can make it for your family. The recipe is very easy. The dressing can be brought together in minutes made the day before. And, with the exception of the kiwi, the fruit can also be prepped the day before. An hour prior to serving simply peel and slice the kiwi and add it to the rest of the fruit. Drizzle the dressing over, gently toss to coat and serve.
And the taste? Really, really good. The zesty lime and ginger go great with the tropical fruit. It’s not too heavy, and it provides a wonder sweet glistening drizzle. If you can find star fruit, it would be fun to add one of those, sliced, to garnish the bowl. This is a great dish to accompany the breakfast tacos.
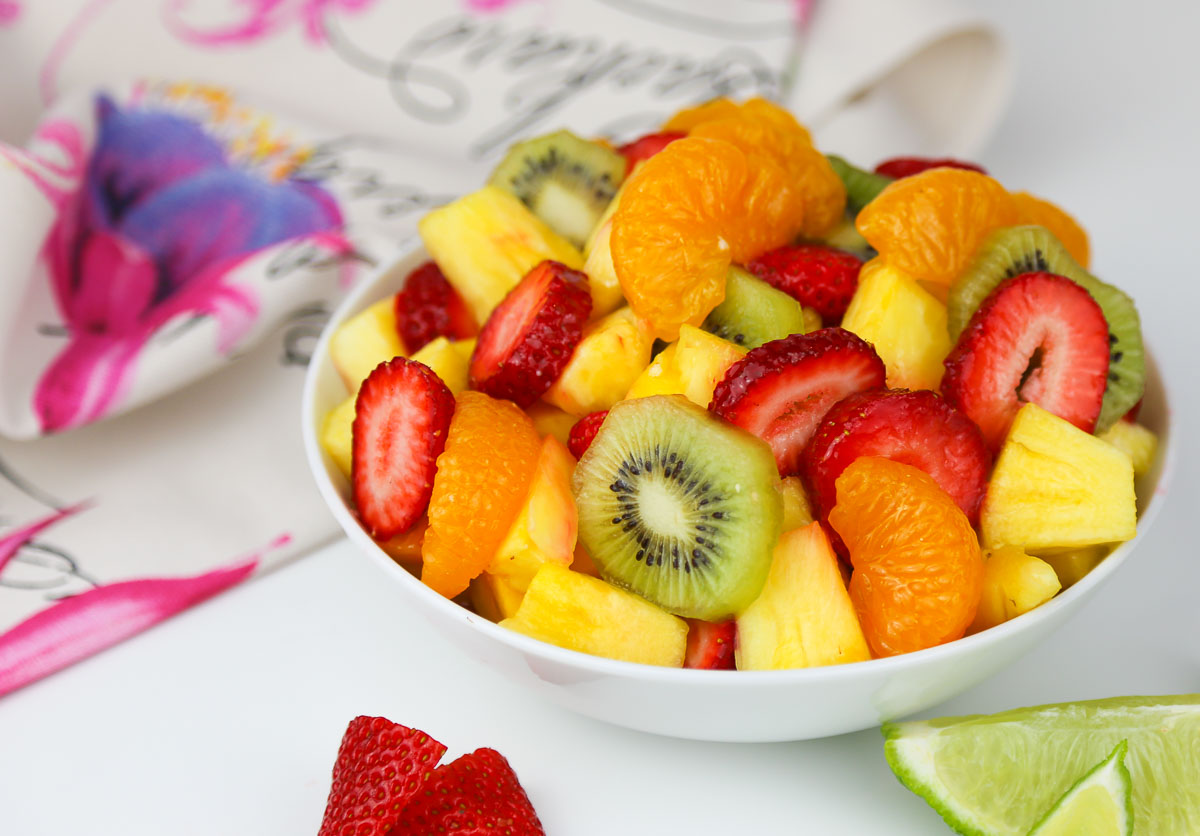

Did you know ginger can be stored up to 3 months in the freezer. Just peel it, wrap in a freezer proof bag and freeze. When ready to use, you can easily grate it with a micro-plane grater.

Makes 10 servings (serving size: 3/4 cup)
In a medium bowl, whisk together the lime juice, powdered sugar, and ginger until all the powdered sugar is dissolved. Cover and refrigerate until ready to serve.
Cut fruit into bite-size pieces and combine in a large bowl. NOTE: If prepping the fruit the day before, don't cut up the kiwi.
Up to two hours prior to serving, peel and slice the kiwi. Add to the salad. Gently stir to distribute.
Did you know ginger can be stored up to 3 months in the freezer. Just peel it, wrap in a freezer proof bag and freeze. When ready to use, you can easily grate it with a micro-plane grater.
I'm so glad you dropped by. I'm Betsy. Here you'll find my favorite fabulous, trusted recipes - everything from delicious, quick meals for your family to wonderful classics made easy.
I'm also here to help you with large group recipes from 20 to 200. So next opportunity you get to cook for a large group - Say 'Yes!' Then relax. I've got your back.
Ever wished you could build your dream home? How about building your dream home in a tropical paradise? Join me, room by room, as we design and build a fabulous dream home in Hawaii!