Red Hot Rose Apples
 Aloha Dreams
Fabulous Recipes, Cooking for a Crowd & Dream Home Design


Red Hot Rose Apples
These apples roses are fabulous! Every time I serve them, folks are wowed. And they have no idea how easy they are – until they ask for the recipe and try them. You’ll want to too!

They take some prep work, but the finished product is well worth it. They taste fabulous and they look even better. They are perfect for a Wedding Reception, Wedding Dinner, Valentines Day Party, Fabulous Christmas Feast, Mother’s Day Brunch or any kind of celebration.
Here’s how they came about.
Recently I agreed to coordinate the food for a small church Christmas party of approximately 100 folks. (In case you had any lingering doubts as to my sanity, you can now dispense of them.) I wanted to create a Christmas-present of a dinner with abundance and decadence and I wanted to include a classic (retro) dish mom made at the holidays – candied rose apples. So in case you need to host a Fabulous Feast for a Crowd for any occasion, you can find the entire menu here! (I’m in the process of adding all the recipes.)
Mom would cook whole cored apples in a red hot cinnamon candy bath and then stuff them with a cream cheese walnut filling. (Recipe coming eventually over in the ‘Cooking with Betty – Rockin’ Retro’ section. They are WONDERFUL for Thanksgiving.) They are a great side dish for a casual, retro-inspired meal by the way! They taste marvelous, but they have a very retro Betty Crocker look about them. There’s nothing wrong with that, but it wasn’t what I was going for as part of the Fabulous Feast. So I googled apple roses and I saw a lot of very fancy looking mini apple rose tartlets. I loved the look and their bite-size aspect would be perfect for the dinner. I figured maybe I go with them instead of mom’s recipe. But when I whipped up a batch of the mini apple rose tartlets to try, guess what?
We’ve all seen it. Food that looks amazingly delicious but tastes only okay. Those mini apple rose tartlets are a perfect example. They look fantastic but their taste is down right ‘meh’. The plain apples were tasteless and the sugar cinnamon sprinkle lacked punch. Worst of all, they had an annoying tendency to burn, imparting a bitter acrid taste. Not good.
First rule of the day: we don’t serve anything that tastes ‘meh.’ I don’t care how great they look. They have to taste fabulous too. If we’re going to do it, we might as well WOW them, don’t you think? (We have a reputation to maintain after all.)
So I thought about it and something came to mind. I could combine the wonderful taste of mom’s apple roses with the fancy preparation of the mini tartlets. So I cooked the apple ‘petals’ for the mini tartlets in mom’s cinnamon candy bath and then, to send them over the top, I drizzled on the cinnamon candy cooking syrup over them once the apples were baked. Score! It resulted in treats that guests were taking seconds and often thirds of with multiple requests for the recipe. A clear winner.
While it’s not necessary, this is a great recipe to make with one or two helpers. It goes very quickly if it’s made assembly line style. A suggestion: DO NOT ATTEMPT TO PREPARE THESE THE DAY OF SERVING. (Was that strong enough? I hope so, because if you do make them the ‘day of’, you’ll be pooped and feel very pressured. Ask me how I know…) Instead, just make them up to 2 months in advance and freeze them. Then bake them just before serving. They’ll be perfect.
Here’s how you do it.
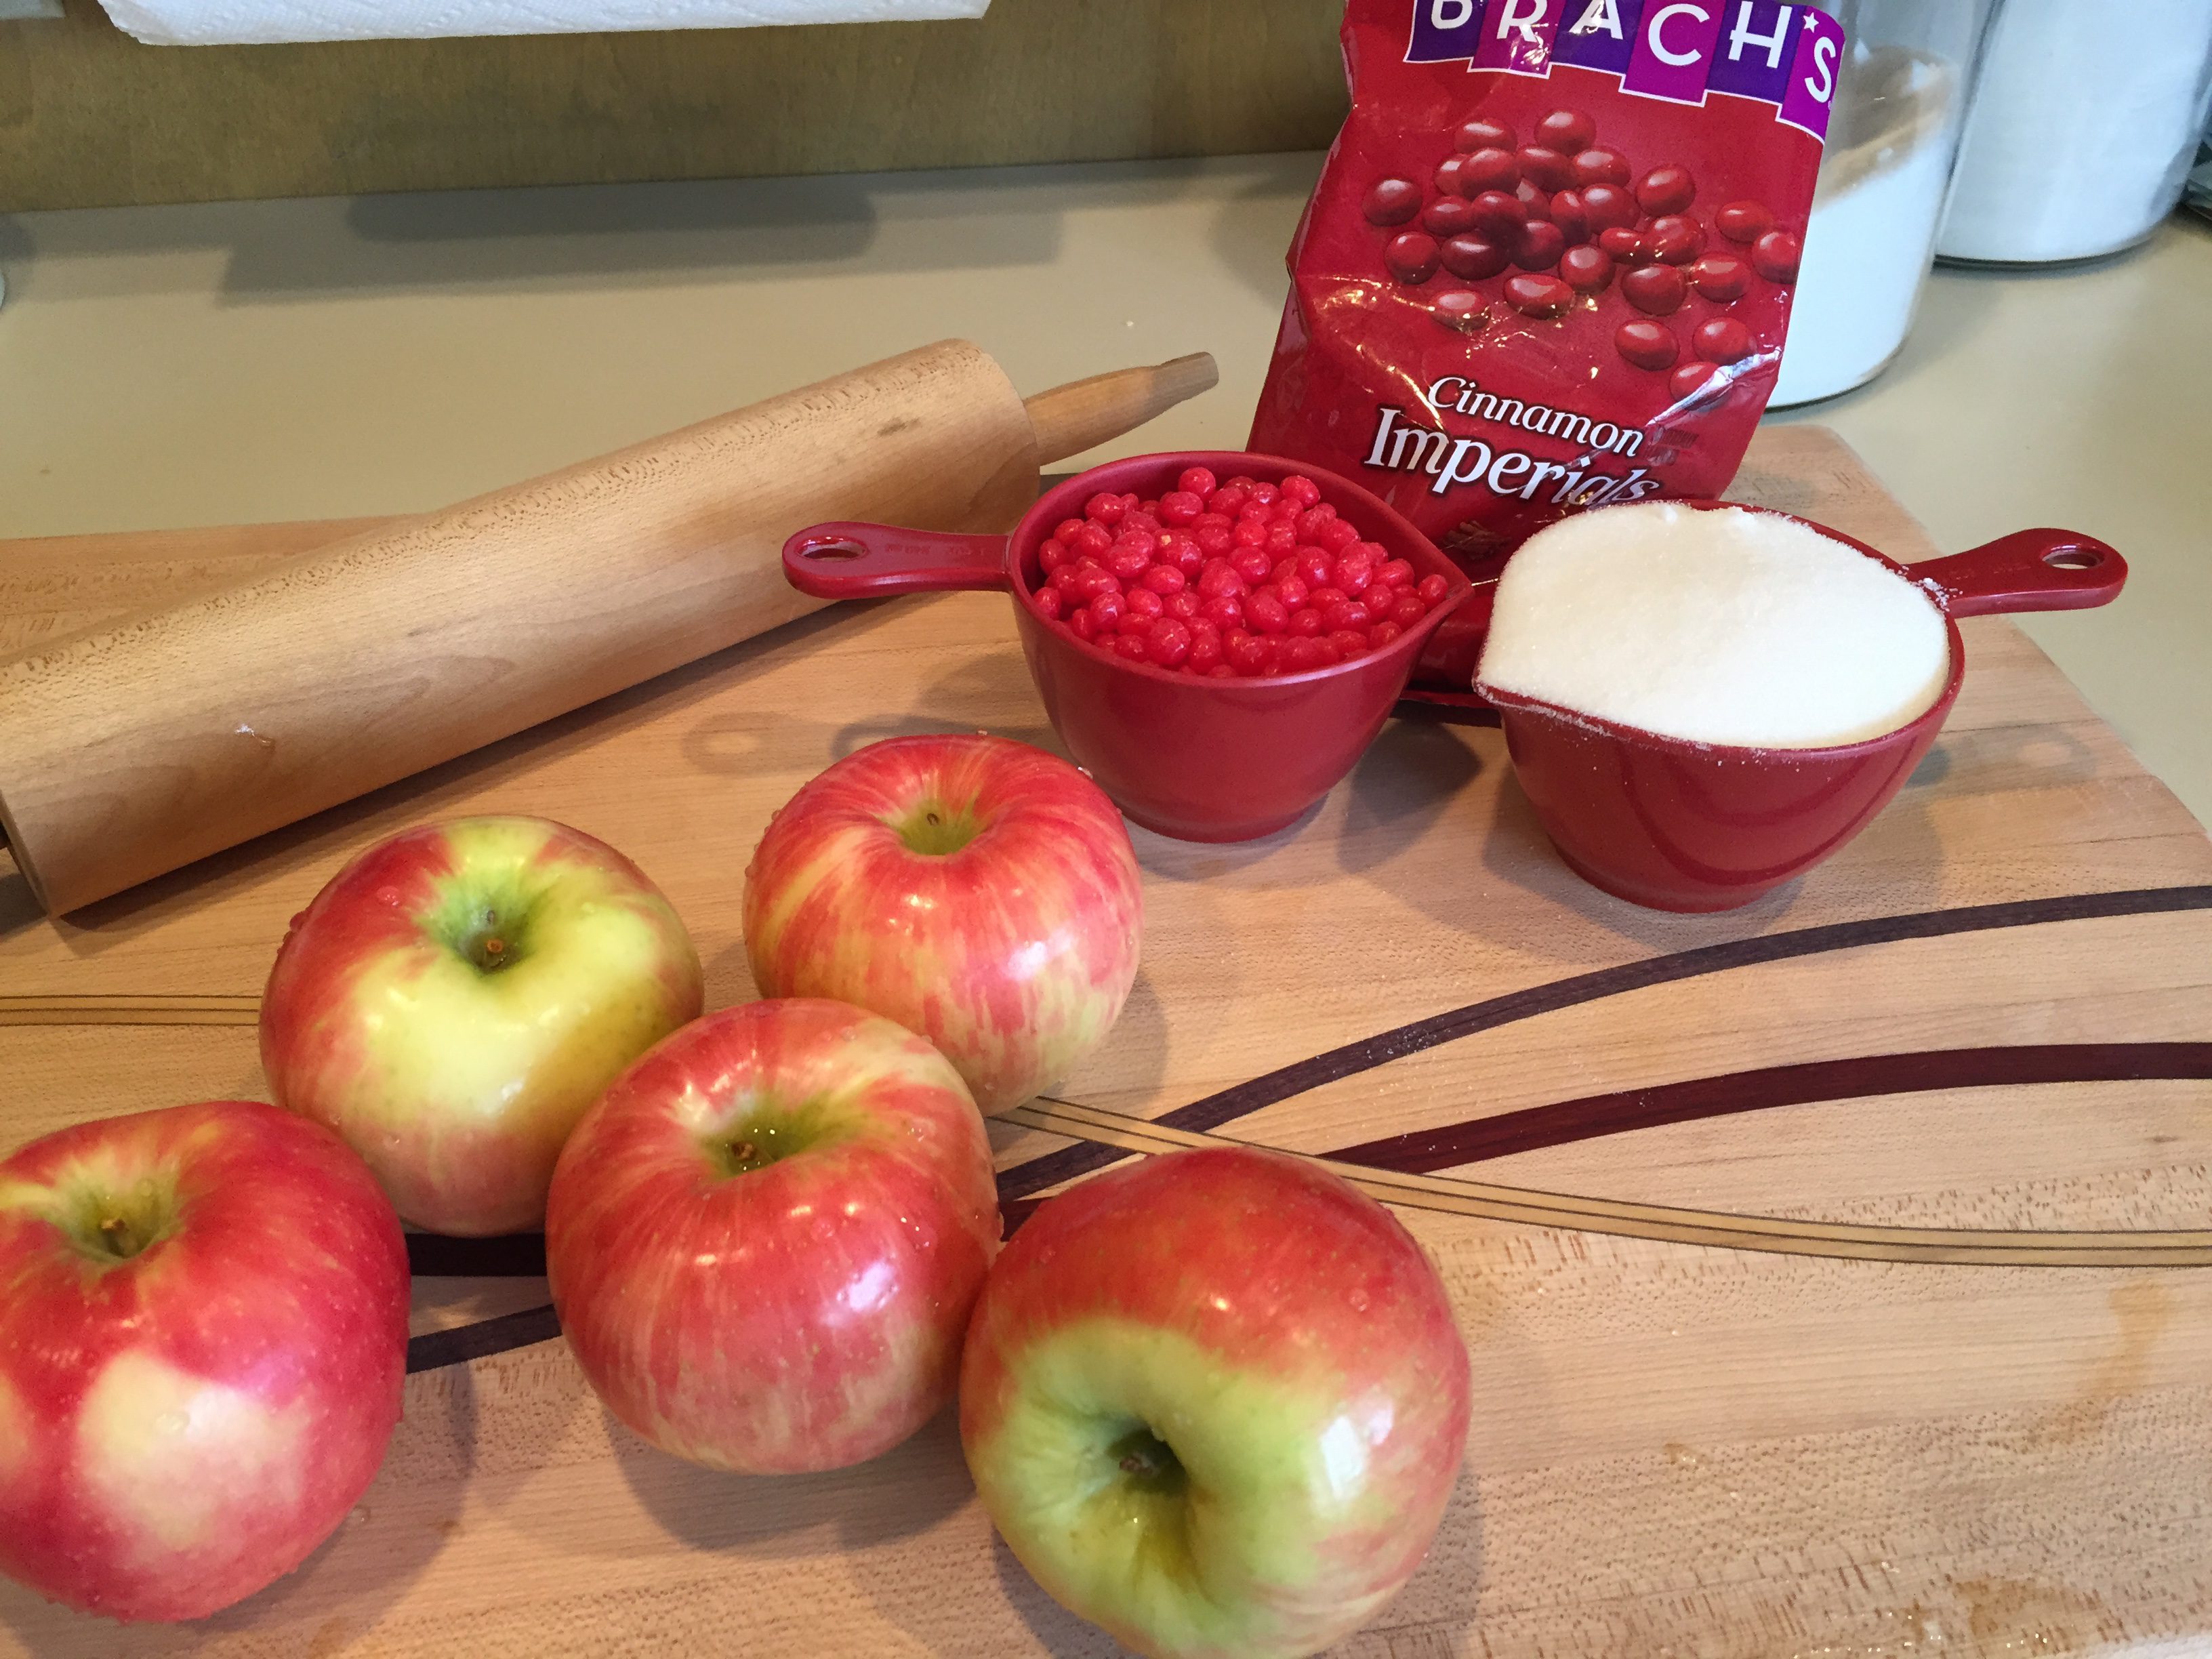
Along with several packages of Pepperidge Farm Puff Pastry (2 sheets per package), these are all the ingredients you need. Very simple.
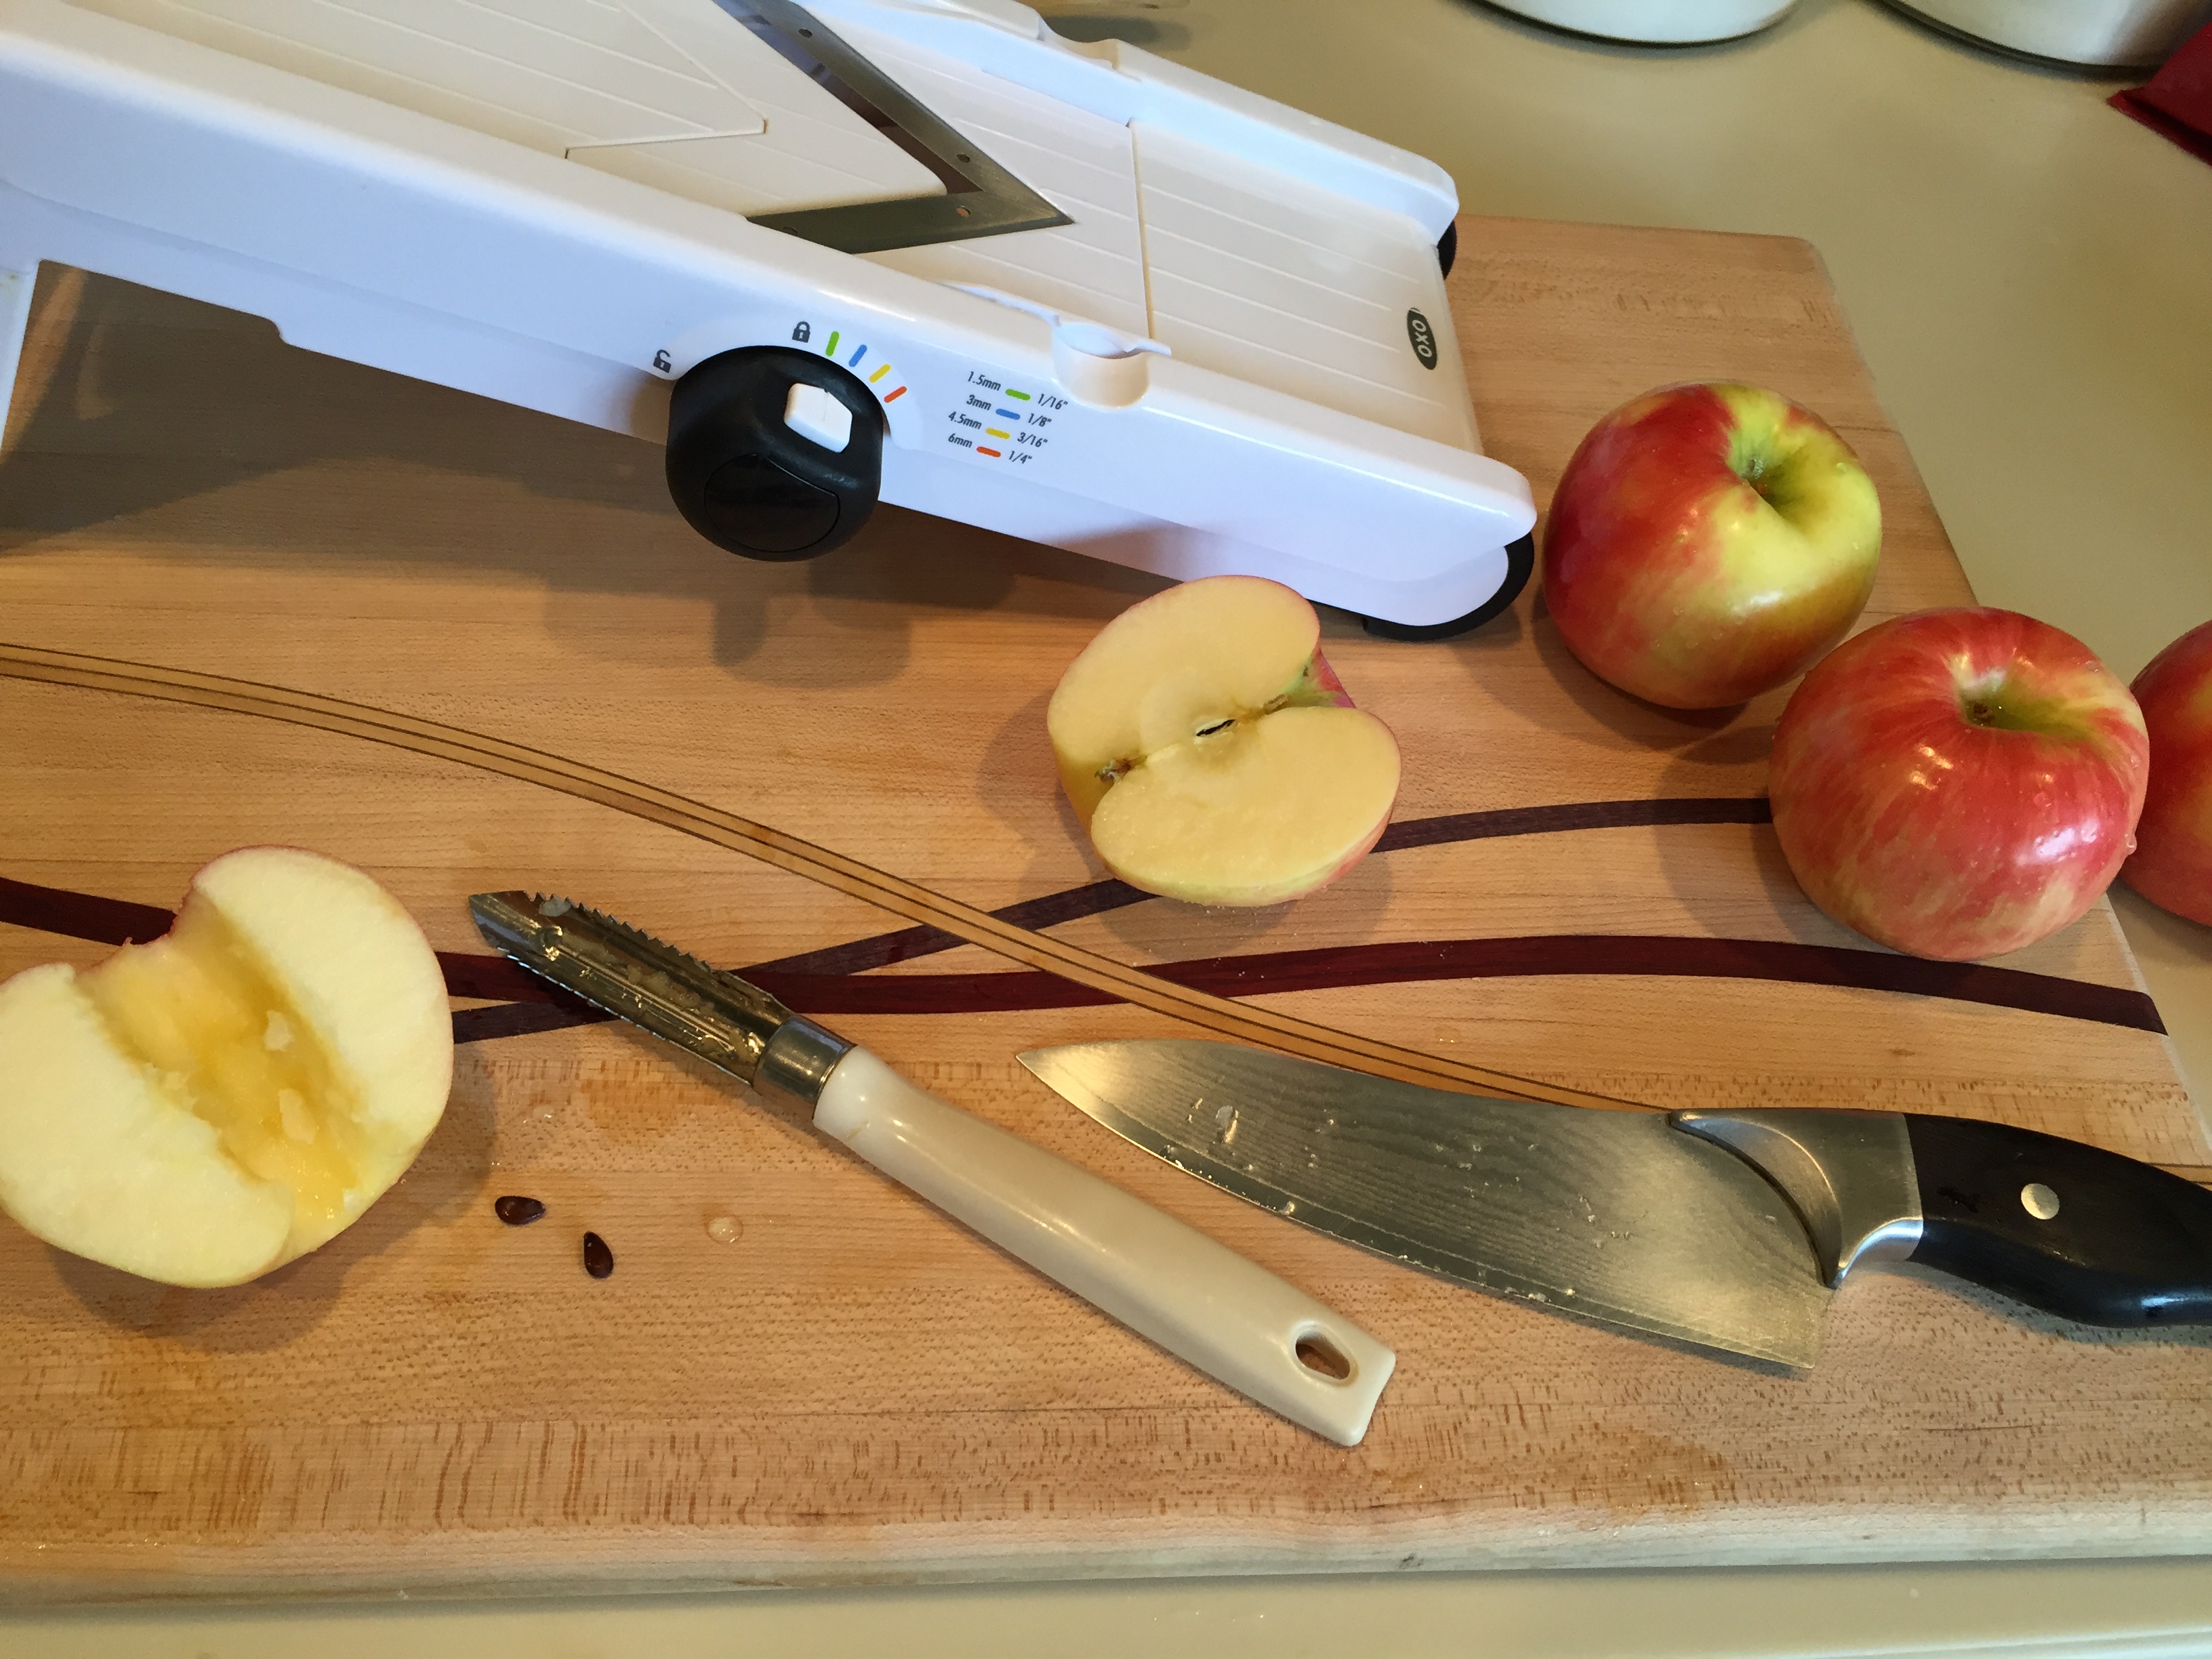
Prep your apples by cutting them in half, coring them and cutting them into paper-thin slices, using a mandolin set to 1/16 inch slices. You’ll want to put the cut slices in water with a little lemon to prevent discoloration while you’re cutting the remainder of the slices.
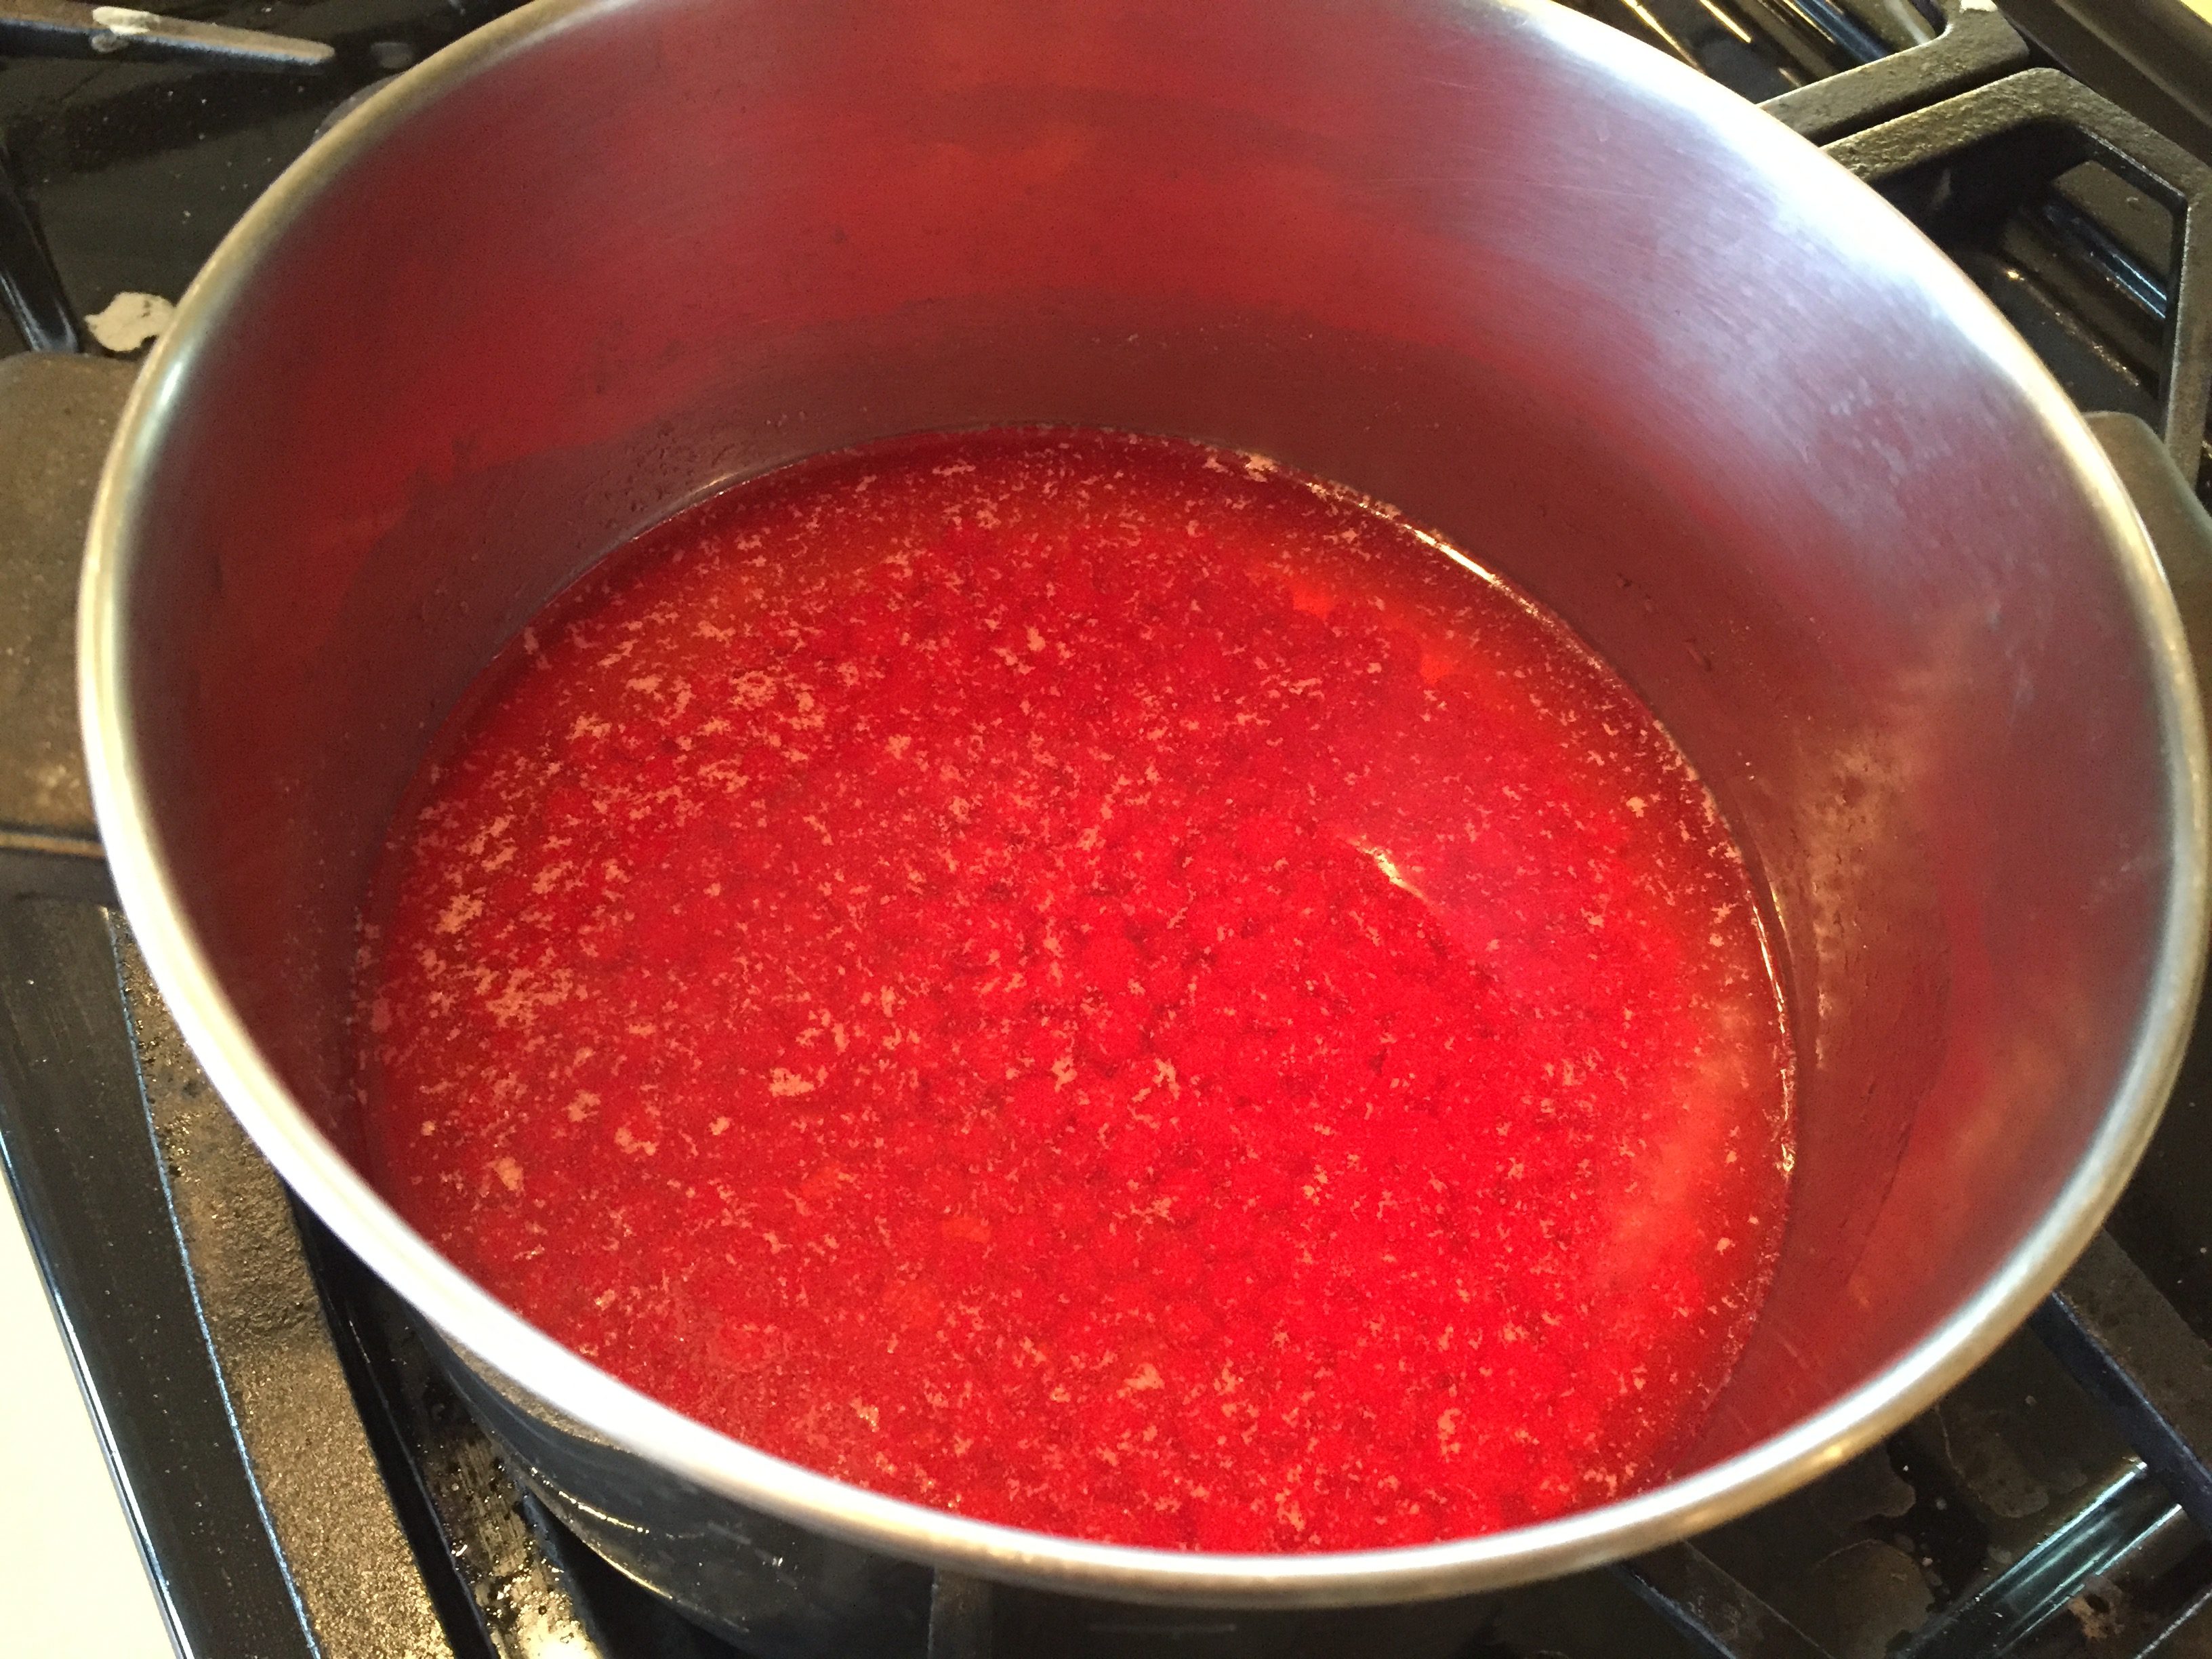
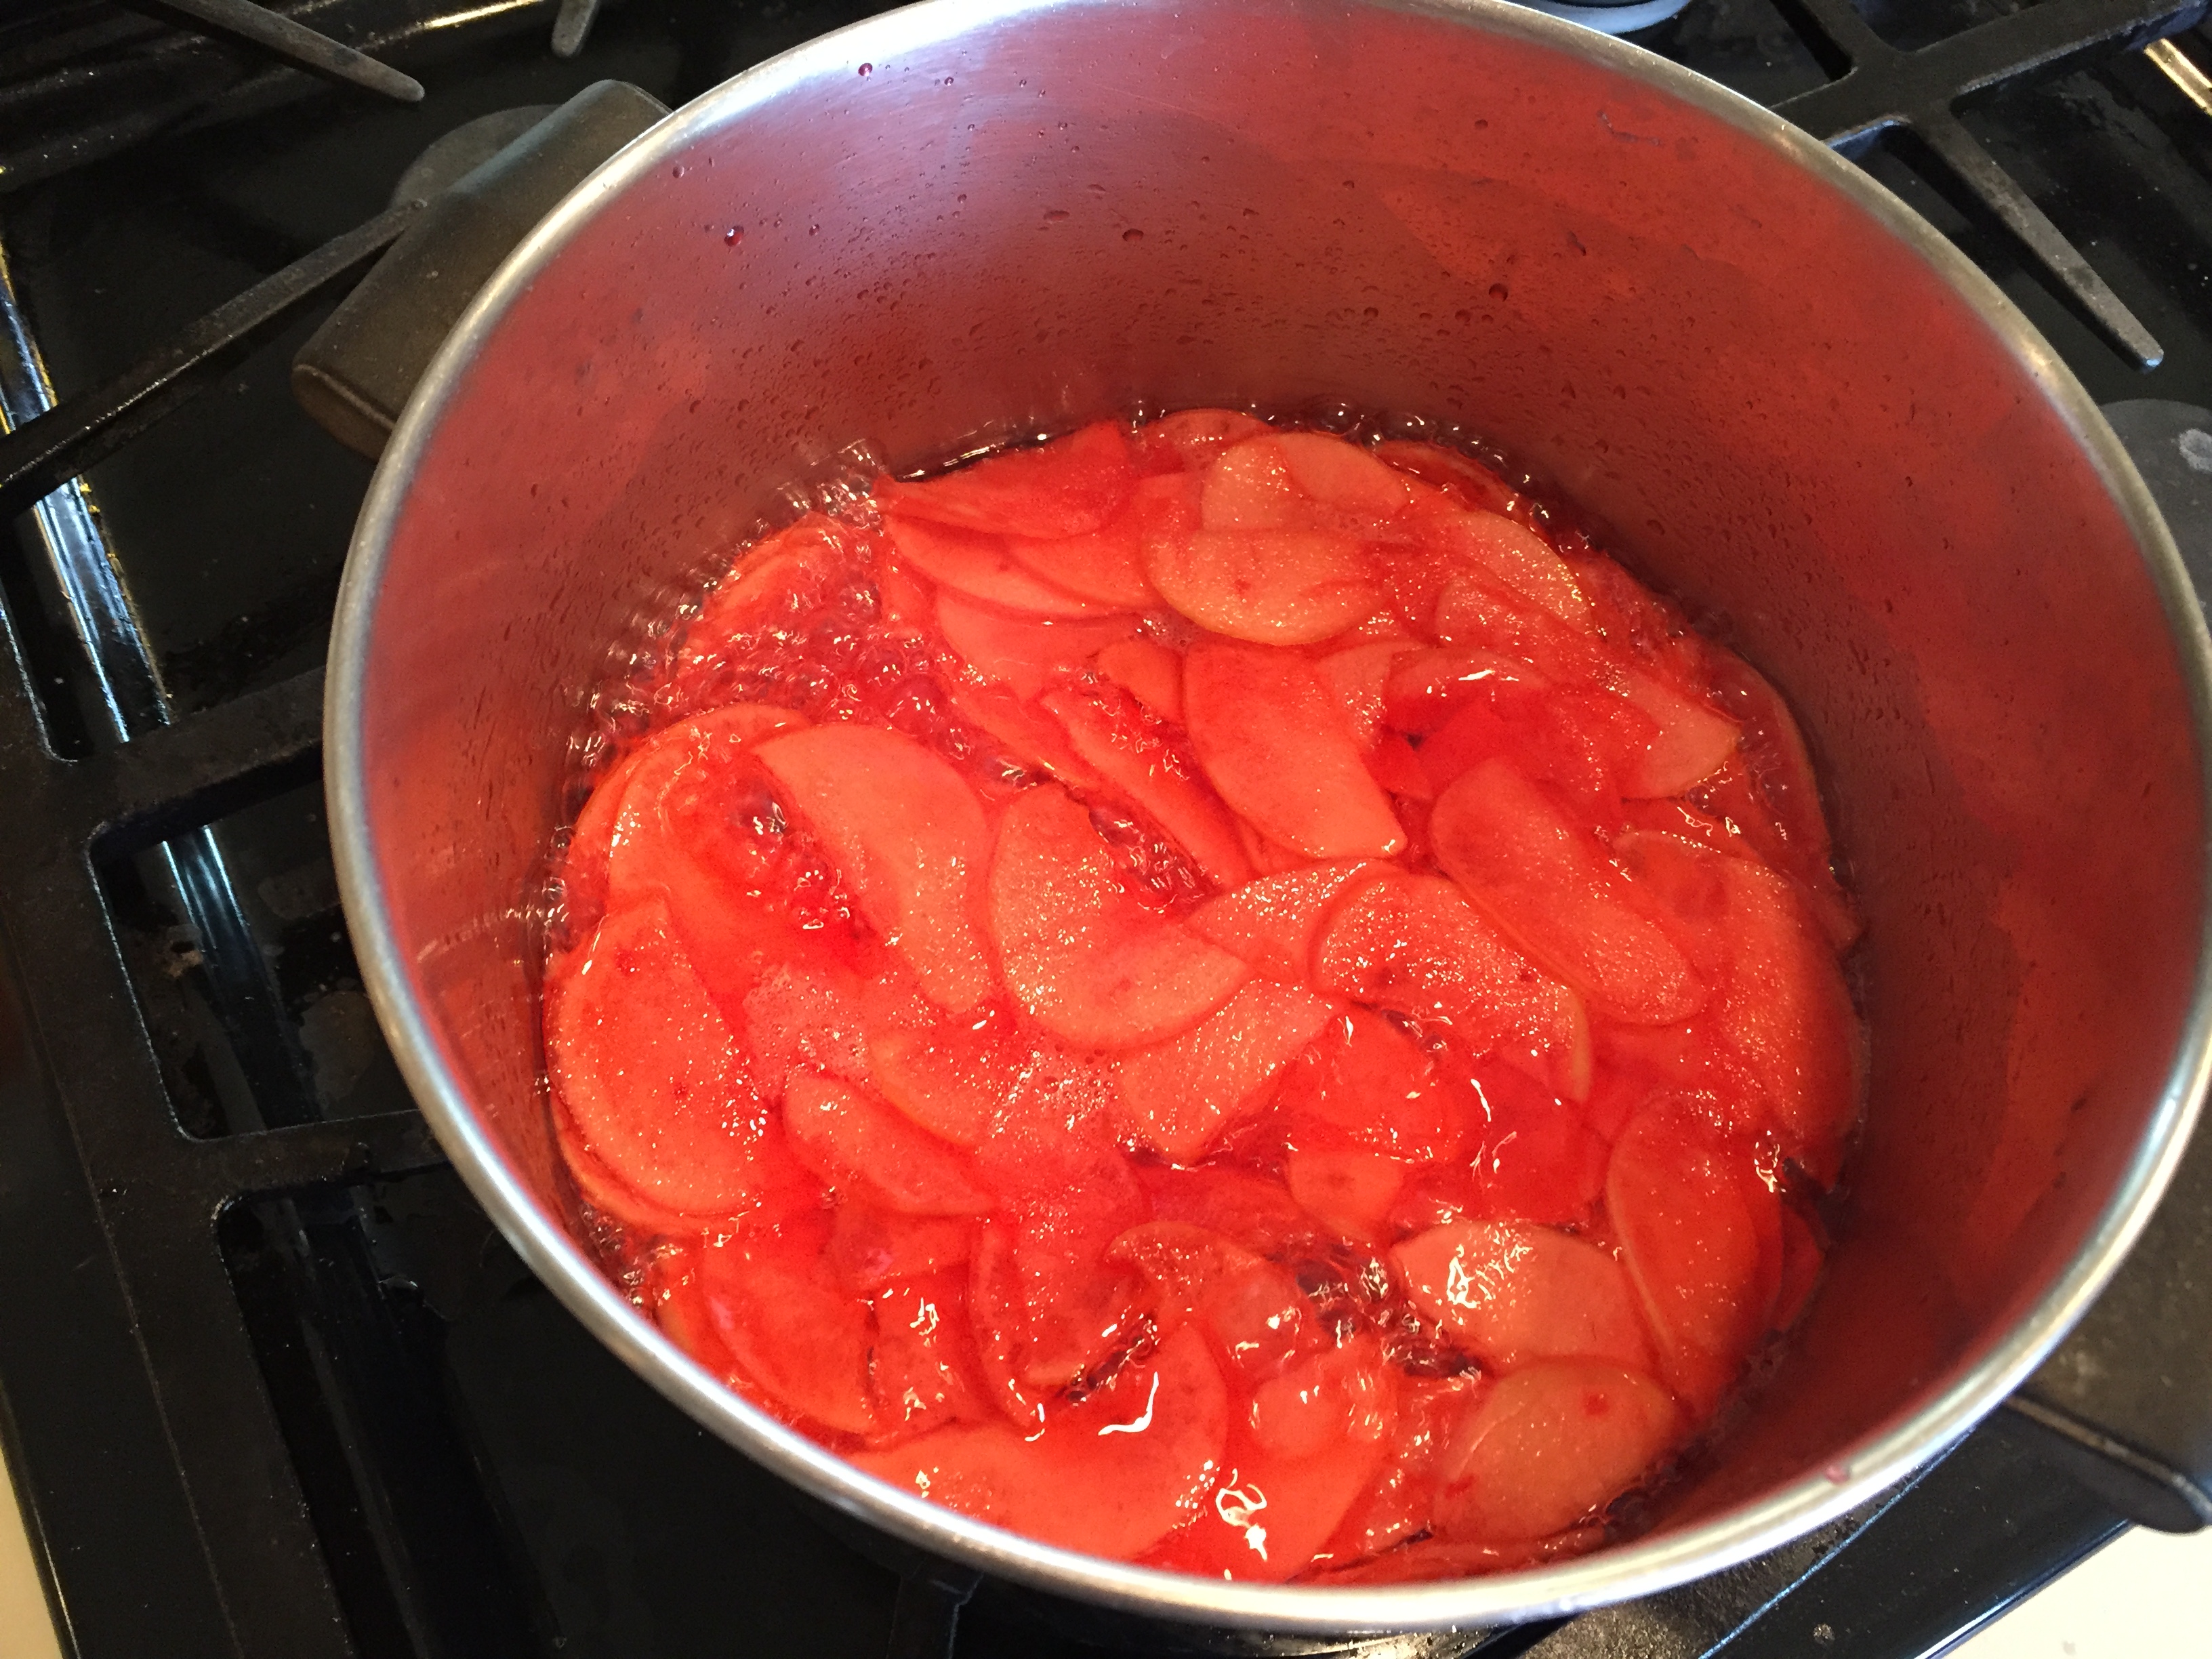
In a large sauce pan, over medium heat, bring water, red hot candies and sugar to a boil. Stir until red hots are dissolved. There may be a few unresolved ones, but that’s just fine.
Drain and add apple slices to the pot with the red hots.
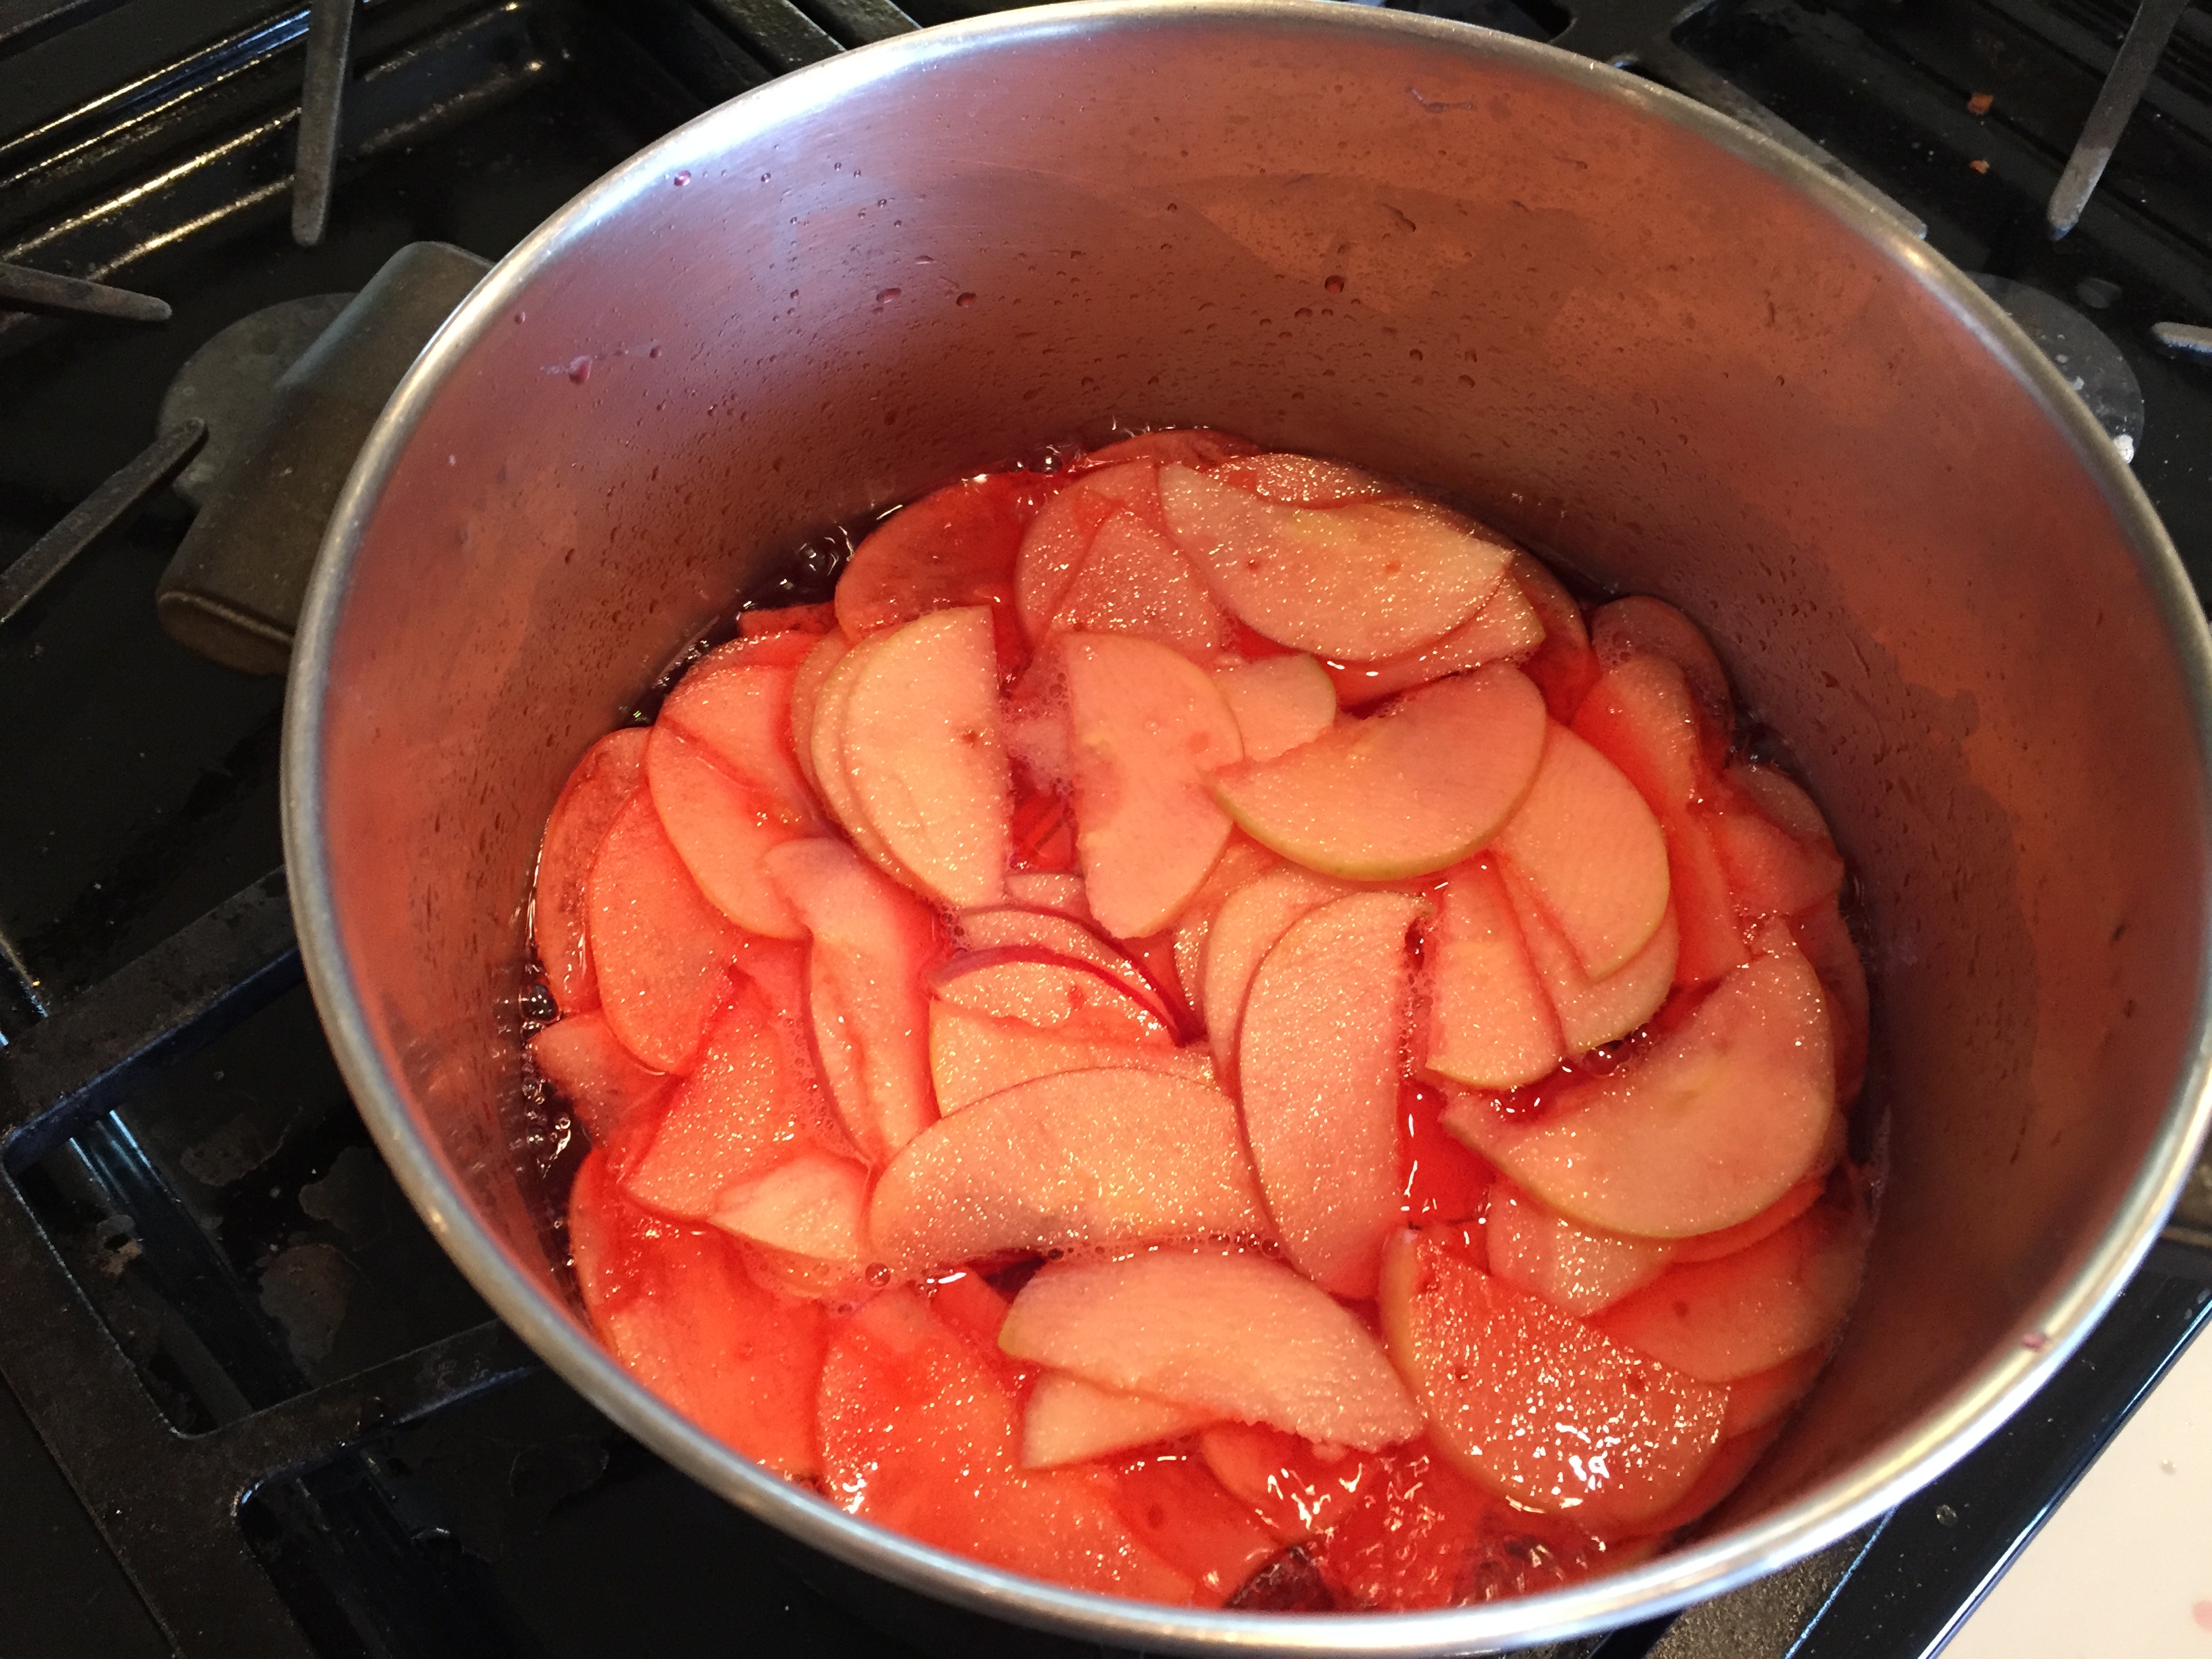
Reduce heat to medium and cook, uncovered, for 5 – 10 minutes until apples are tender. They should be cooked enough to bend without breaking. If they break you need to cook them a bit more. They should be a pretty red-pink in color. Like this.
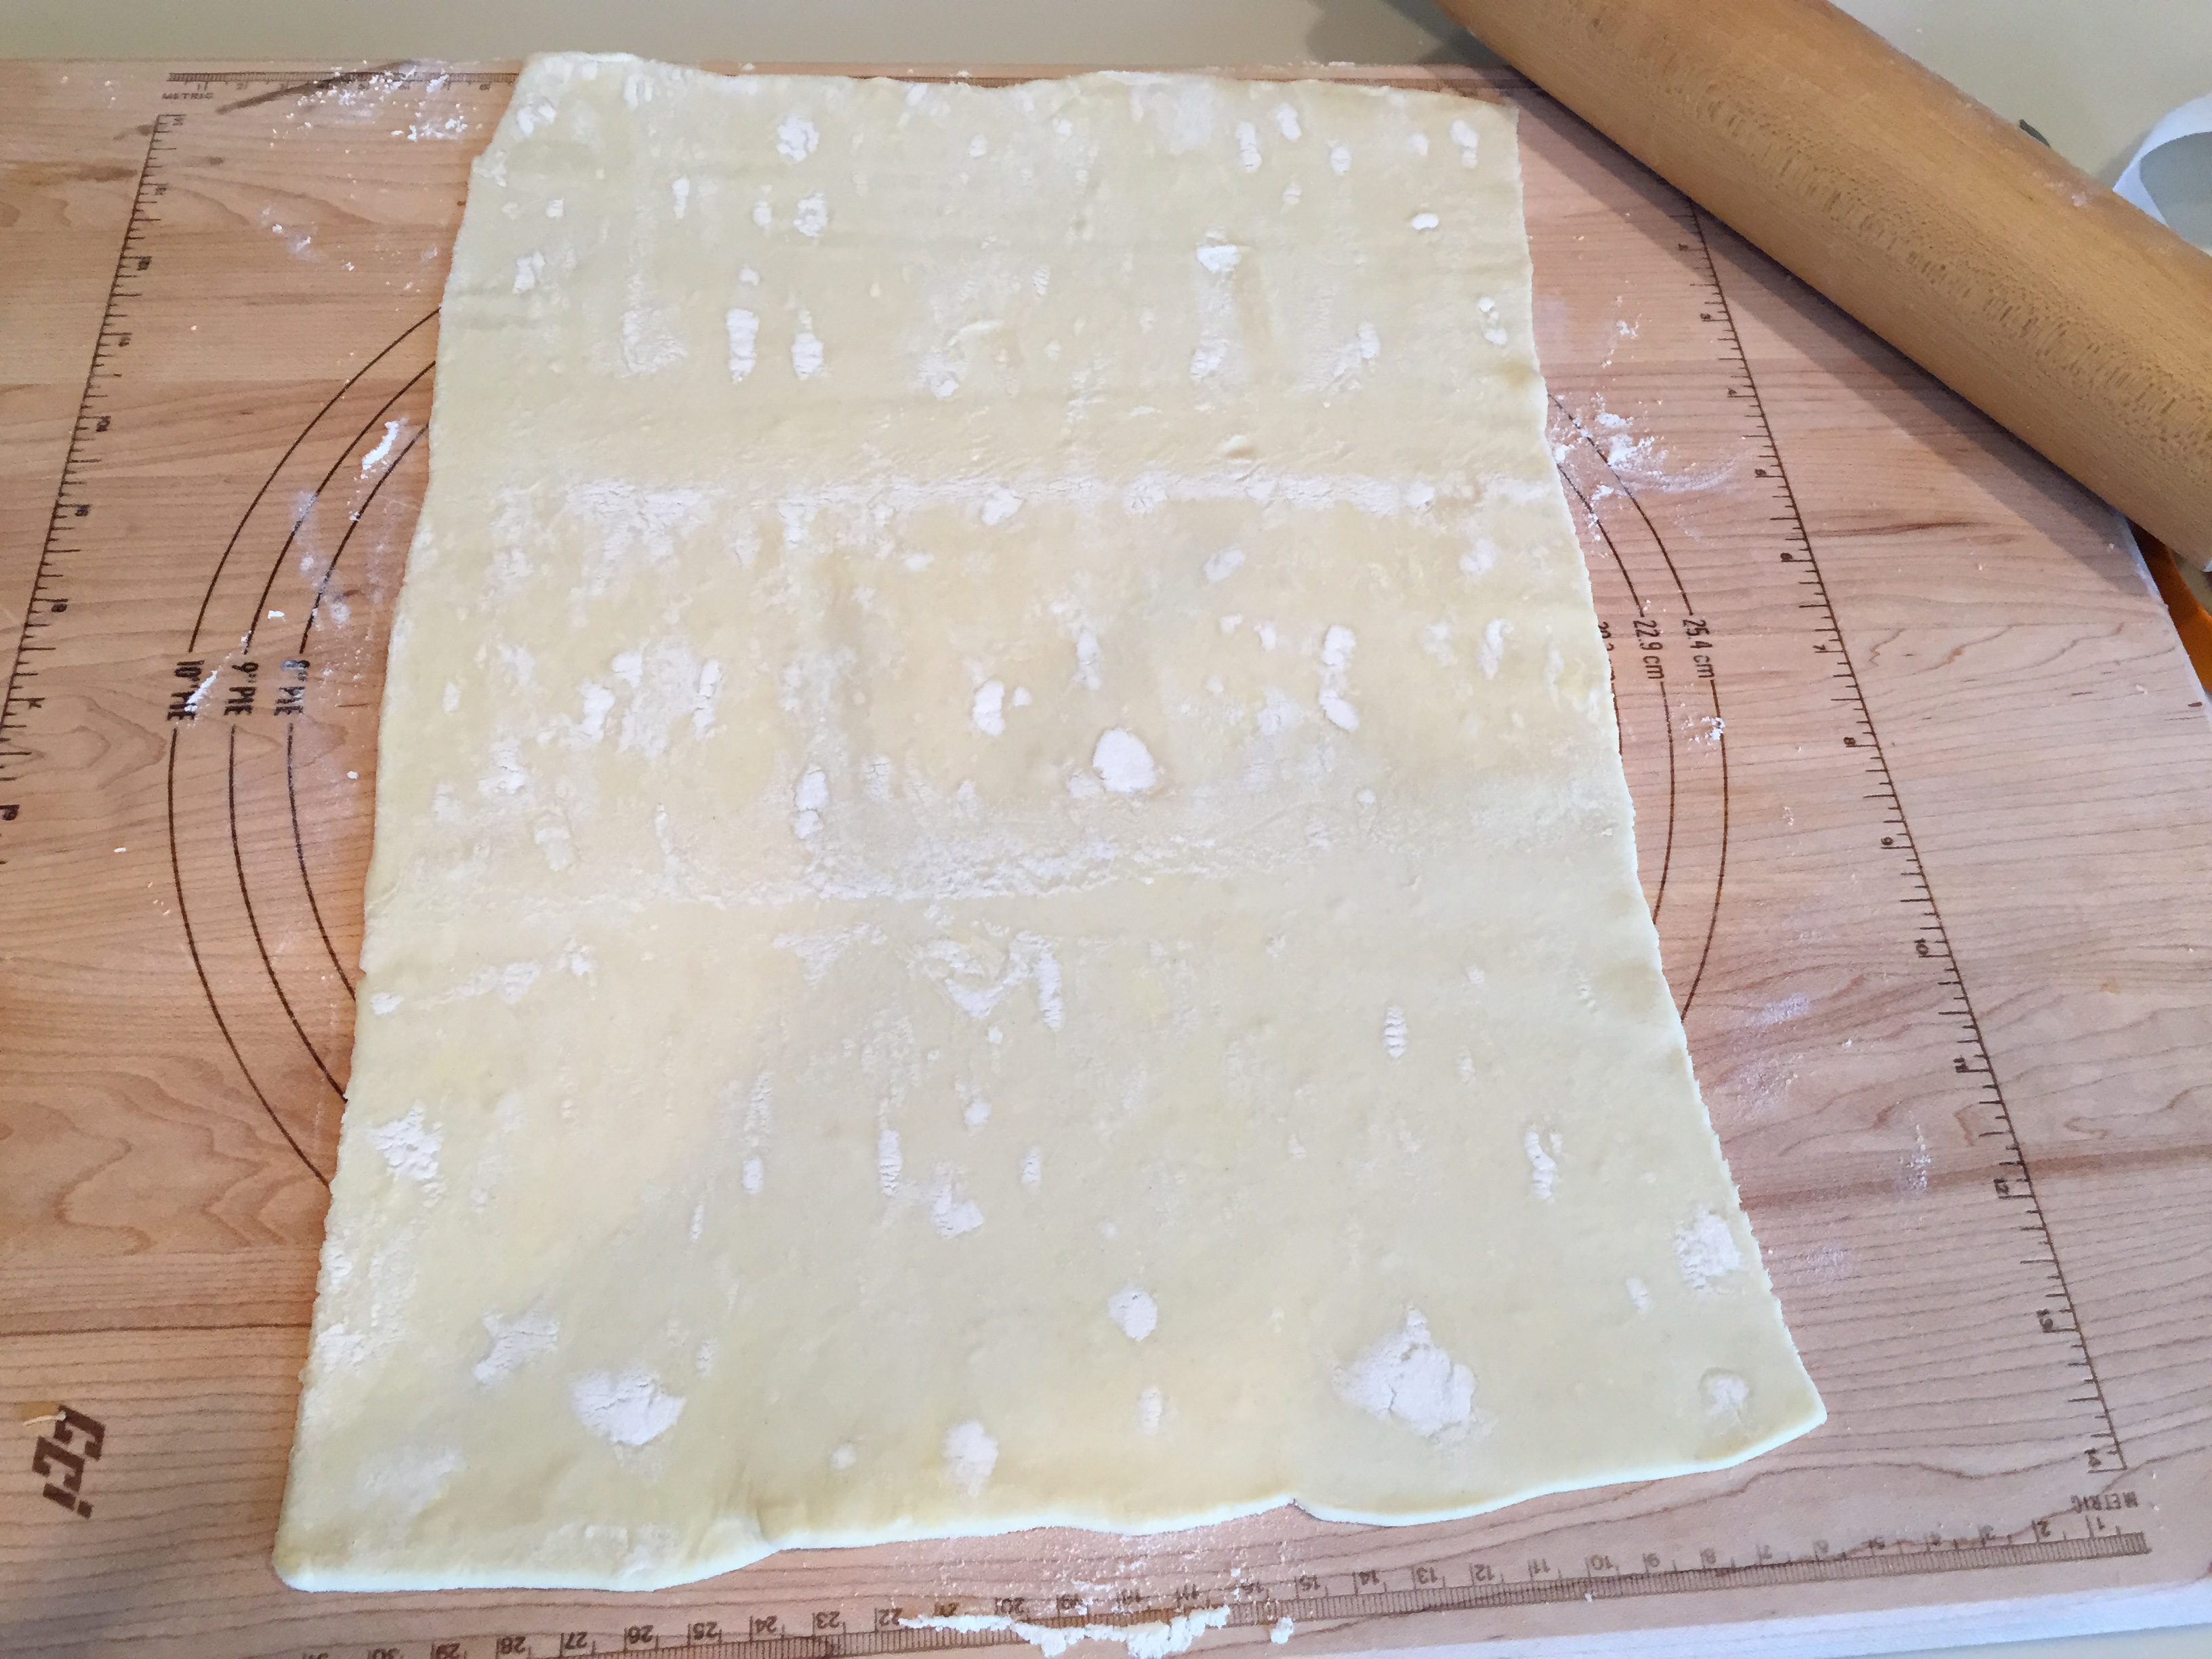
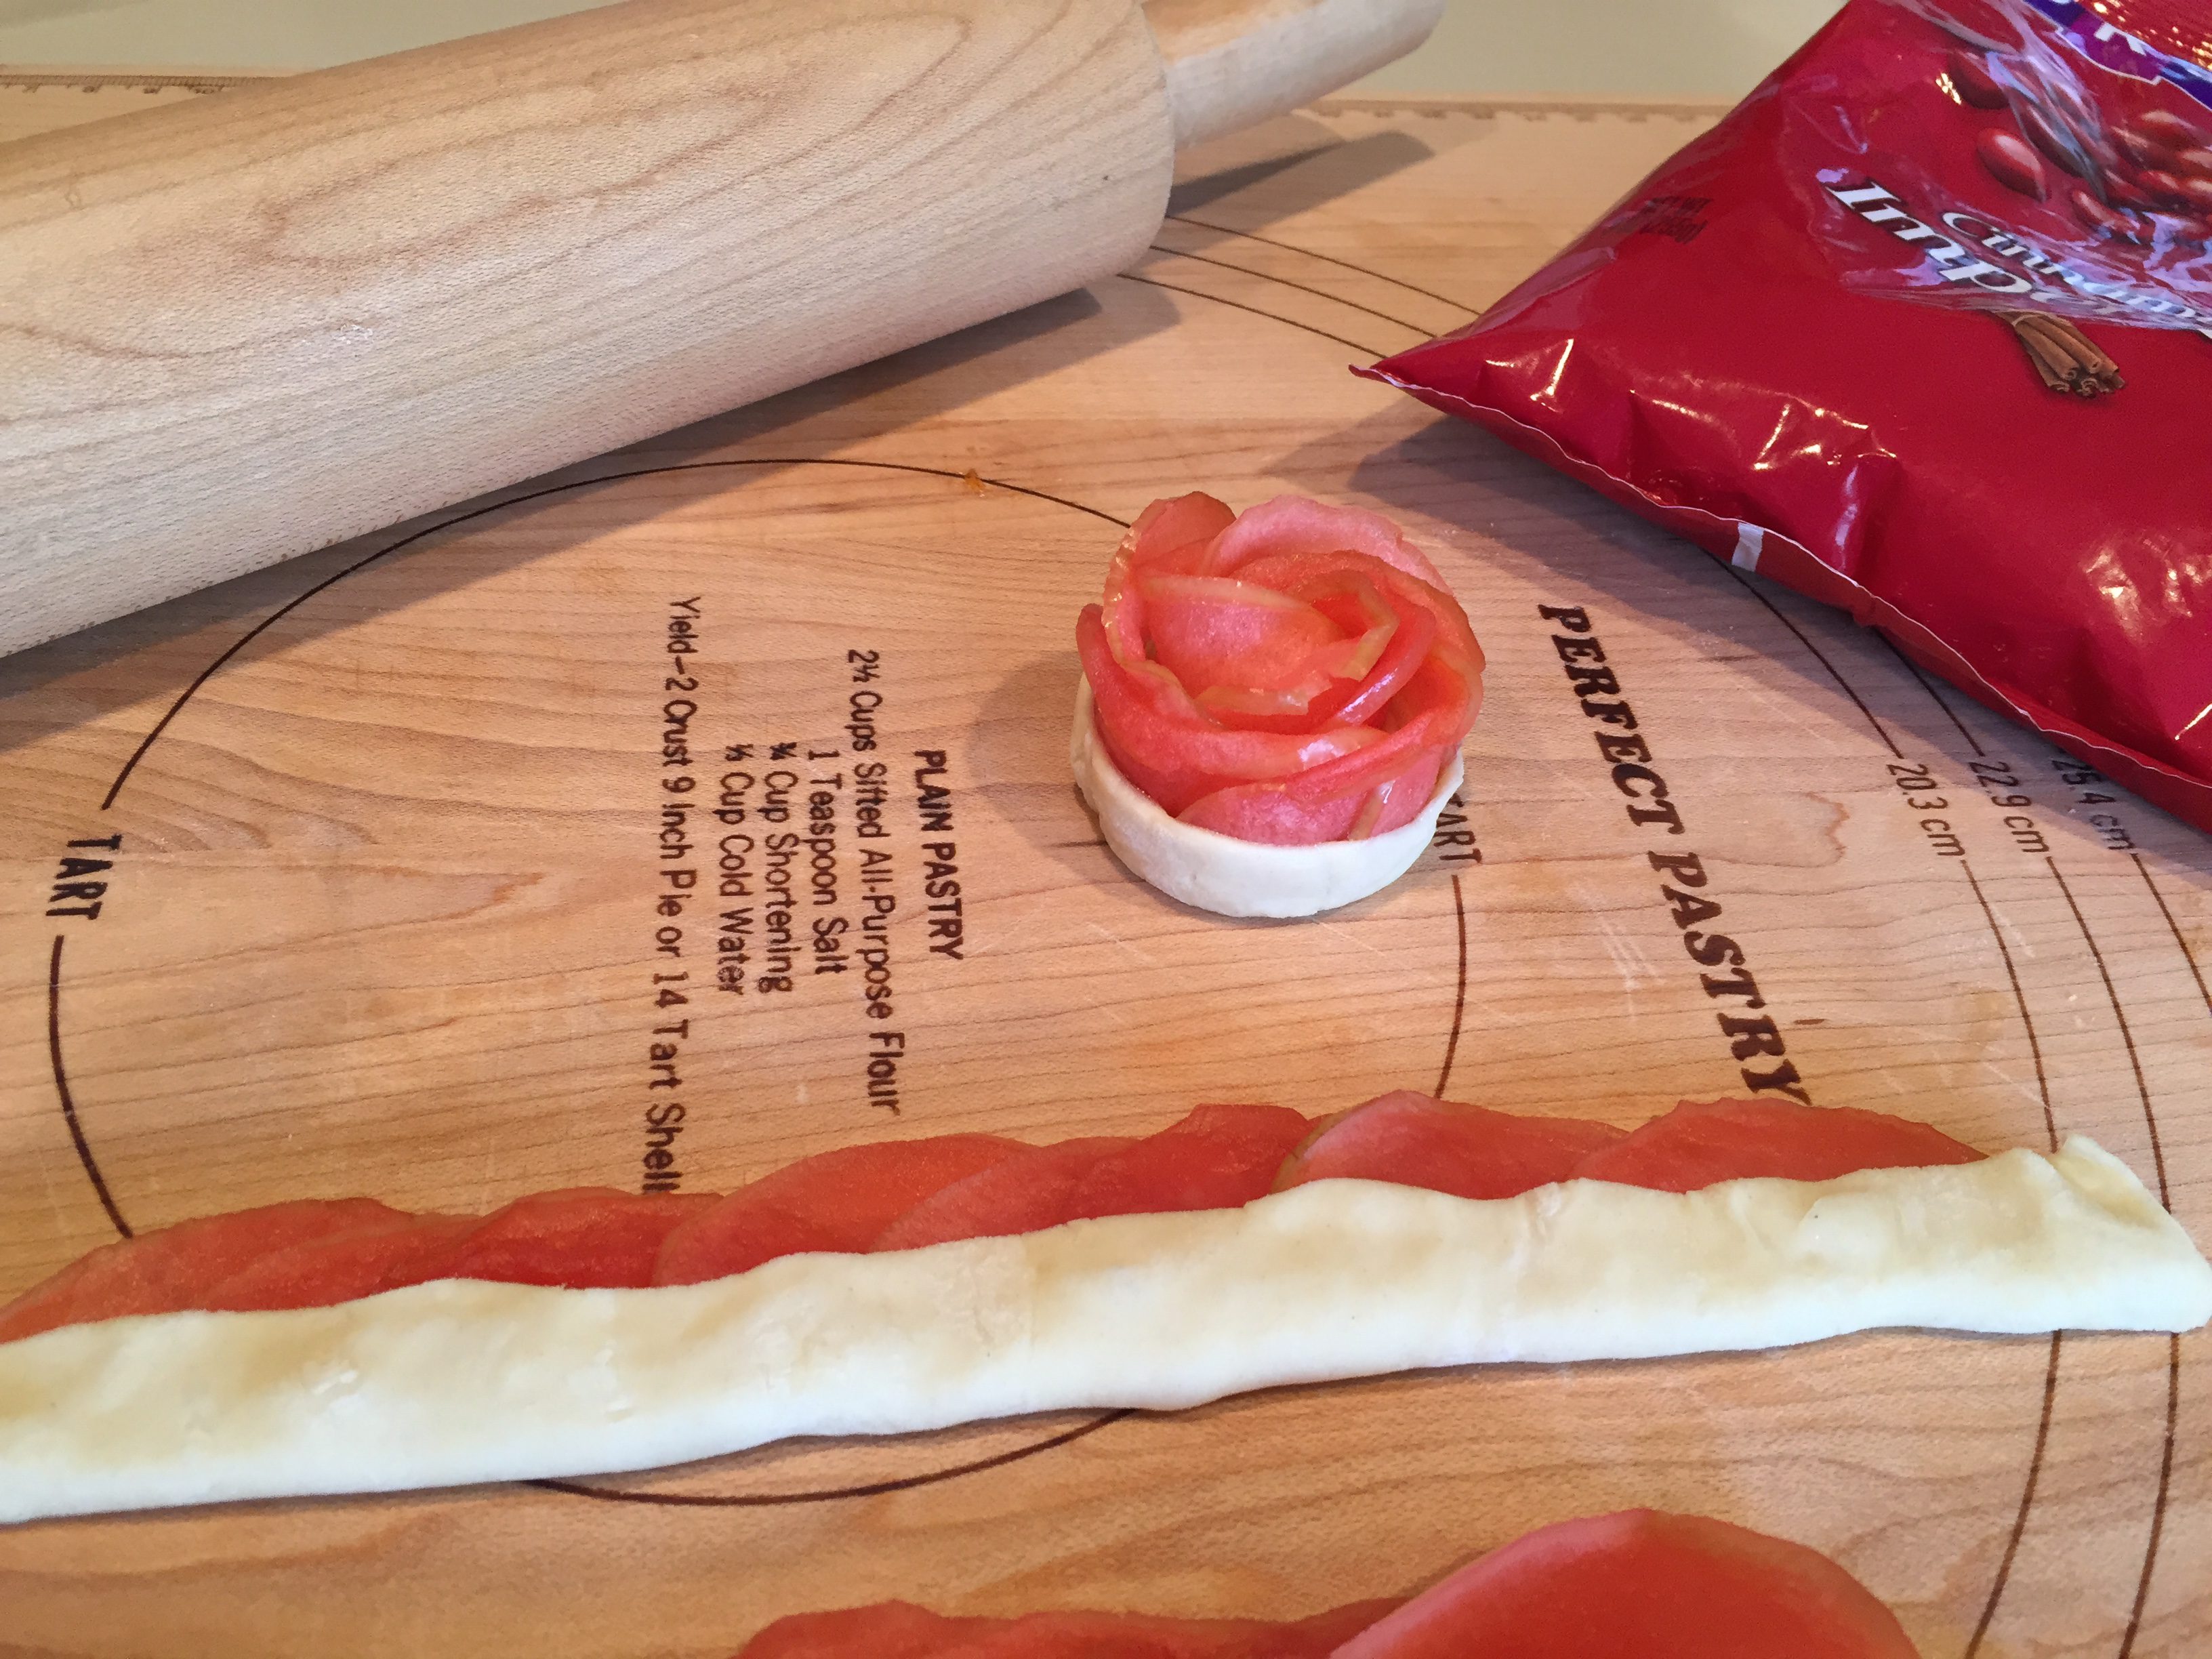
On a floured board, roll out 1 sheet of dough until it measures 10 inches by 14 inches. Like this.
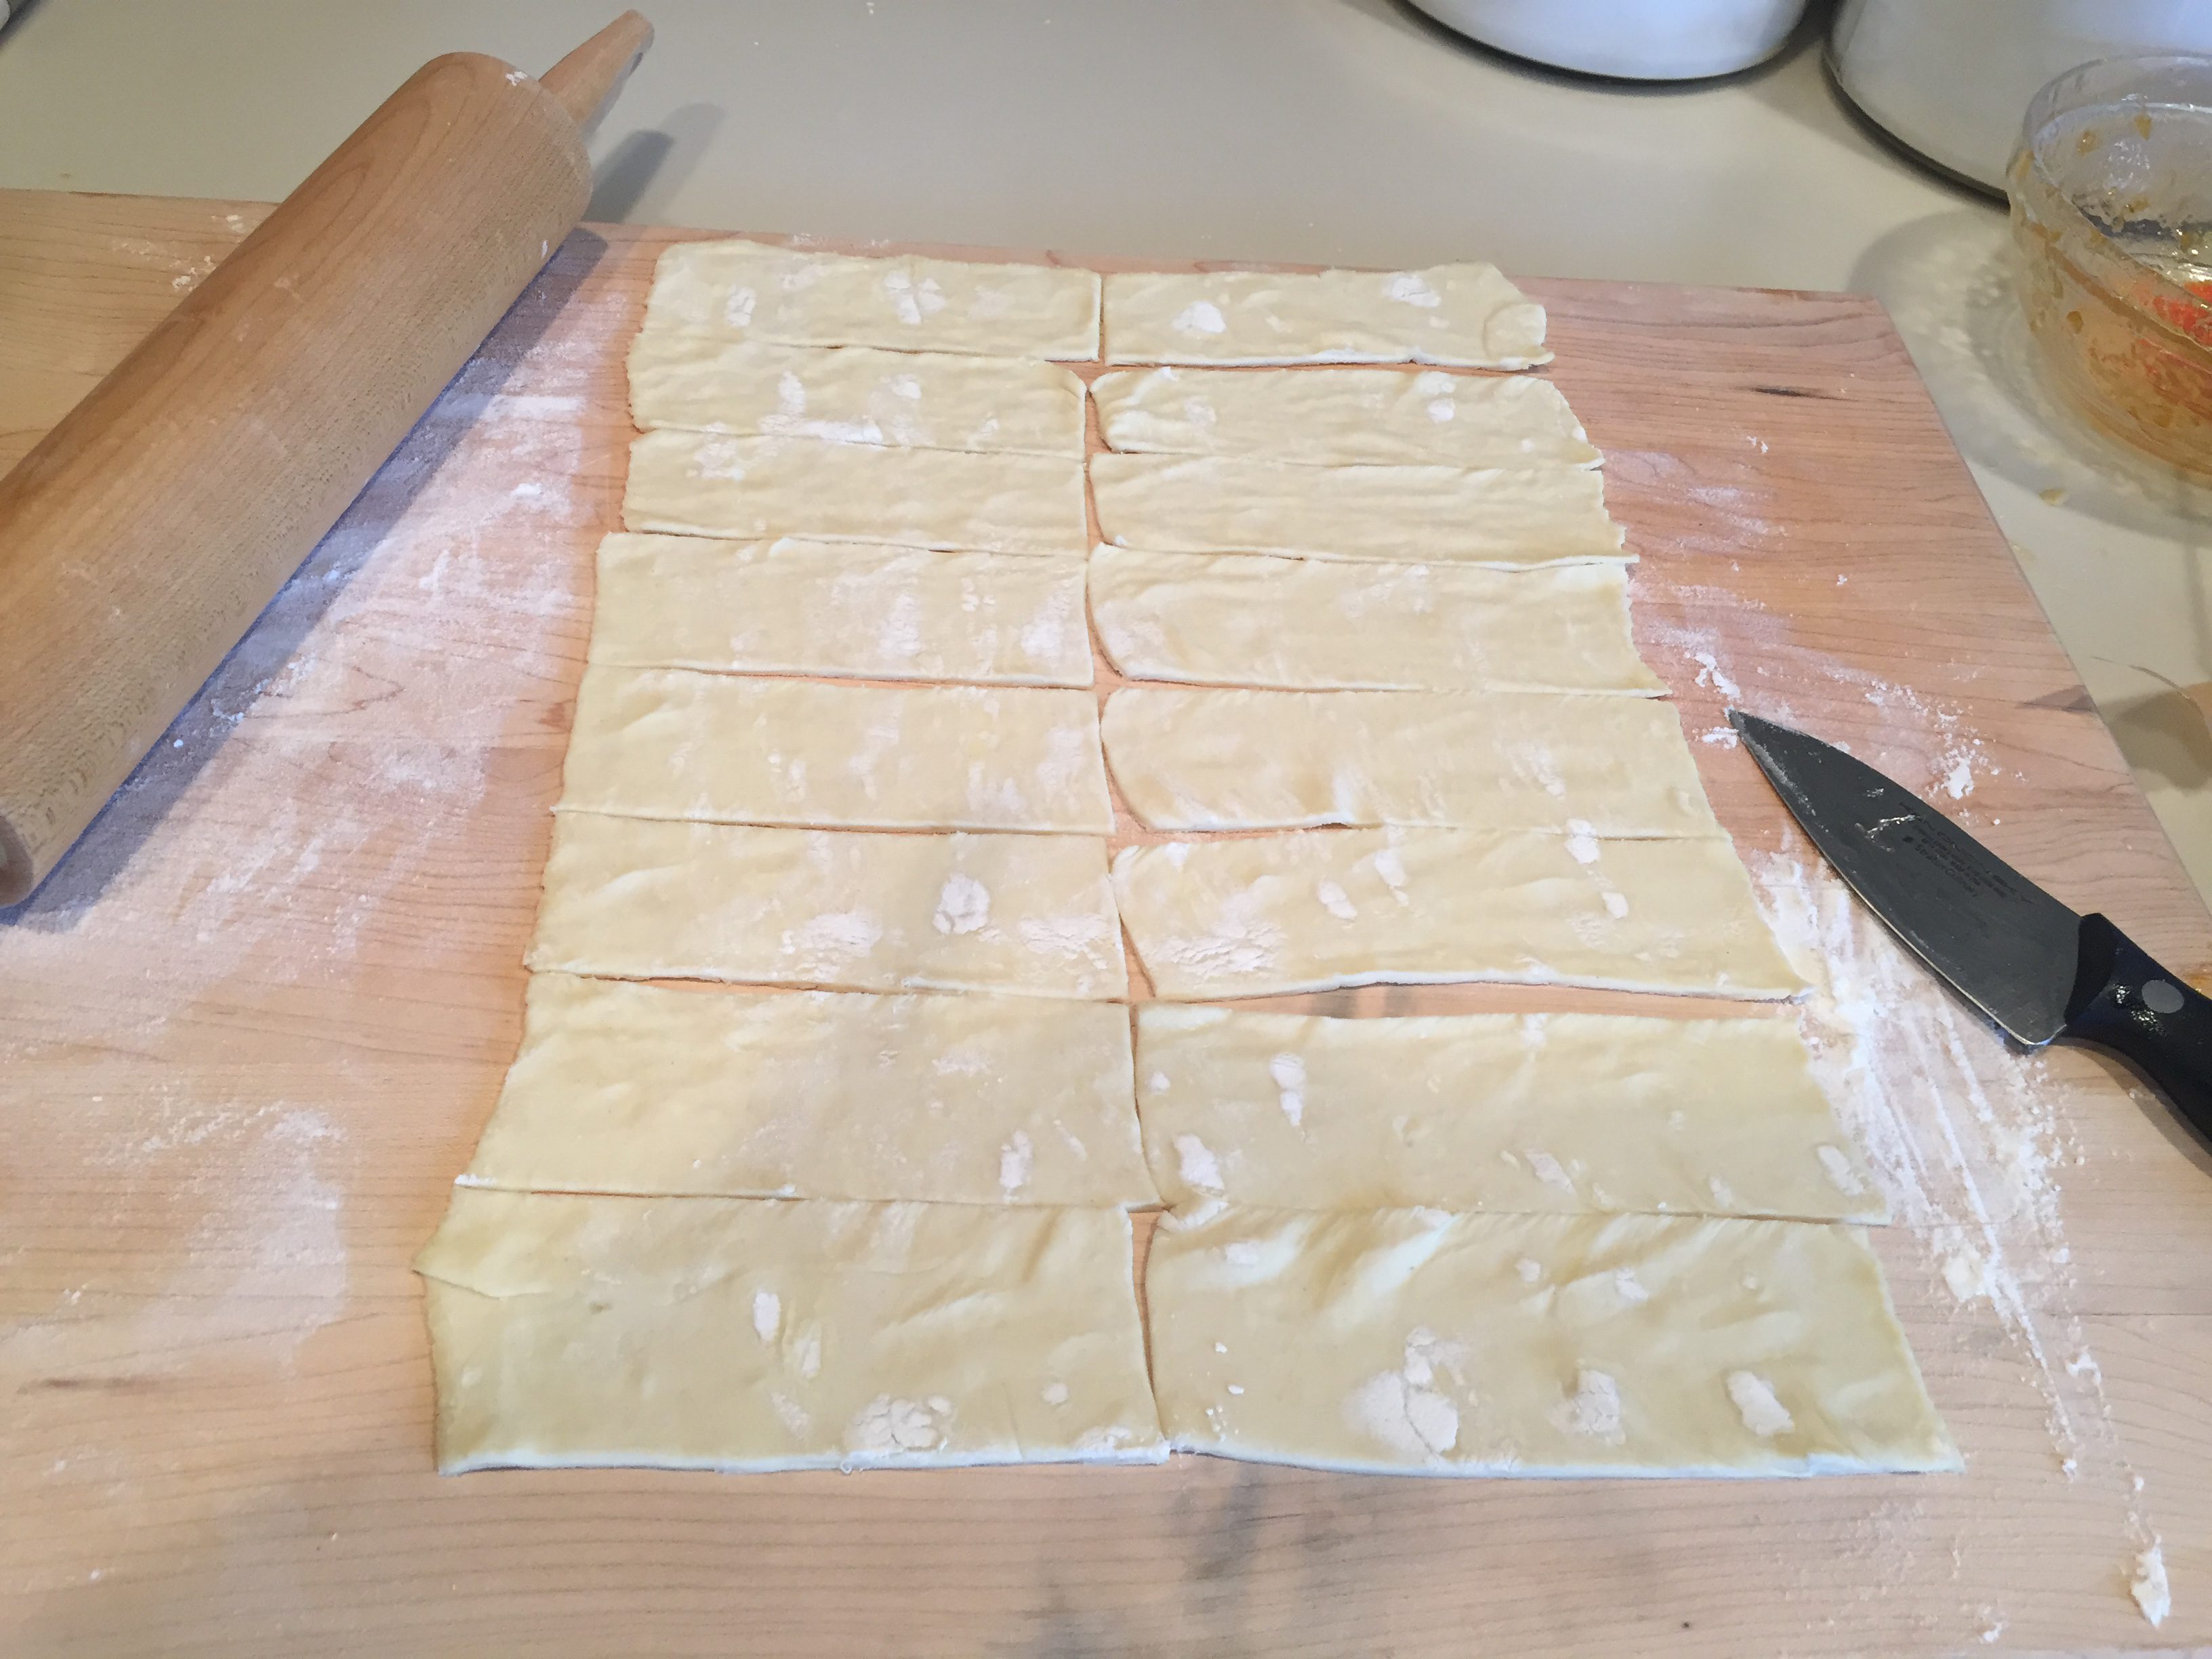
Then cut your dough in half length wise with a knife or pizza cutter and cut it in 8 strips from side to side. Like this.
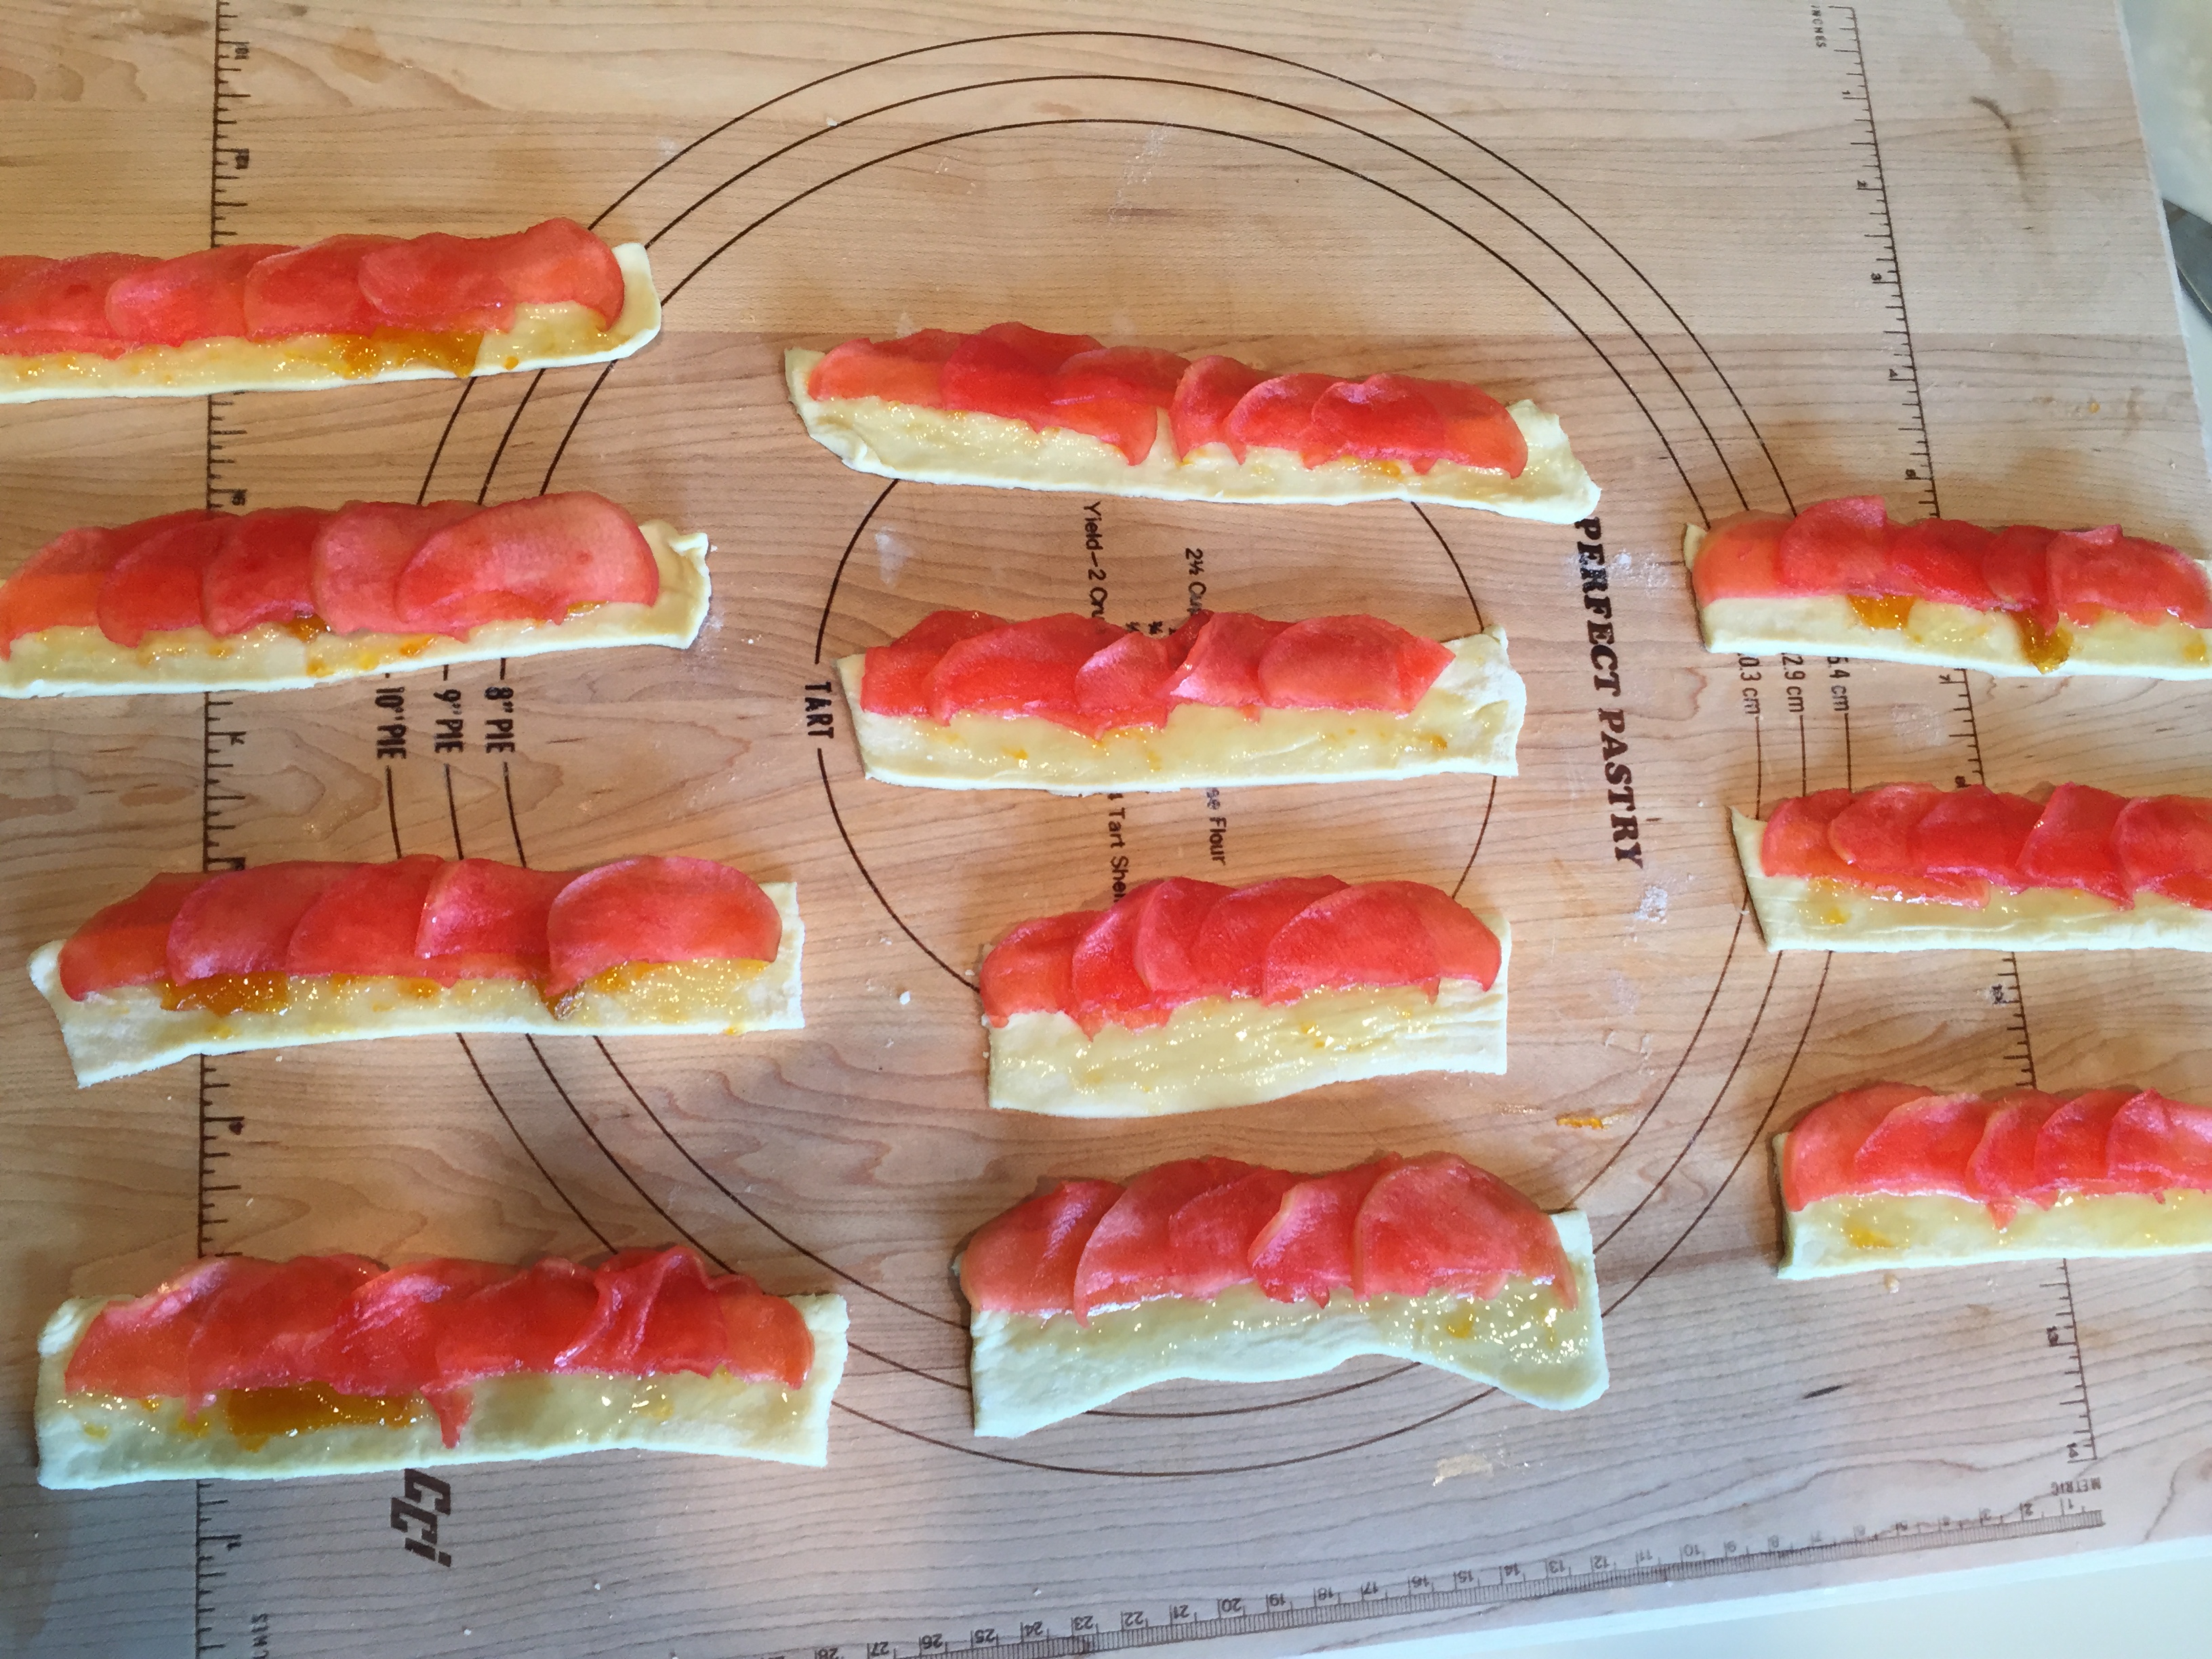
Then cut each of the strips in half the LONG way, so you have 16 long skinny pieces of dough. Brush each piece of dough with the apricot jam. and lay on about 5 to 7 apple slices, overlapping the slices. Like this.
Next, fold up the bottom of the dough, so the roses are laying in a ‘dough pocket’ (see example below.) Then, starting at one end, carefully roll the dough up, so the apple slices form a rose. If the apple slices start to slip out from between the dough, just poke them back in. Here is what the dough looks like folded up to form the ‘dough pocket’ and here is what a finished rose will look like. Isn’t that pretty? You can do it too!
These tartlets take 50 – 60 minutes to fully cook. Without the proper precautions, that’s plenty of time for the bottoms and sides to burn to an almost inedible state (almost). To solve that problem, I employed the following system. You’ll need 2 baking half sheet pans, a rack, parchment paper and water:
• Place one half-sheet pan on the lower rack of the oven.
• Fill it ½ way full with water.
• Set a rack in the second half-sheet pan. Lay a sheet of parchment paper on the rack.
• Place the tartlets on the parchment paper and lay aluminum foil loosely over the tartlets.
• Set the pan with the tartlets on the top rack directly over the pan with the water.
• Bake at 375 for 50 minutes. Then start checking every few minutes until the tartlets are done.
They are somewhat labor intensive. It will take you about 4 -5 hours to make 100. But best of all, you can (and should) make them in advance and freeze them if you are cooking for a large group. When ready, you can just bake and serve. They are delicious either hot out of the oven or at room temperature. They will earn you many happy raving fans!

- 2 cups Water
- 1 cup Sugar
- 1 cup Red Hot candies
- 5 medium apples, sweet, red Gala, Red Delicious, or Rome
- 1 lemon
- 2 tablespoons flour
- 2 packages Pepperidge Farm puff pastry thawed (each cut into xx strip1 package (2 sheet2 packages (4 sheet4 packages (8 sheets)
- 2 tablespoons powdered sugar
- 1 half sheet baking pans
- 1 parchment sheet
- aluminum foil
- 1 rack
-
Instructions:
-
Thaw the puff pastry at room temperature if you haven't done so yet. It should take about an hour.
-
If you're going to be baking the day you make them (which I don't recommend) then preheat the oven to 375º F. Place racks in baking sheets. Line racks with parchment paper.
-
Fill a large bowl with water and squeeze the lemon juice into the bowl.
-
Cut the apples in half, remove the core and cut the apples in 1/8 inch slices (with mandolin if possible). Put the cut apple slices in the lemon water to prevent discoloration. Set these aside while you prepare the red hot poaching syrup.
-
In a large saucepan, bring water, red hot candies and sugar to a boil over medium heat; boil and stir until candies and sugar are dissolved.
-
Reduce heat; carefully add apples. Cook, uncovered, about 5-10 minutes until apples are tender and red-pink. The apple slices should be cooked enough to bend without breaking. If they break, you need to cook them a little more. Remove with a slotted spoon and drain in colander. Let the poaching red hot syrup cool and reserve it in a small container.
-
Unwrap the puff pastry over a clean and lightly floured cutting board. Using a rolling pin stretch each sheet into a rectangular shape of about 14-16 x 9 inch (30 x 22 cm). Cut the dough in 8 strips, each about 2 x 9 inch (5 x 22 cm).
-
In a bowl, place the apricot preserve with two tablespoons of water. Microwave for about one minute (or warm up on the stove so that the preserve will be easier to spread.
-
Spread a thin layer of preserve on each strip of dough. Arrange 7-9 apple slices on the dough, overlapping one another, as shown in the picture. Make sure the top (skin side of the slices sticks a little out of the strip)
-
Starting from one end, carefully roll the dough, keeping the apple slices in place. Seal the edge at the end, tucking the tail into the previous row pressing with your finger, and place on the parchment lined rack.
-
An hour and 15 minutes prior to serving, remove the roses and the poaching liquid from the freezer. Let the poaching liquid thaw on the counter.
Place one of the oven shelves in the middle - upper third of the oven and the other oven shelve anywhere below it and pre-heat the oven to 375 º F (190 º C).
-
Meanwhile, put a cooling rack in a half sheet pan. Line the cooling rack with parchment paper.
-
Set the tartlets on the parchment covered cooling rack.
-
Put the tartlet pan in the oven.
-
Cover tartlets loosely with aluminum foil.
-
Set another sheet pan on the lower shelve of the oven.
-
Fill bottom sheet pan half-way full with water this is to keep the tartlets from burning, which they have a tendency to do without these precautions.
-
Bake tartlets for about 50 - 60 minutes. Test one at about 50 minutes for doneness. Continue baking till dough is cooked.
-
When done remove from oven. Lightly drizzle the reserved Red Hot syrup over the tartlets. Sprinkle lightly with powder sugar.
-
These are best eaten right after baking, when still warm and crisp. But they are still very good at room temperature.
Tarts can be stored in an air-tight container at room temperature for up to two days. Or in the refrigerator for up to three days. You can always warm them up for a few minutes by placing in the oven before serving.

Welcome to Aloha Dreams!
I'm so glad you dropped by. I'm Betsy. Here you'll find my favorite fabulous, trusted recipes - everything from delicious, quick meals for your family to wonderful classics made easy.
I'm also here to help you with large group recipes from 20 to 200. So next opportunity you get to cook for a large group - Say 'Yes!' Then relax. I've got your back.
Ever wished you could build your dream home? How about building your dream home in a tropical paradise? Join me, room by room, as we design and build a fabulous dream home in Hawaii!